Android安全-用魔法打败魔法:互联网大厂虚拟机分析还原
推荐 原创【Android安全-用魔法打败魔法:互联网大厂虚拟机分析还原】此文章归类为:Android安全。
前言
为什么还是虚拟机
有人就要问了,怎么又是虚拟机的文章,我觉得其他领域基本上都有人分析过了再次写重复的文章意义不大,虚拟机保护分析的门槛较高且文章明显偏少于是就选择了它。
虚拟机保护到目前为依然是很多人迈不过去的一个坎,但对于现在逆向工程来说它不是唯一到达目的的捷径,很多时候可以跳过虚拟机的分析对目标app的指令和数据流回溯分析,例如最近流行的各种trace。另外即使能够分析和还原它虚拟机也只占用工程工作量中的少量时间,这个时间比例可能就5%-10%左右吧。
每个人的分析方法思路、使用的工具、对逆向工程的理解都有各不相同,文中只是将我个人的一些分析方法思路分享出来,可能方法不是最好的,或许在有些人眼中觉得你的方法太笨了,每个人都有技术盲点的地方,有交流才会有进步欢迎留言指正我的不足。
随着最近几年对抗的升级现阶段大厂基本上都是虚拟机了,分析的工作量明显上升,一个人对抗大厂多个团队已经显得力不从心,单兵作战早已经成为过去式。
逆向工程从来就不是一个简单的事情,在逆向分析过程中很长时间就是精神上的折磨,时间久了会慢慢的适应这种精神折磨状态,逆向工程概括了方方面面的东西:经验、知识面、理解和认知、天赋,好像这些和我沾边的都不多,有时在逆向分析时会一根筋的钻进死胡同。
环境
App版本:versionCode='1200280405' versionName='12.28.405'
手机系统:android 11/pixel 2 xl
PC: macOS 15.3
分析篇
代码混淆乱序
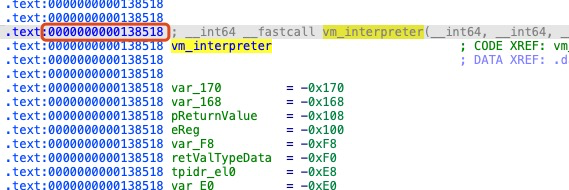
以函数vm_interpreter为例,函数的开始和结束边界清晰,代码块没有穿插到其他函数或位置中,说明混淆或乱序只是在函数的开始和结束地址范围内进行。
- 函数开始
- 函数结束

基本块分割
在分析时发现很代码块(指多连续的基本块)的终止符使用无条件跳转连接,通常正常编译生成无条件跳转可能出现在if then end、if else end、break、continue、switch case、switch case end、loop entry、loop、loop exit的位置比较多,正常的代码不会出现如此多的无条件跳转,这说明基本块从中间被分割后被随机打乱后使用无跳转条件跳转进行连接。
指令分发基本块复制
看来app加密开发者还是很懂逆向的,一般来说handler执行完成会回到取指的基本块位置,这里将分发取指的基本块进行了复制作为handler的后续终止符进行连接,防止一个位置下断或hook拿取opcode数据。
但是也不排除是函数inline造成多个分发位置。
间接跳转
去掉间接跳转的目的是方便在IDA中查看分析代码的结构,读取跳转常量数组将真实的地址连接。
1 2 3 4 5 6 7 8 9 10 11 12 13 14 15 16 17 18 19 20 21 22 23 24 25 26 27 28 29 30 31 32 33 34 35 36 37 38 39 40 41 42 43 44 45 46 47 48 49 50 | import idautilsimport idcimport idaapifrom keystone import * # pip3 install keystone-enginedef get_insn_const(addr): op_val = None if idc.print_insn_mnem(addr) in ['MOV', 'LDR']: op_val = idc.get_operand_value(addr, 1) if op_val > 0x1000: # 可能是间接引用 op_val = idc.get_wide_dword(op_val) else: raise Exception(f"error ops const: {addr}") return op_valdef get_patch_data(addr): addr_list = [] for bl_insn_addr in idautils.XrefsTo(addr): bl_insn_addr = bl_insn_addr.frm # print(f'L1 {hex(bl_insn_addr)}:') for xref_addr_l2 in idautils.XrefsTo(bl_insn_addr): # print(f'\tL2 {hex(xref_addr_l2.frm)}:') index = get_insn_const(xref_addr_l2.frm - 4) const_table_start = bl_insn_addr + 4 offset = idaapi.get_dword(const_table_start + index * 4) link_target = const_table_start + offset addr_list.append({"bl_insn_addr": bl_insn_addr, "patch_addr": xref_addr_l2.frm, "index": index, "offset": offset, "link_target": link_target}) return addr_listdef print_patch_data(patch_data): for item in patch_data: print( f"bl_insn_addr: {item["bl_insn_addr"]:#x}, patch_addr: {item["patch_addr"]:#x}, index: {item["index"]}, offset: {item["offset"]:#x}, link_target: {item["link_target"]:#x}")def patch_insns(patch_data): index = 0 for item in patch_data: ks = Ks(KS_ARCH_ARM64, KS_MODE_LITTLE_ENDIAN) asm = f'B {item["link_target"]:#x}' print(f'patch addr {item["patch_addr"]:#x}: {asm}') encoding, count = ks.asm(asm, as_bytes=True, addr=item["patch_addr"]) print(encoding) for i in range(4): idc.patch_byte(item["patch_addr"] + i, encoding[i]) index += 1 # if index == 1: # break def start(): modify_x30_func_address = 0x25D00 patch_data = get_patch_data(modify_x30_func_address) print_patch_data(patch_data) patch_insns(patch_data)start() |
调用关系图
快速定位虚拟机位置
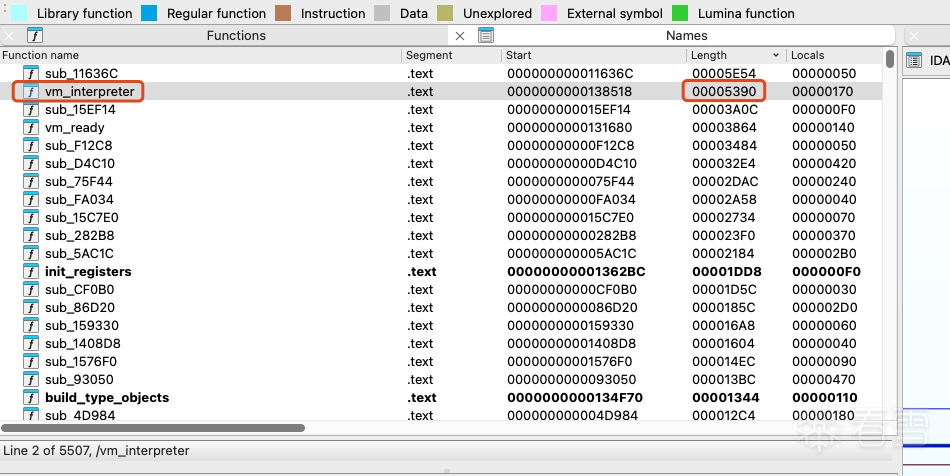
载入IDA分析完成后打开函数视图,函数列表最上方找到Length表头点击按函数大小排序,找到第二大小的函数就来到了虚拟机解释器的位置。
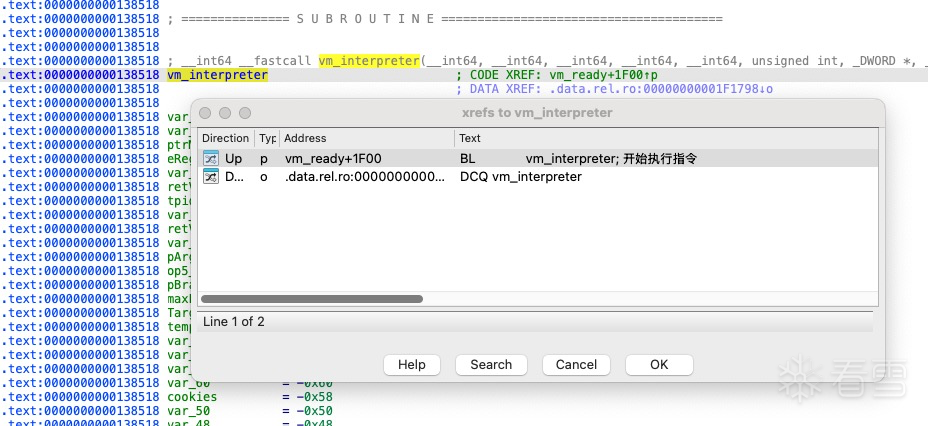
- vm_interpreter
vm_interpreter(0x138518)是虚拟机解析执行的核心,它包含了取指、解码、执行handler三个基本的完整流程。
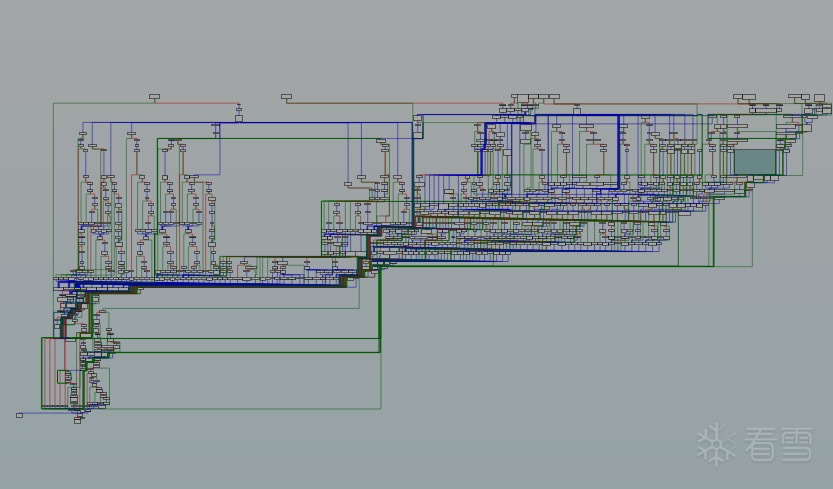
从cfg图看比较复杂,其中有很多的switch和间接跳转没有识别出来出现在流图中,实际复杂程度比想象中的要复杂得多。
- vm_read
双击函数列表中的地址vm_interpreter(0x138518)来到vm_interpreter函数起始的位置,交叉引用来到上级调用函数vm_read。
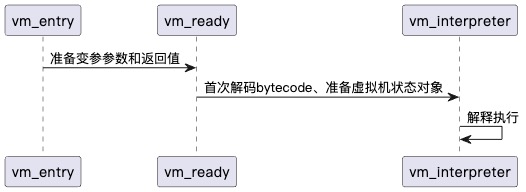
- vm_entry
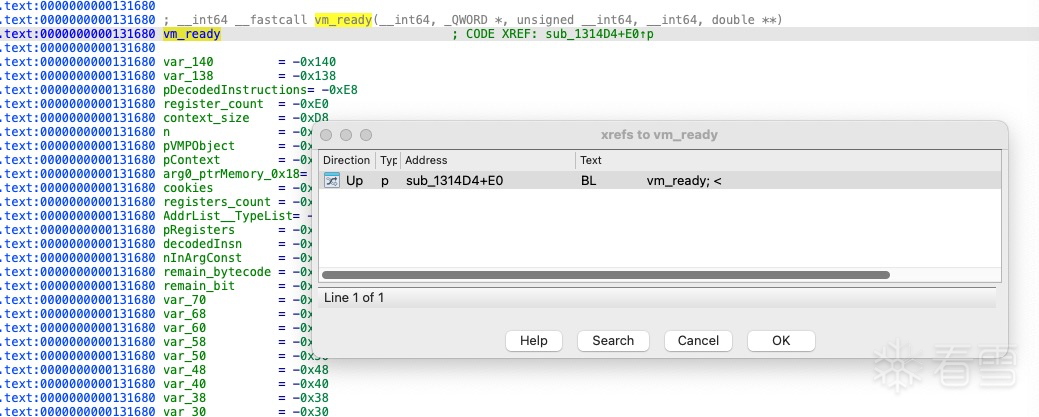
找到函数vm_read起始位置0x131680,再次交叉引用找到上级调用函数vm_entry。
函数分析
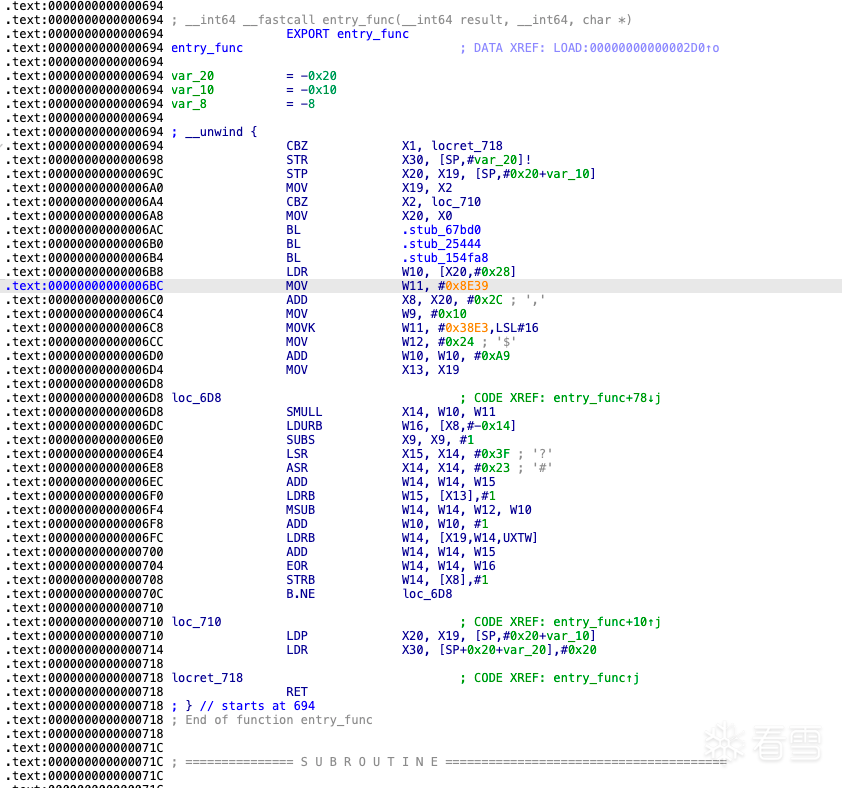
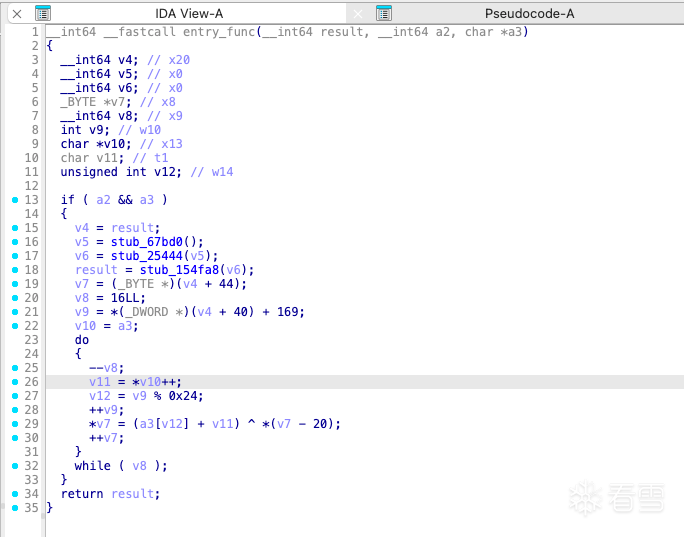
找到vm_entry起始地址0x1313F0,这时可以看到有31个引用地址这意味着有31个函数被虚拟化执行,找到2号引用地址,它是app启动后首次调用的虚拟机代码,从这里开始逐步展开分析。
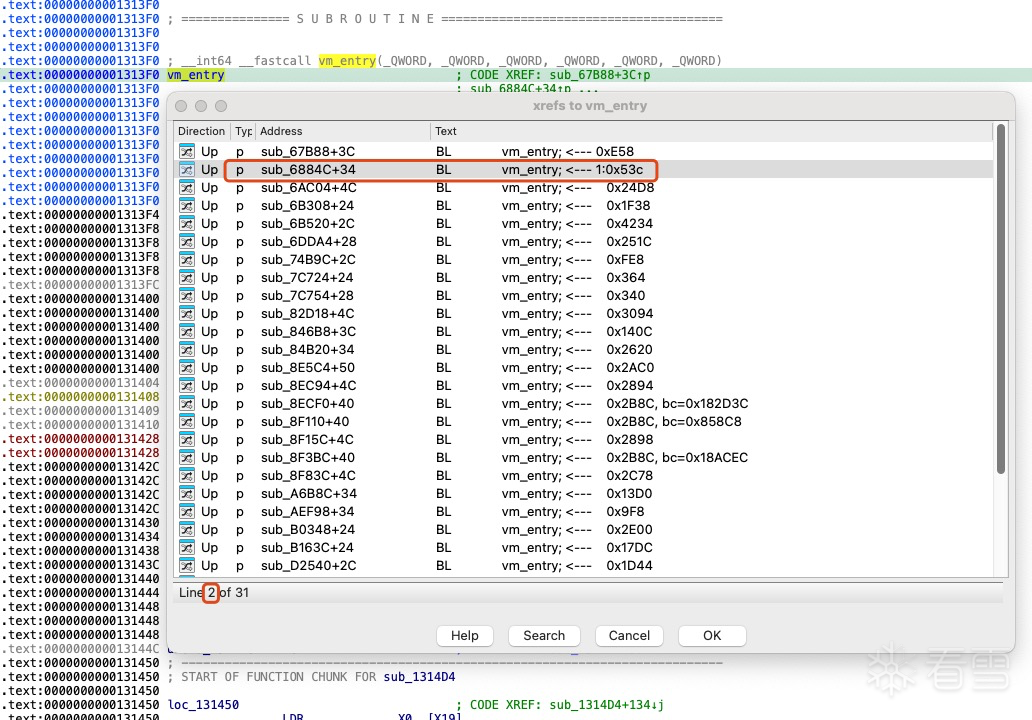
双击2号交叉引用来到函数0x6884C,x0-x2对应函数原型的3个参数bytecode、bc_size、external,其他剩余的参数寄存器是变参部分:寄存器x3-x7、Q0-Q7、堆栈。
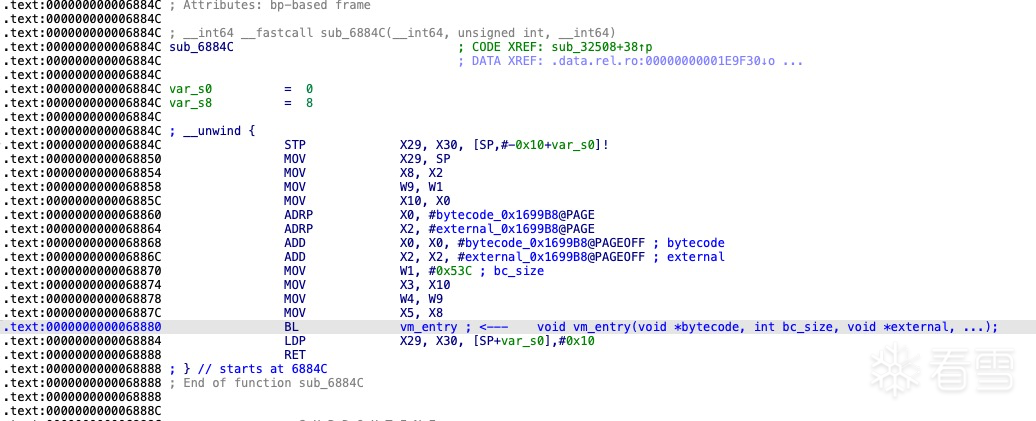
void vm_entry(void * bytecode, int bc_size, void** external, ...)
描述:准备参数和返回值对象bytecode: 字节码指针bc_size: 字节码大小external: 外部指针数组,它可能包含外部函数地址和全局变量指针。
在函数的开始将所有可能是变参的寄存器入栈、分配返回值对象内存、将变参参数转成指针数组pVA、最后vm_ready调用结束后从返回值对象中取出返回值并赋值给真实寄存器x0。

int vm_ready(void *ret_val, void *pBytecode, int bcSize, void **external, void **pVA)
描述:构建或准备bytecode对应的VMPState对象,bytecode映射一个VMPState。pRetVal: 返回值regCount: 虚拟寄存器数量pRegister: 虚拟寄存器typeCount: 类型表数据pTypeList: 类型表insCount: 虚拟机指令数量pInstructons: 虚拟机指令pBranchs: 分支表
解析器比较复杂,只介绍简单的handler分析过程,在分析时有五个非常重要的数据在需要时刻清楚放在什么位置:**虚拟机pc**、*指令对象*、上下文对象、类型表对象、分支表对象(遇到分支指令时关注),不然在分析时非常容易迷茫。
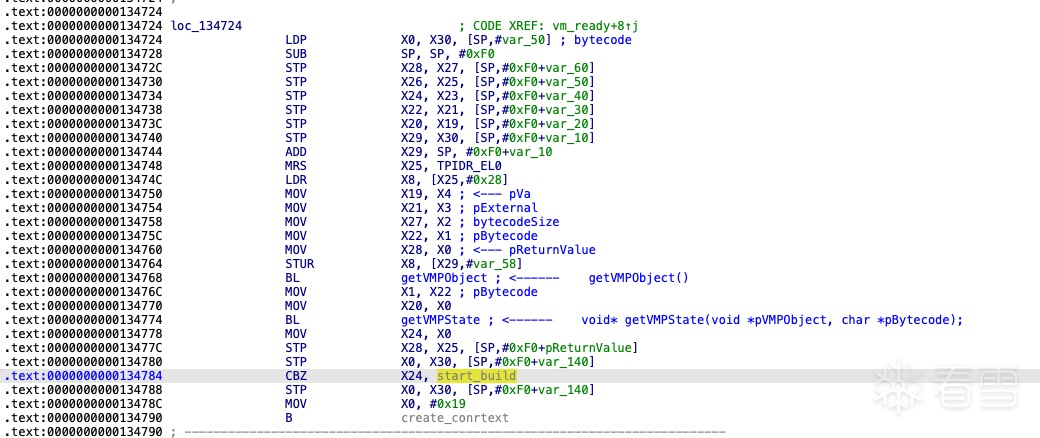
getVMPObject函数
获取全局虚拟机缓存对象,返回值是一个std::list
getVMPState
根据入参pBytecode尝试从缓存中查找应对的VMPState对象,如果VMPState没有被缓存则跳到start_build解析bytecode生成VMPState对象,相关分析参考bytecode首次解码,否则开始创建上下文对象。
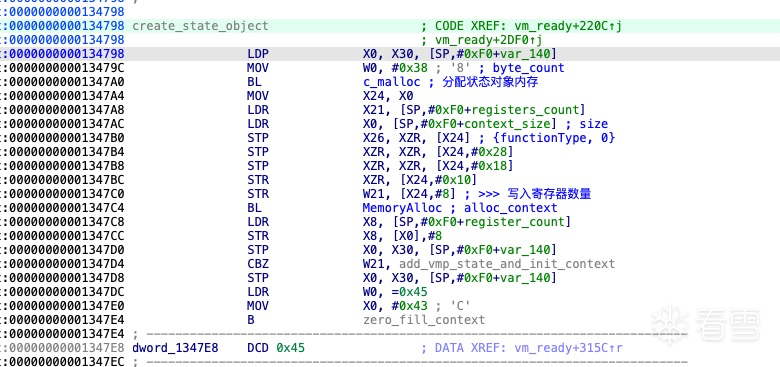
创建一个上下文对象
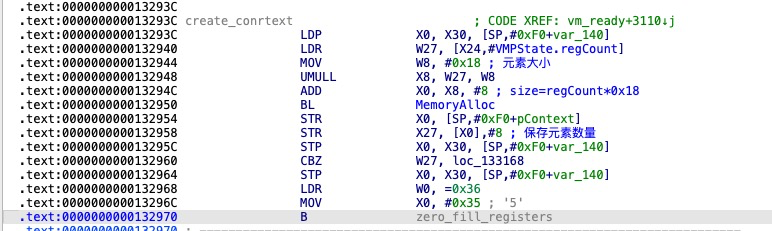
初始化寄存器
将所有寄存器填充为0
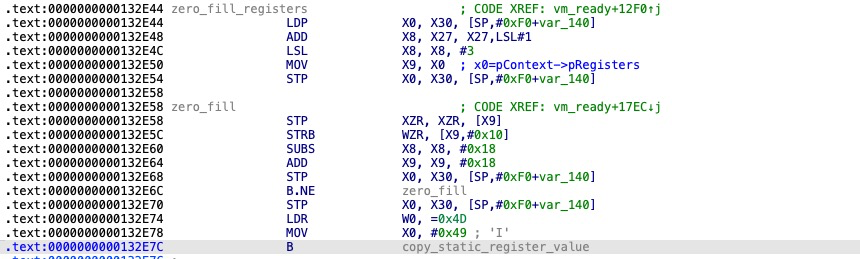
复制寄存器数据
在首次解码构建时有一部分的寄存器会被赋上初值,寄存器中的初值是加密前原生汇编代码中的常量是不能被修改的,因此需要复制寄存器对象。
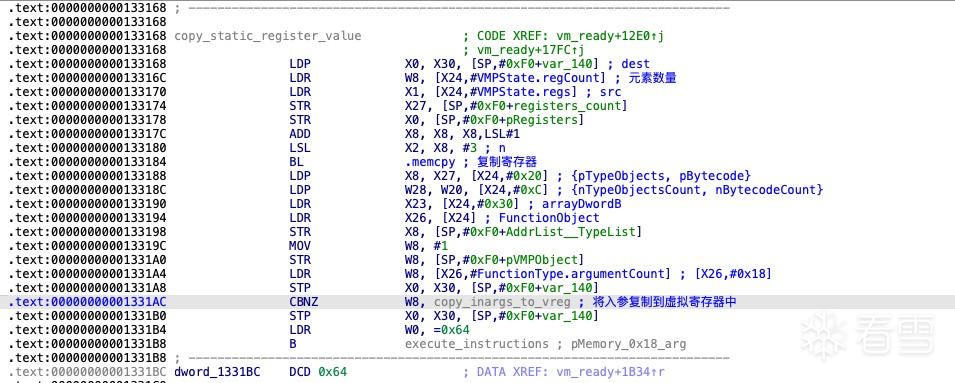
复制入参到虚拟机寄存器
如果不存在参数则准备执行vm_interpreter,否则将传入的变参依次将参数复制到虚拟寄存器V0,V1,V2,...。
数据结构VMPState对应着加密前的函数信息,其中包括参数数量、参数的类型和返回值
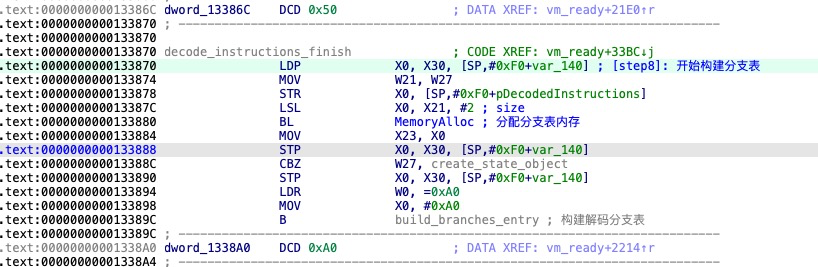
准备执行
在进入解释器前会把VMPState的数据结构成员作为参数传入后,准备执行虚拟机解释器了。
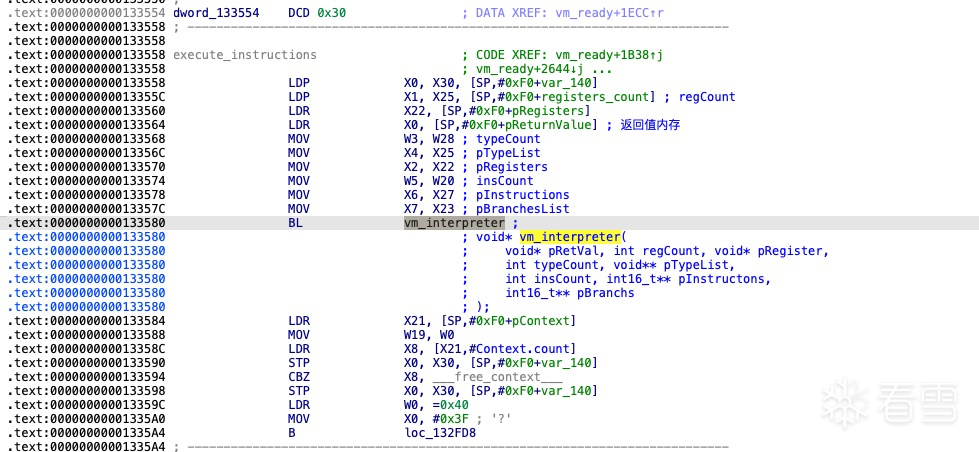
int vm_interpreter()
void *pRetVal: 返回值
int regCount: 虚拟寄存器数量
void *pRegister: 虚拟机寄存器
int typeCount: 类型表数量
void **pTypeList: 类型表
int insCount: 虚拟机指令数量
int16_t **pInstructons: 虚拟机指令
int16_t **pBranchs: 分支表
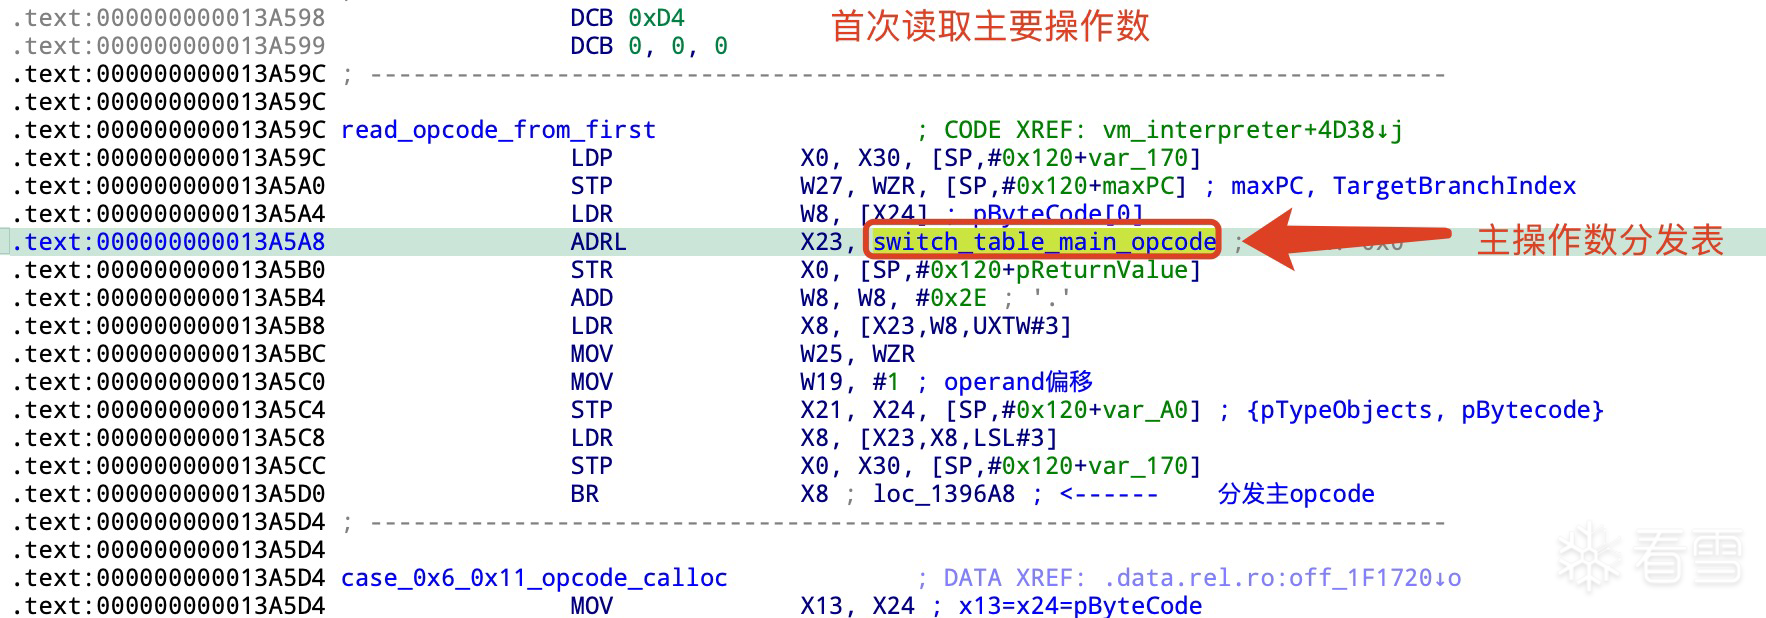
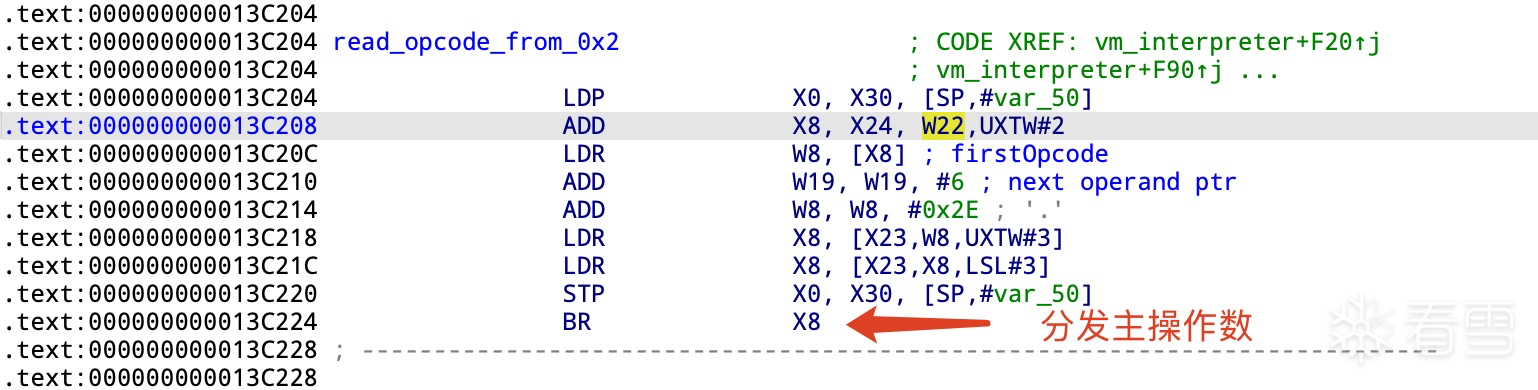
首次读取主操作码
在进入解释器后这里只执行一次,由于指令分发基本块被分别复制到13个handler尾部原因,因此每个handler都有自己独立的主操作码分发器,在handler执行完成后会接着读取下一条虚拟机指令的主操作码然后进入下一个handler,具体原因可以参数上面的章节指令分发基本块复制。
分发指令时关注对象:
虚拟pc: 0x0
指令对象:X24
读取主操作数时需要关注是指针对象和pc,这里刚刚开始执行pc为0,只要关注指令对象在x24寄存器就行了,值得要注意的是不是的主操作码分发器中指令对象有可能在其他真实寄存器中。
13A5C0 MOV W19, #1
在指令中读取了相对偏移0的主操作码后,通常这个指令相对偏移0用不上了,因此会有一个指针指向当前指令字节码的下一个字节也就是偏移1,在很多的主操作码分发器中经常就是这样做的,因此在进入handler后看到的都是从偏移1开始读取指令中的字节码。提示:在大多数分发器中使用W19来指向偏移1的。
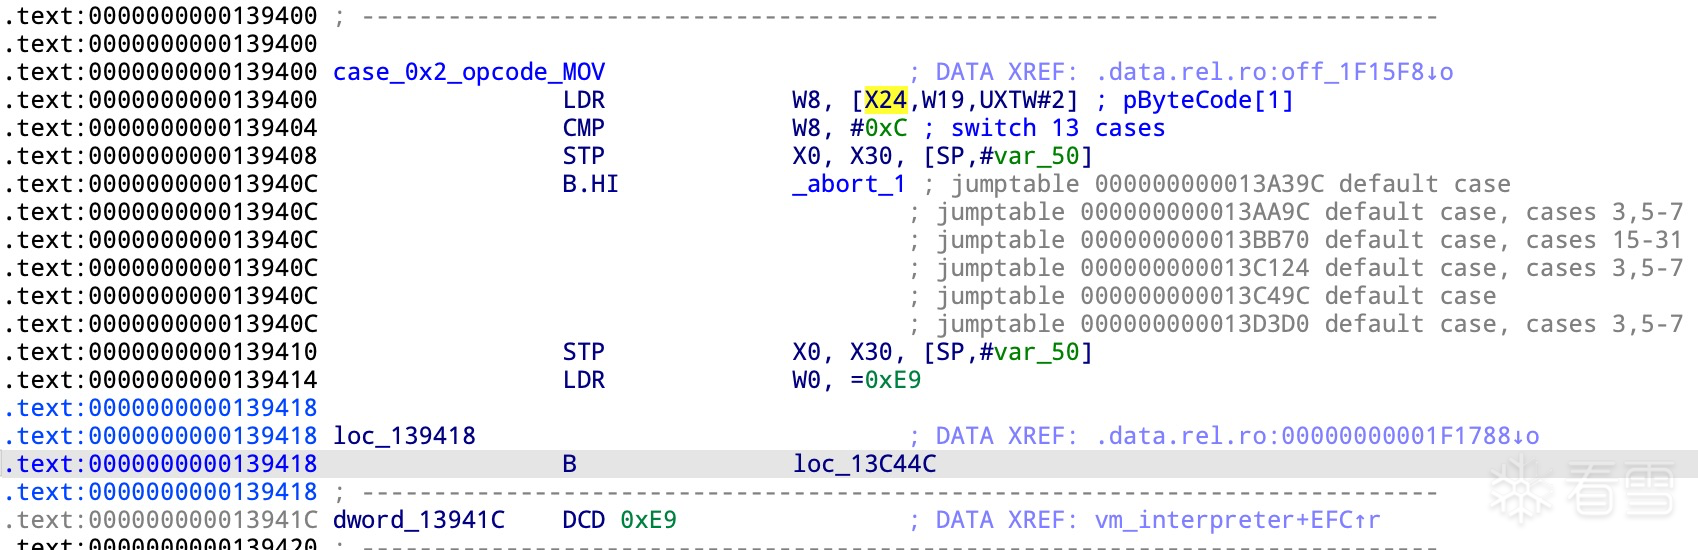
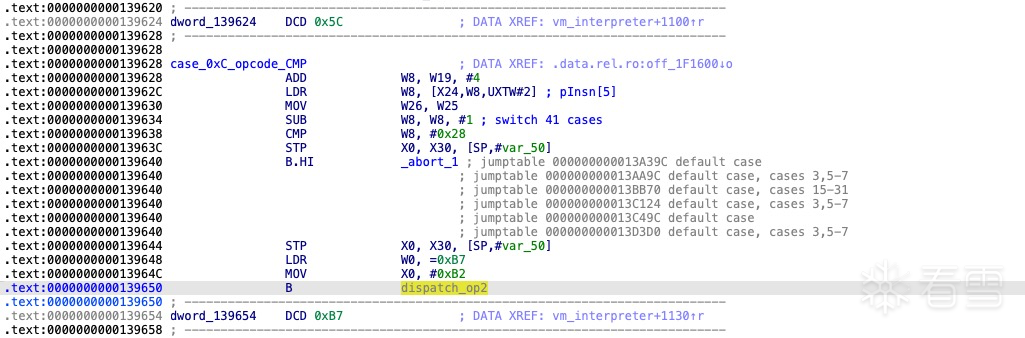
主操作码switch分发表
switch表中包含了13个handler,图中未命名暗蓝色loc开头的是填充虚假无用的地址并非真实handler起到一定的迷惑作用。
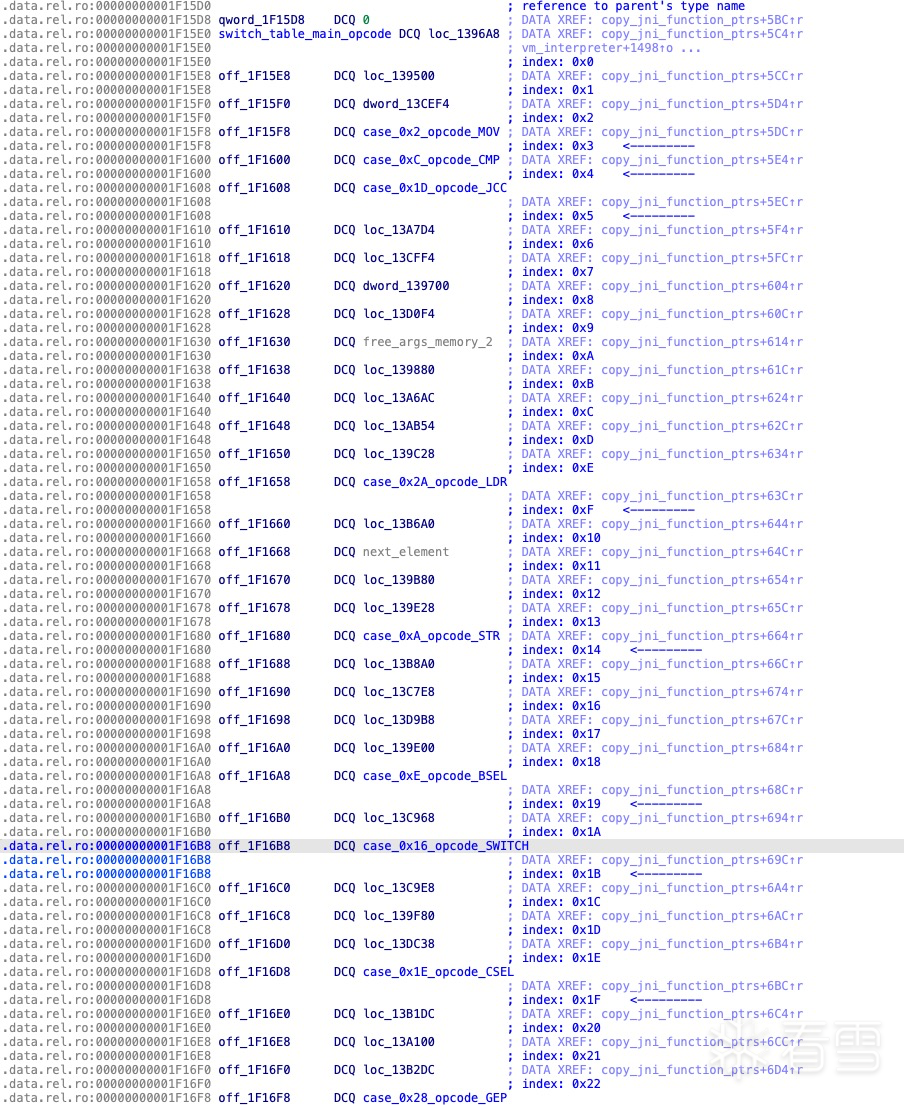
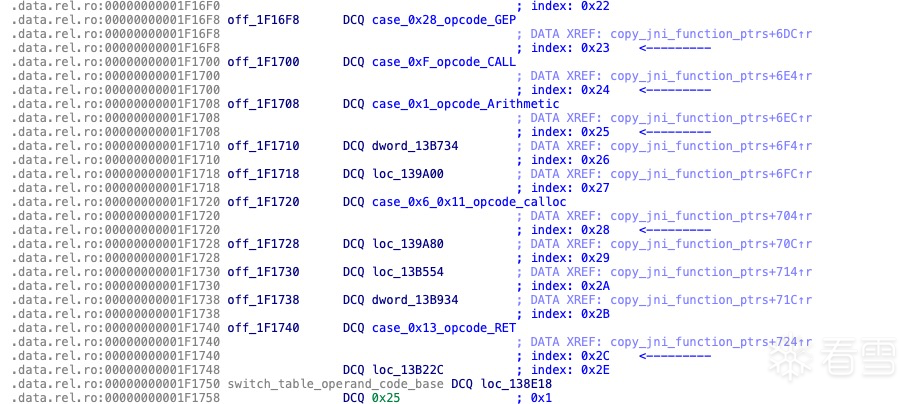
透过下面一张图可以了解虚拟机所有指令集和第二操作码的情况,有第二操作码意味着会有再次switch子分发的情况。

指令集分析
在此只介绍一些简单的指令分析带领大家入门,复杂的指令会让文章变得更加杂乱无章。
MOV指令
MOV 指令格式 (6): [opcode, op2, dtype, stype, sreg, dreg]
opcode: 主操作码
op2: 第二操作码
dtype: 目标操作数类型
stype: 源操作数类型
sreg: 源寄存器
dreg: 目标寄存器
汇编语法:
MOV dreg, sreg
有时MOV可能并不是直接将原寄存器中的数据传到目标寄存器,可能还有会其他操作:零扩展、带符号扩展、截断等等,这是什么还有op2第二个操作码的原因。
提示:IDA PRO中的注释op和pBytecode是同一个指针变量两者等价,原因是我懒得一个一个的去回改注释了。
按重要程度依次分别是:虚拟机pc、指令对象、上下文对象、类型表对象、分支表对象(遇到分支指令时关注)
虚拟机pc(当前指令偏移op/pInsn): 当前指令MOV来源于13个handler其中之一尾部的主操作码分发,因此pc指针的当前指令偏移0已经不再使用,W19已经在主分发器中修正为当前指令偏移1的位置,只要关注W19即可。指令对象(pReg): 真实寄存器x24指向它。
前驱节点: w25=0。
x24指向pInstructions起始位置指针,w19指向当前指令字节码中的偏移1。
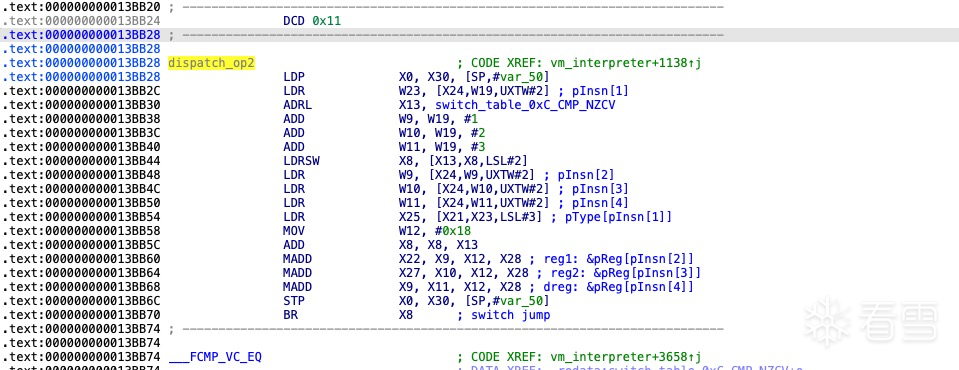
地址0x139400: 取出op2第二个操作码到w8并判断op2是否合法。
ADD W9, W19, #1
ADD W10, W19, #2
ADD W11, W19, #3
ADD W12, W19, #4
计算出当前指令字节的偏移,然后分别将读取偏移2、3、4、5的字节数据。w19=当前指令偏移op
x24=指令对象:它是一个16位的数组使用w19计算好的偏移索引来访问
x21=类型对象(pType):同样它是一个指针数组,同样使用索引来访问
x28=寄存器对象(pReg):它也是一个数组,不同的VMPState元素数量不同,使用索引来访问,元素是Register内存大小0x18,使用base+index*0x18
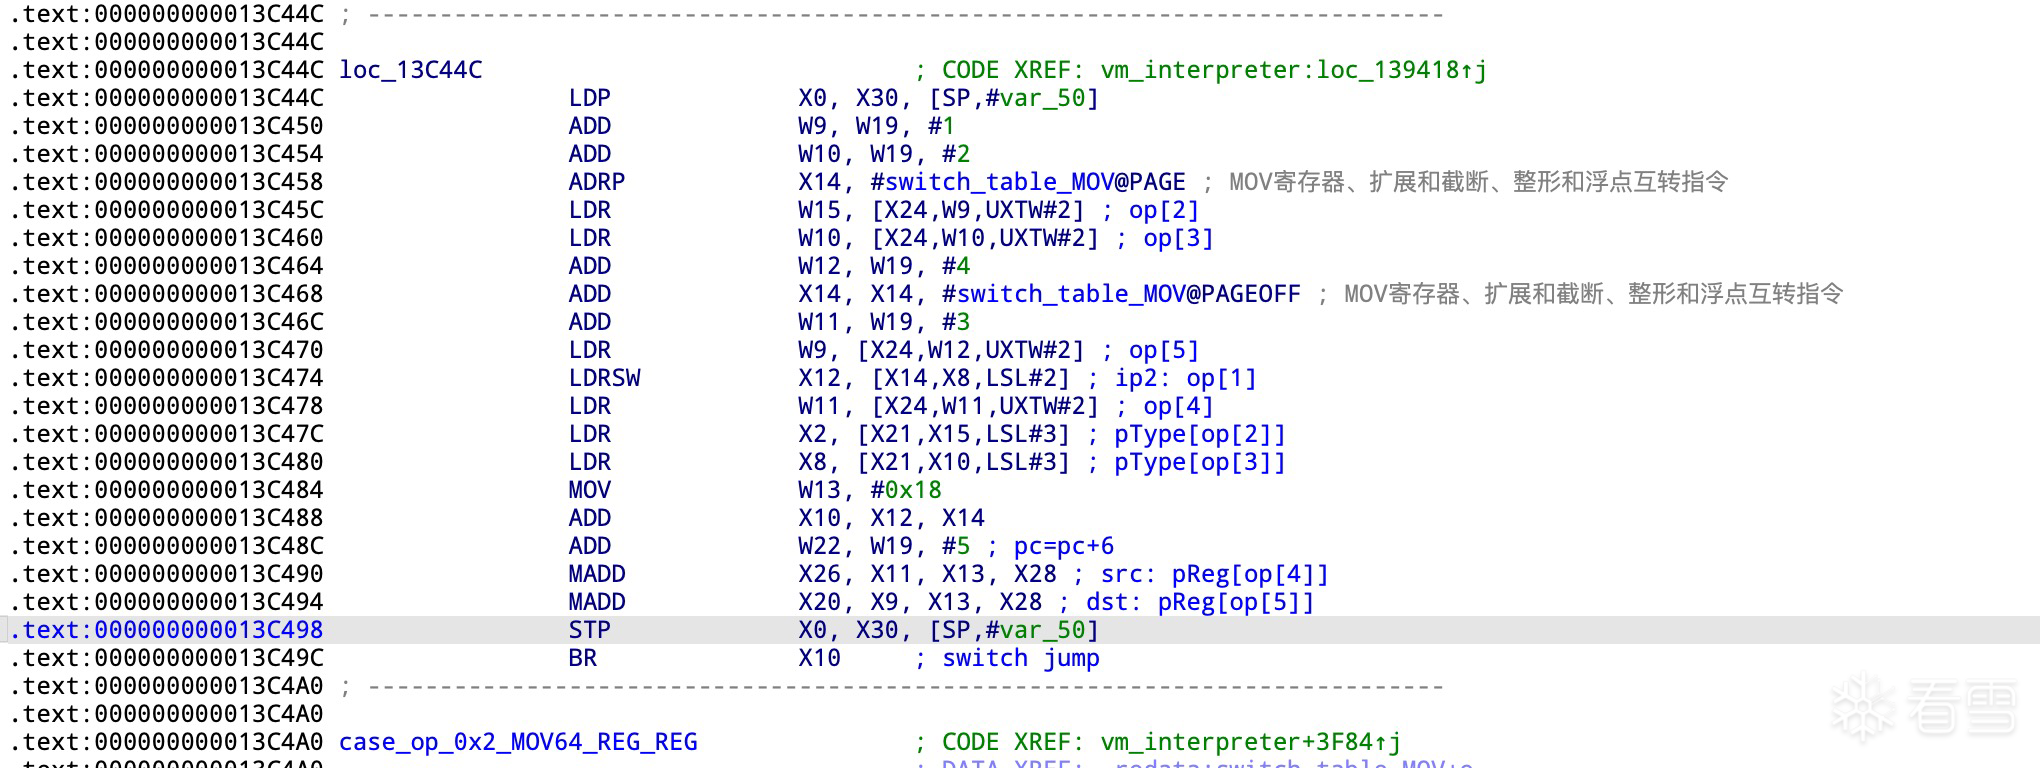
当指令执行到0x13C49C位置时开始分发op2,此时的数据状态如下:目标操作数类型: x2=pType[op[2]],从当前指令偏移2读取索引值,然后使用索引获取类型指针源操作数类型: x8=pType[op[3]],从当前指令偏移3读取索引值,使用索引获取类型指针源寄存器: x26=pReg[op[4]],从当前指令偏移4读取索引值,再从使用索引获取寄存器指针目标寄存器: x20=pReg[op[5]],从当前指令偏移5读取索引值,再从使用索引获取寄存器指针
0x13C48C ADD W22, W19, #5
下一个pc: 此时W19是指向偏移1的位置,加上5后W22指向下一条指令起始位置即偏移0,由此得知当前指令长度是6个字节。
取出源寄存器的值并存放到目标寄存器
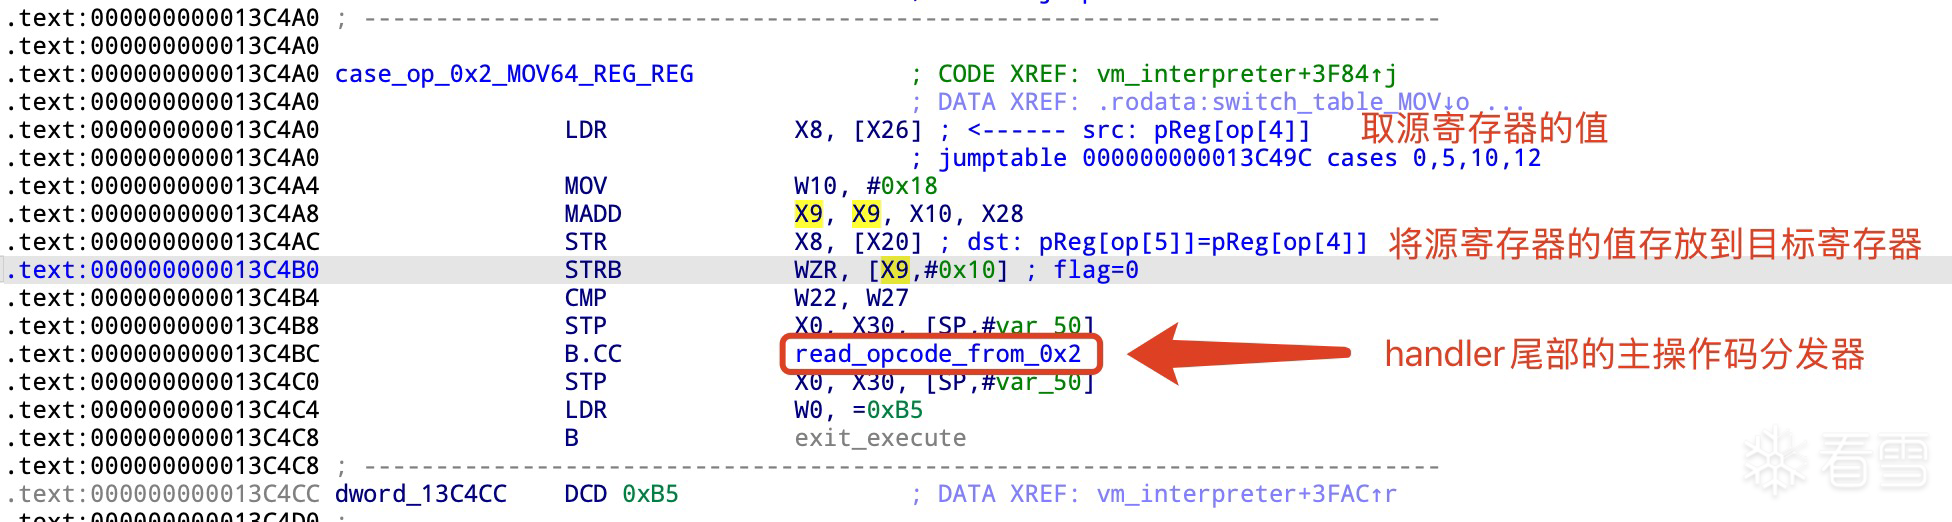
0x13C4BC: 是MOV handler尾部的添加的主操作码分发器。
MOV handler主操作码分发器:
x24是指向指令对象的,使用索引w22(new pc)获取下一条指令的主操作码。
此时W19指向上一指令偏移1的位置并且上一条指令的长度是6个字节,在执行W19, W19, #6之后W19正好指向下一条指令偏移1的位置。注:加上长度是6个字节,是因为 此分析器是MOV专用的只有MOV指令执行完成后才可到达此位置。
CMP指令
CMP 指令格式(6): [opcode, type, sreg1, sreg2, creg, op2]
opcode: 主操作码
type: reg1, reg2的操作数类型
sreg1: 源寄存器1
sreg2: 源寄存器2
creg: 目标条件码寄存器
op2: 第二操作码
指令说明: 通常cmp和jcc、cmp和csel成对出现
汇编语法:
CMP.
在分析前再次提示一下重要的对象,handler分析是主要围绕这五个对象的数据展开分析的。
按重要程度依次分别是:虚拟机pc、指令对象、上下文对象、类型表对象、分支表对象(遇到分支指令时关注)
虚拟机pc: 当前CMP指令来源于13个handler其中之一尾部的主操作码分发,此时已经完成分发到当前指令,pc偏移0已经不再使用,在主分发器中W19已经修正为当前指令偏移1的位置,只要关注W19即可。指令对象: 真实寄存器x24指向它。
W19指向当前指令偏移1的位置,加上4后W8指向偏移5,根据上面的指令格式偏移5是读取op2。
ADD W8, W19, #4
LDR W8, [X24,W8,UXTW#2]
备份W25到W26因为后面要使用W25寄存器了,这里的W25是指向前驱基本块,在后面执行PHI时会用到前驱基本块数据。
MOV W26, W25
检查op2是否合法
CMP W8, #0x28
准备分发第二个操作数,第二个操作码就是比较条件的种类:EQ、NE、GT、GE、LT、LE等等。上下文对象: X28
类型表对象: X21
获取操作数类型type:
LDR W23, [X24,W19,UXTW#2]
LDR X25, [X21,X23,LSL#3]**
获取第一个源寄存器sreg1指针,pRegsBase+Index+0x18(寄存器元素长度):
ADD W9, W19, #1
MOV W12, #0x18
LDR W9, [X24,W9,UXTW#2] *
*MADD X22, X9, X12, X28*
获取第二个源寄存器sreg2*指针
*ADD W10, W19, #2*
*LDR W10, [X24,W10,UXTW#2]*
MADD X9, X11, X12, X28
取目标操作数creg条件码寄存器指针
ADD W11, W19, #3
LDR W11, [X24,W11,UXTW#2]
MADD X9, X11, X12, X28
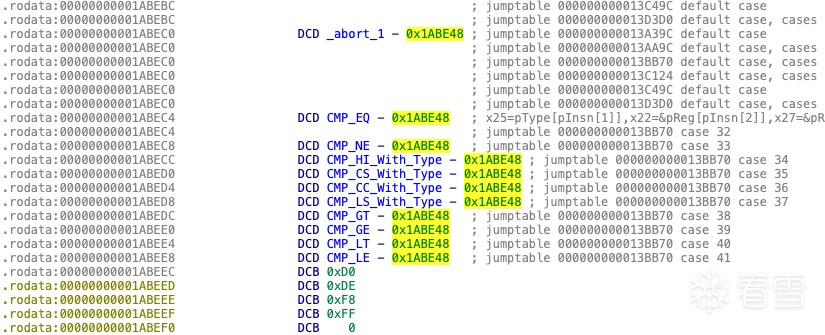
当指令执行到地址0x13BB70,指令中的操作数已经全部取出,类型对象、指令对象已经不再使用,只需关心type、sreg1、sreg2、dreg所在寄存器即可:
type: X25
sreg1: X22
seg2: X27
creg: X9
第二个操作数是CMP条件码的种类,条件码中还包括浮点数的比较,在此以常用的条件码CMP.EQ进行分析。
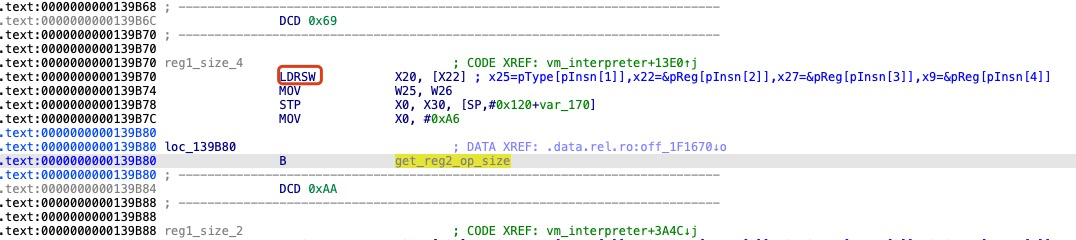
首先获取比较操作数的大小,再从寄存器指针sreg1获取操作数大小的值,以4个字节大小为例:
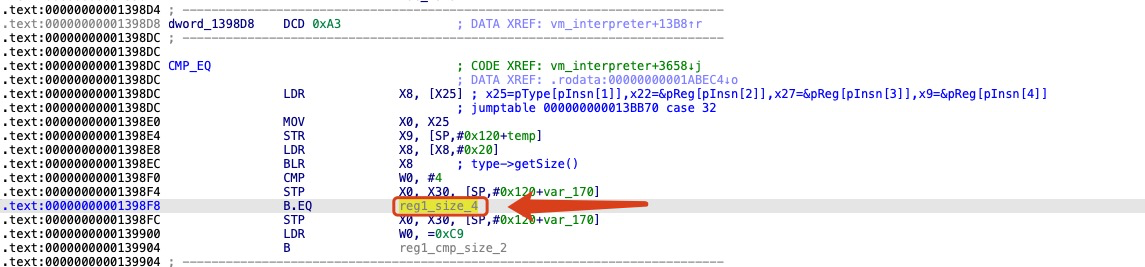
取sreg1的值:
此时发现使用的汇编指令是LDRSW,的确是取出4个字节的数据。
sreg1_val: X20
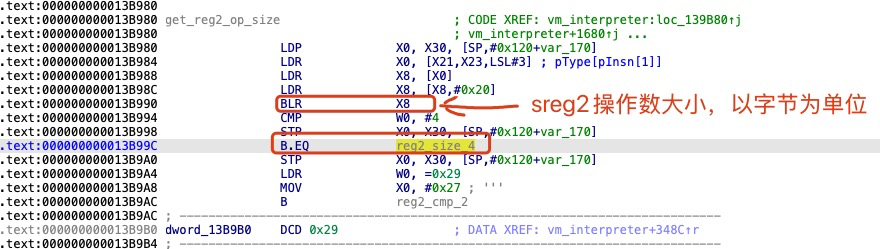
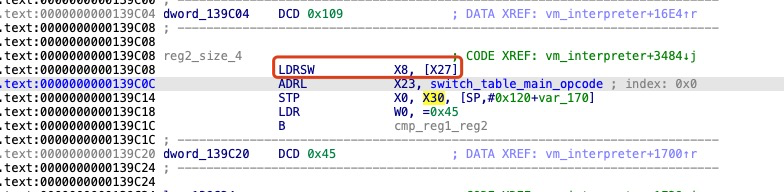
取sreg2操作数大小和寄存器的值:
`sreg2_val: X8
比较sreg1和sreg2获取EQ条件码
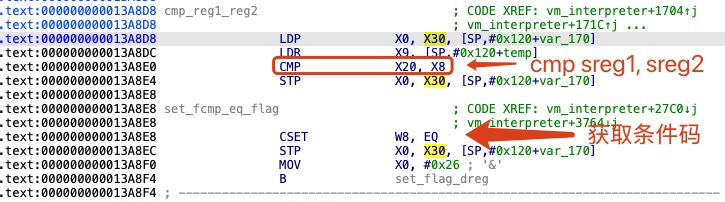
更新下一条指令pc并检查是否超过macPC,w19指向当前指令偏移1的位置,ADD W8, W19, #5并指向下一个指令的偏移0位置,表示当前指令CMP长度是6。
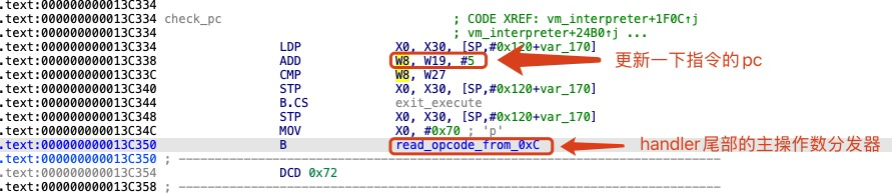
CMP 尾部主操作码分发器:
依旧是读取主操作码、更新w19指针到偏移1位置,最后BR X8进入下一个handler。

LDR指令
LDR 指令(4): [opcode, type, mreg, dreg]
opcode: 主操作码
type: 操作数类型
mreg: 源寄存器内存,没有偏移量立即数
dreg: 目标寄存器
指令说明: LDR dreg, [mreg], LDR指令是mem--->reg到目标寄存器,即寄存器内存的值到寄存器中
汇编语法:
LDR dreg, [mreg]
关键对象:虚拟机pc、指令对象、上下文对象、类型表对象、分支表对象(遇到分支指令时关注)
虚拟机pc: W19
指令对象: X24
上下文对象: X28
类型表对象: X21
获取操作数类型type:
0x13A1AC LDR W10, [X24,W19,UXTW#2]
0x13A1C0 LDR X1, [X21,X10,LSL#3]
获取目标操作数寄存器dreg:
0x13A1B0 ADD W8, W19, #1
0x13A1B8 LDR W8, [X24,W8,UXTW#2]
0x13A1C4 MOV W10, #0x18
0x13A1C8 MADD X2, X8, X10, X28
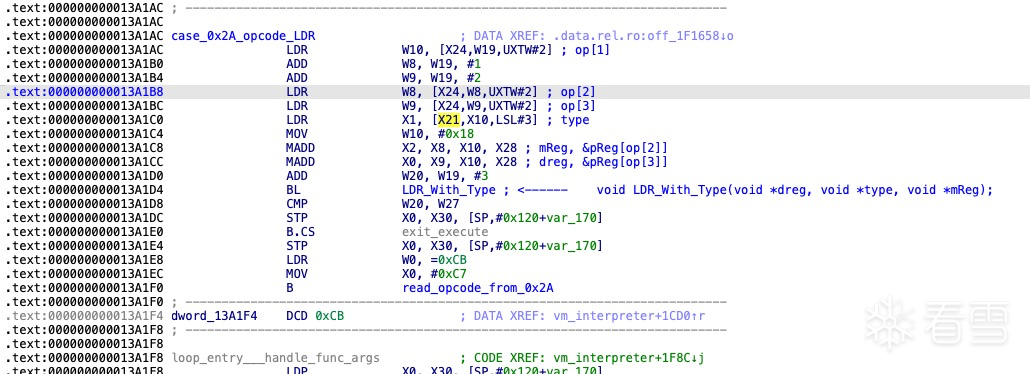
LDR_With_Type函数分析:
函数原型:void LDR_With_Type(void *dreg, void *type, void *mReg);
参数:x0=dreg, x1=type, x2=mreg
判断操作数类型是否char指针类型,如果是char指针则拷贝指针,否则取出mreg地址中的值赋值给dreg。
获取类型长度:
0x13FF60 BLR X8
类型长度不能大于8个字节:
0x13FF68 CMP W8, #7
获取mreg中的指针:
LDR X8, [X20]
依据类型长度1/2/4/8字节,然后再次从获取指针中的值:
0x13FF88 LDRSB W8, [X8]
0x13FFA4 LDRSH W8, [X8]
0x13FFB0 LDR W8, [X8]
0x13FF94 LDR X8, [X8]
最后将值赋值给dreg:
0x13FF98 STR X8, [X19]
或
0x13FFB4 STR W8, [X19]

bytecode首次解码
解码的目的就是将bytecode反序列到VMPState对象。
VBR编码
bytecode使用Variable Bitrate(VBR)编码格式,这个编码很多领域都在使用例如音频和视频,有兴趣的也可以AI了解。
虚拟机字节码采用了6位的编码格式,与protobuf的Varints 编码格式有些类似,只不过protobuf使用了8字节,这里使用了6个字节。
protobuf Varints 编码相关链接:5.1、Varints 编码(变⻓的类型才使⽤)
虚拟机6位的VBR编码:
数字5的二进制6位编码是这样的,以0位开始最高位5是0说明没有后续字节位数据,解码后的数值就是5
000101
前6位最高位是1,代表还有后续的字节位数据。
100101 001111
在解码组合位数据时先取0-4位有效数据低5位: 00101,第5位为1说明还有后续的字节位数据,然后再取下一个6位字节数001111,第5位为0说明没有后续的字节位数据了,有效数据位是低5位:01111,解码组合后的数值为0x1E5(0b111100101)。注意:后6位的在组合时要放在高位。
01111 00101 ---> 111100101
如果后位最高位为1就再取六位数据,如此反复直到最高位为0为止。
使用脚本解码VBA,默认位数6bit
脚本实现decode:
1 2 3 4 5 6 7 8 9 10 11 12 13 14 15 16 17 18 19 20 21 22 23 24 25 26 27 28 29 | class BytecodeDecoder(): def __init__(self, bytecode: bytes, extern_address: list, filename): self.extern_address = extern_address self.bytecode_bits = bitarray(endian='little') self.bytecode_bits.frombytes(bytecode) self.bytecode = bytecode self.bit_index = 0 self.filename = filename def decode(self, nBit=6): num = 0 index = 0 bit_num = 0 exit = False while index + nBit <= len(self.bytecode_bits): # 读取 nBit 位 chunk = self.bytecode_bits[self.bit_index:self.bit_index + nBit] high_bit = chunk[-1] # 最高位 low_bits = ba2int(chunk[:-1]) # 低 5 位转换为整数 if high_bit == 1: num = num | (low_bits << bit_num) # 左移 5 位并按位或合并 else: num = num | (low_bits << bit_num) exit = True self.bit_index += nBit # 移动索引 if exit: return num bit_num += 5 raise Exception("bytecode decode error") |
bytecode解码流程
bytecode解码流程书签
在IDA PRO使用ctrl+m打开收藏的书签,没有快捷键的打开菜单View->Open subviews->bookmarks打开,[step
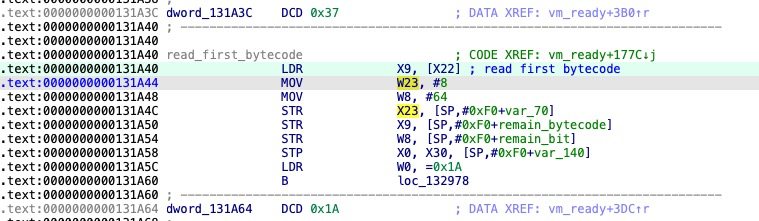
读取第一个字节码
字节码是64位长度为单位进行处理的,而VBR是以6个字节单位处理数据,当前64位中有效字节码数据不足6位时,会读取下一个64位数据并从低位开始取字节位,将不足的有效位补到当前字节位直到满6位为止。在解码的同时还在堆栈中维护了表示当前VBR解码状态的数据,分别是指向字节码的指针:pBytecode,当前剩余的64数据:remain_bytecode,remain_bytecode的剩余位数: remain_bit。
从bytecode读取64位的数据:
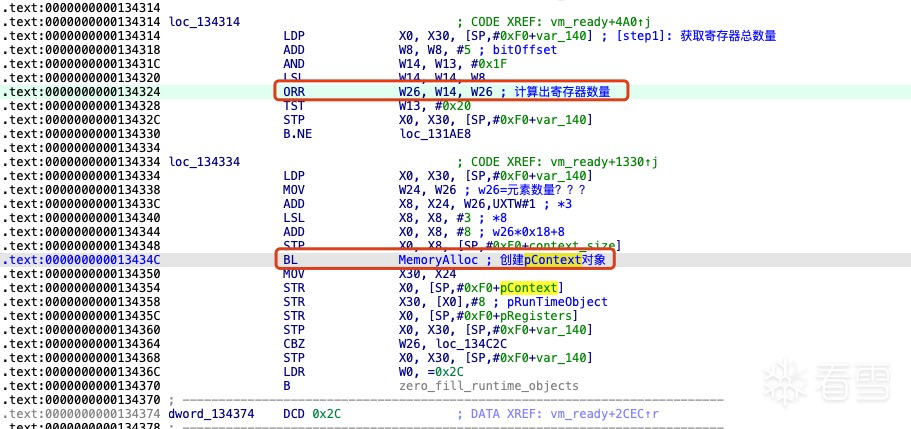
计算出寄存器数量
bytecode最开始位置保存了寄存器数量,读取数量并创建上下文对象。
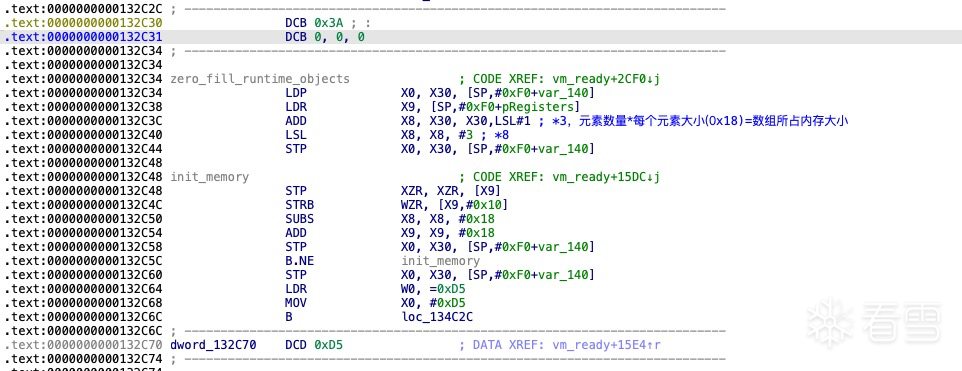
初始化并填充数据
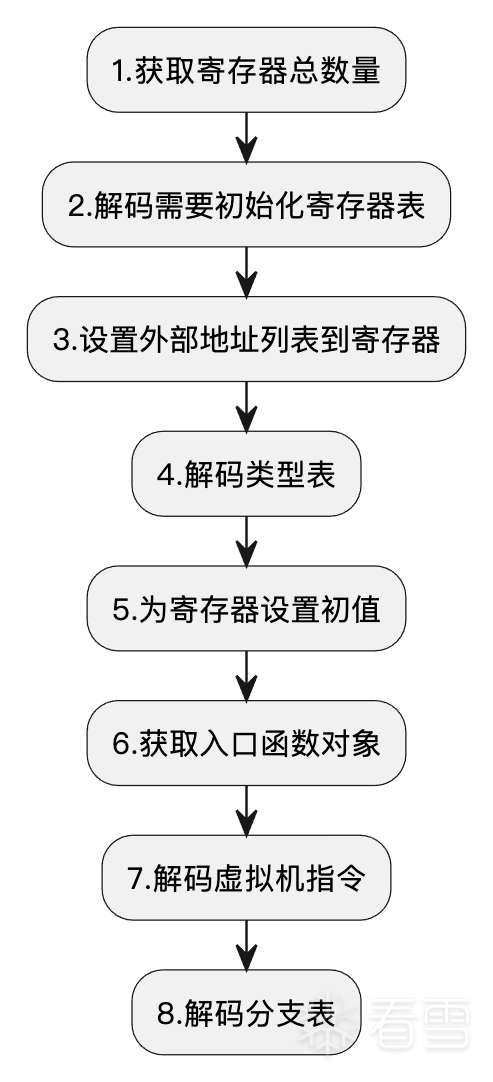
解码脚本:123defdecode_register_count(self):regs_count=self.decode()returnregs_count解码需要初始化寄存器
初始化寄存器的数量
解码出需要初始化寄存器的数量,然后申请了一个堆内存用于存放寄存器索引。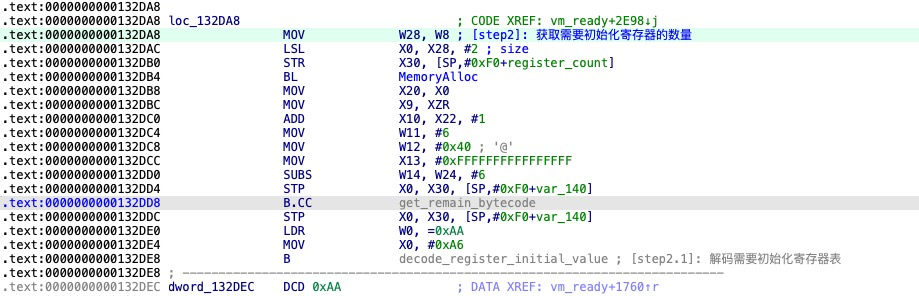
解码需要初始化寄存器表
在解码完寄存器数量后,紧接着字节流后面数据是需要初始化的寄存器表。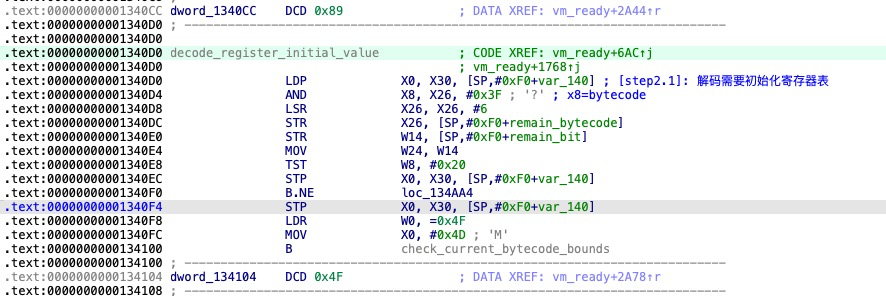
解码脚本:
1 2 3 4 5 6 7 8 | def decode_register_initial_value(self): regs_initial_count = self.decode() regs_initial = [] for i in range(0, regs_initial_count): reg_num = self.decode() # init_regs_num.append((insn, f'{insn:#x}')) regs_initial.append(reg_num) return regs_initial |
设置外部地址列表到寄存器
这里的外部地址的寄存器索引数据与第2步的初始寄存器数据不共用。
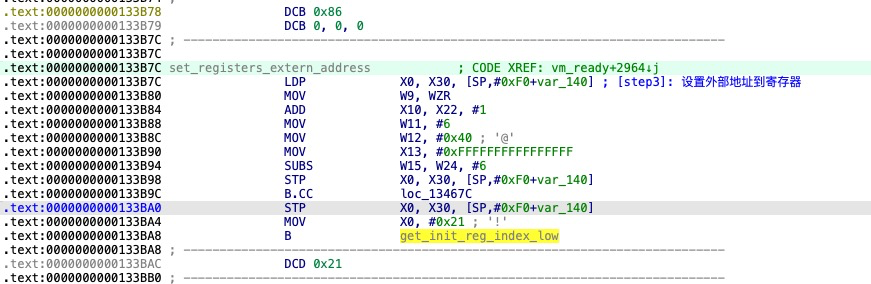
解码脚本:123456789101112131415defset_registers_extern_address(self,registers:list[Register],extern_address:list[int]):extern: ExternInstructions=ExternInstructions()addr_list_count=self.decode()foriinrange(0, addr_list_count):reg_idx=self.decode()# 初始化的寄存器索引addr_list_idx=self.decode()# 获取地址列表索引addr=self.read_extern_address(extern_address, addr_list_idx)registers[reg_idx].value=addrextern.targetRegs.append(reg_idx)extern.externalAddress.append(addr)# print(# f"extern register[{reg_idx}] = {addr:#x}")returnextern解码类型对象表
虚拟机解释执行时所需的类型数据均来自此表。
解码脚本:12345678910111213141516171819202122232425262728293031323334353637383940414243444546474849505152535455565758596061626364656667686970717273747576777879808182defdecode_types(self):# 4.解码类型表types_count=self.decode()types=[None]*types_countforiinrange(0, types_count):type=self.decode()# print(f'type[{i}]: {type:#x}')match(type):case0x3|0x10|0x12:raiseException("error")case0x5|0xc|0x13:struct_0xC=0struct_0xD=self.decode()struct_0xE=1member_count=self.decode()# 4.1设置结构体成员类型members=[]forjinrange(0, member_count):member_type_index=self.decode()t_membetr=types[member_type_index]ift_membetrisNone:types[member_type_index]=t_membetr=StructType(0, [], "")members.append(t_membetr)# 4.2 获取结构体类型名type_name=[]type_name_size=self.decode()forjinrange(0, type_name_size):c=self.decode()type_name.append(c)name="".join(chr(c)forcintype_name)struct_type=StructType(member_count, members, name)struct_type.init()types[i]=struct_typecase0x1:types[i]=VMPType()case0x6:nbit=self.decode()types[i]=IntegerType(nbit)case0x9:element_count=self.decode()element_type_idx=self.decode()element_type=types[element_type_idx]ifelement_typeisNone:# 创建数组元素为结构类型...raiseException("error")types[i]=ArrayType(element_count, element_type)case0x7:ptr_type_index=self.decode()ptr_type=types[ptr_type_index]ifptr_typeisNone:ptr_type=StructType(0, [], "")types[ptr_type_index]=ptr_typetypes[i]=PointerType(ptr_type)case0xb:types[i]=FloatType()case0x14:flag=self.decode()return_value_type=self.decode()argument_count=self.decode()return_value=types[return_value_type]arguments=[]ifreturn_valueisNone:return_value=NoneraiseException("返回值类型 error")forjinrange(0, argument_count):arg_type_idx=self.decode()arg_type=types[arg_type_idx]ifarg_typeisnotNone:arguments.append(arg_type)else:# 构建结构类型raiseException("error")types[i]=FunctionType(return_value, argument_count, arguments, flag)case0x15:types[i]=DoubleType()case _:input(f"未知的类型:{type:#x}\n")returntypes为寄存器设置初值
这里的寄存器列表来源第2步解码的数据,这里不仅会为寄存器设置初始值,还会有其他指令的操作,目标寄存器是一个“静态或只读的”,解释器的执行不会改目标寄存的值。
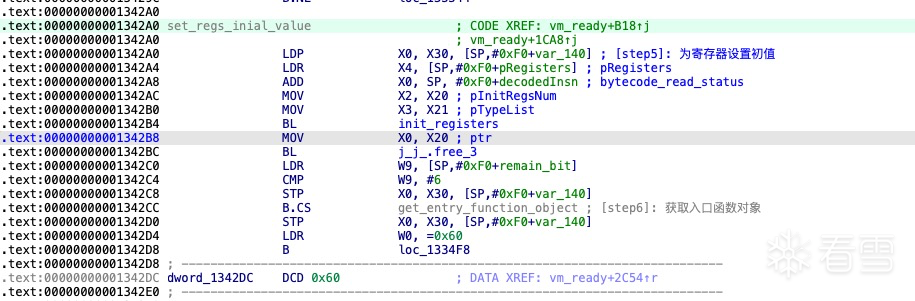
解码脚本:123456789101112131415161718192021222324252627282930313233343536373839404142434445464748495051525354555657defset_registers_inial_value(self, registers:list[Register], types:list[int],regs_initial:list[int]):init_instructions: InialInstructions=InialInstructions()count=self.decode()foriinrange(0, count):init_type=self.decode()reg_idx=regs_initial[i]# print(f'init reg type: {init_type:#x}')# 记录初始化指令init_instructions.opcodes.append(init_type)init_instructions.dRegs.append(reg_idx)match(init_type):# ADD.MOcase0|0xb|0x17:type_idx=self.decode()deep=self.decode()breg=self.decode()member_offset_table=[]forjinrange(1, deep):member_offset_table.append(self.decode())# 记录初始化指令init_instructions.imm.append(member_offset_table)init_instructions.type.append(type_idx)init_instructions.sRegs.append(breg)case7:# MOV REG, IMMimm=self.decode()registers[reg_idx].value=imm# 记录初始化指令init_instructions.imm.append(imm)init_instructions.type.append(None)init_instructions.sRegs.append(None)# print(f'init register[{reg_idx}] = {imm:#x}')case8:# MOV REG, ???type_index=self.decode()t=types[type_index]ift.tag !=0xe:registers[reg_idx].value=0else:raiseException("error")# 记录初始化指令init_instructions.type.append(type_index)init_instructions.imm.append(None)init_instructions.sRegs.append(None)case0x15:# MOV REG.T, REG@FuncPtrwhileself.decode() &0x20:passtype_idx=self.decode()t=types[type_idx]sreg=self.decode()registers[reg_idx].value=registers[sreg].valueregisters[reg_idx].type=t# 记录初始化指令init_instructions.type.append(type_idx)init_instructions.imm.append(None)init_instructions.sRegs.append(sreg)case _:input(f"未知的初始化寄存器类型:{init_type:#x}\n")returninit_instructions获取入口函数对象
从第4步类型对象表获取入口函数类型信息,这里的入口函数是指原生代码未虚拟化前的函数信息。
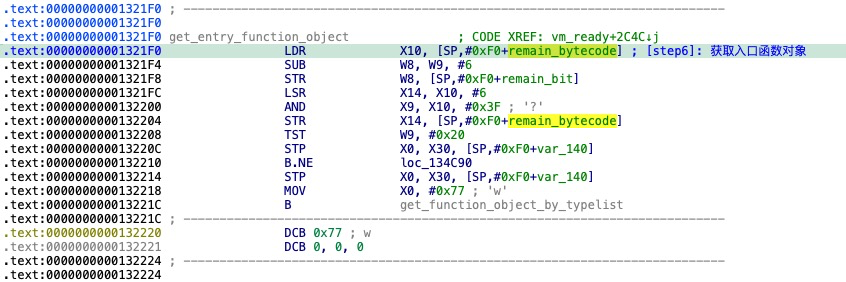
解码脚本:123defget_function_type(self, types:list[int]):func_type_idx=self.decode()returntypes[func_type_idx].type解码虚拟机指令
虚拟机机解释器执行的指令。
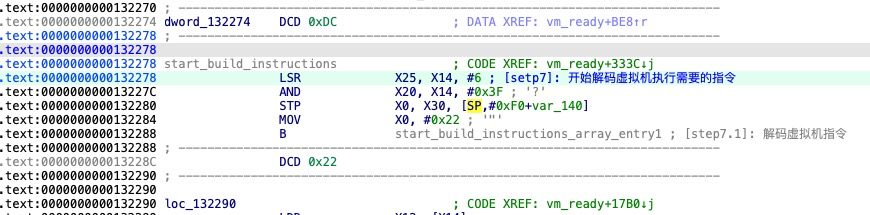
解码脚本:1234567defdecode_bytecode(self):vm_insn_count=self.decode()vm_instructions=[]foriinrange(0, vm_insn_count):insn=self.decode()vm_instructions.append(insn)returnvm_instructions创建分支表
分支表是跳转的目标地址,BSEL.PHI、J、JCC、SWITCH指令等会从此表中获取目标地址。
解码脚本:1234567defdecode_branches(self):branches_count=self.decode()branches=[]foriinrange(0, branches_count):offset=self.decode()branches.append(offset)returnbranches
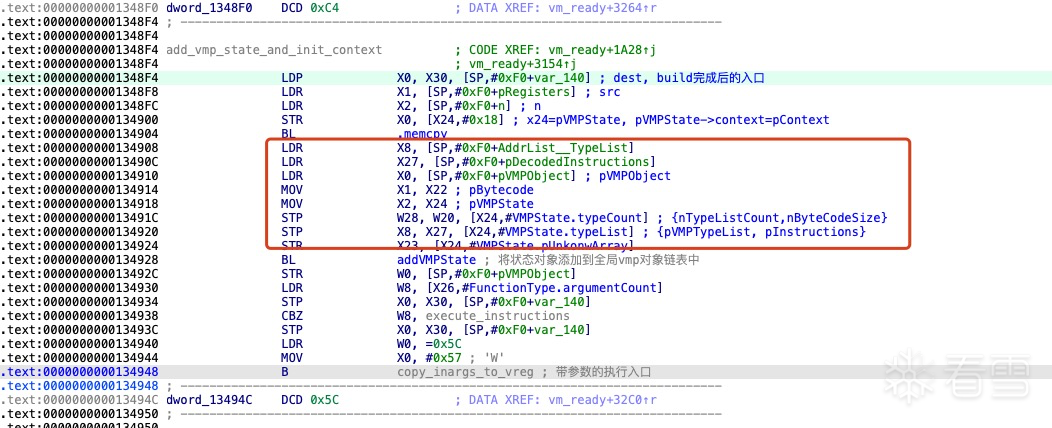
创建VMPState对象
在解码完bytecode后,入口函数类型、虚拟寄存器数量、类型表数量、指令数量、上下文对象、类型表对象、指令表对象、分支表关键数据已经获取,接下来该创建VMPState对象了。
并将解码完成后的数据放入此对象并将VMPState添加到全局缓存对象,防止下次执行此bytecode时重复构建。
虚拟机数据结构
在逆向分析时和虚拟机执行时这个数据结构十分重要了解好这份数据分析不迷路,尤其是解释执行时经常要获这些数据结构:指令、类型、寄存器、分支等。
虚拟机状态对象
1 2 3 4 5 6 7 8 9 10 | struct VMPState { 0x0: Type* entryFunction; 0x8: int regCount; 0xC: int typeCount; 0x10: int insCount; 0x18 Context* context; 0x20: Type** pTypeList; 0x28: int16_t** pInstructions; 0x30: Branches* pBranches;} |
类型对象
类型对象用于描述类型数据,并不会包含类型的值。
类型签标
1234567891011enumTypeTag {VoidType = 0,FloatType = 2,DoubleType = 3,InteterType = 0xb,FunctionType = 0xc,StructType = 0xd,ArrayType = 0xe,PointerType = 0xf,VertorType = 0x10}所有类型的基类
内存长度: 0x1012345678910structType {+0x0:void* vtable;+0x8: TypeTag tag;+0xc:union{intnbit;// IntegerType时使用boolfield1;}+0xd:boolisInit;// StructType使用,是否计算结构体内存长度+0xe:boolfield3;}空类型
内存长度: 0x1012structVoidType :publicType {}浮点类型
内存长度: 0x10
使用tag来区别数据类型,float长度32位,double长度64位。12structFloatType :publicType {}12structDoubleType :publicType {}整形
内存长度: 0x10nbit成员用于描述1位/8位/16位/32位/64位。12structIntegerType :publicType {}函数类型
内存长度: 0x2812345structFunctionType :publicType {+0x10: Type* returnValueType;+0x18:int. argumentCount;+0x20: type** arguments;}结构体类型
内存长度: 0x381234567structStructType :publicType {0x10: int32 memberCount;0x18: type** members;0x20: int32 memorySize;0x28: int32* memberOffsetTable;0x30:char* typeName;}数组类型
内存长度: 0x181234structArrayType{0xc: int32 count;0x10: Type* element;}指针类型
内存长度: 0x18123structPointerType{0x10: Type* pointee;}上下文对象
内存长度: 0x1812345structRegister {0x0: int64 value;0x8: Type* t;0x10:boolisBuffer;// 指示value是否内存管理函数分配: cmalloc/malloc}内存长度: 内存长度不确定,依据count的数值决定大小, size=count * sizeof(Register)1234structContext {0x0:intcount;0x8: Register regs[];}分支表
内存长度: 内存长度不确定,首次解码有长度数据。123structBranchs {0x0: int16_t br[];}指令对象
内存长度: 内存长度不确定,VMPState->insCount描述了指令数量。123structInstructions {0x0: int16_t ins[];}
指令解码格式
注:第一次解码出VMPState核心数据结构,第二次是虚拟执行时的指令解码
最外层的[]相当于python的列表,里层的[]表示数据是可选的,()通常是成对数据。
| 指令名称 | opcode | 长度 | 格式 | 说明 |
|---|---|---|---|---|
| ARITH | 0x1 | 6 | [opcode, op2, type, sreg1, sreg2, dreg] | |
| MOV | 0x2 | 6 | [opcode, op2, dtype, stype, sreg, dreg] | |
| CALLOC | 0x6 | 5 | [opcode, a2_type, a1_type, a1_sreg, dreg] | |
| STR | 0xa | 4 | [opcode, stype, sreg, mreg] | |
| CMP | 0xc | 6 | [opcode, type, sreg1, sreg2, creg, op2] | |
| PHI | 0xe | 变长(3+) | [opcode, dreg, count, [(reg, branch), (reg, branch), (...)]] | |
| CALL | 0xf | 变长(5+) | [opcode, ftype, [count], tag, [retreg], ereg, none, [areg, ...]] | |
| RET | 0x13 | 变长(2+) | [opcode, type, [retreg]] | |
| SWITCH | 0x16 | 变长(5+) | [opcode, treg, type, defbranch, count, [(casereg, branch), ...]] | |
| J/JCC | 0x1d | 3或6 | [opcode, brtype, tbranch,[creg, ctype, fbranch]] | |
| CSEC | 0x1e | 7 | [opcode, ntype, creg, type, treg, freg, dreg] | |
| GEP | 0x28 | 变长(5+) | [opcode, dreg, none, type, count, breg, [index, ...]] | |
| LDR | 0x2a | 4 | [opcode, type, mreg, dreg] |
还原篇
虚拟机还原一共分两篇,还原到汇编大多数情况只要能够理解其中逻辑就已经足够了,还原到原生代码是将还原做到极致。直接还原汇编是最接近虚拟机指令的语言是最容易的也是最不容易出错的,同样它也是虚拟机指令的映射。
还原到汇编
解码的后的字节码还是一堆数据,为了方便理解数据需要将数据转成汇编代码方便阅读,对于虚拟机指令和原生架构相似度比较高的可以借用原生架构的汇编代码还原,对于一些虚拟机有自己指令集的,通常需要结合虚拟机指令集的特点自定义了一套与虚拟机语意相近的汇编语言,只要将字节码转成语义相近的汇编语言即可,这里的汇编语言参考了mips、risc-v、smali、Binary Ninja中间语言等一些语法。
操作数长度
通用寄存器和浮点寄存数量不固定寄存器 1位 8位 16位 32位 64位 通用寄存器 V0.b V1.b V2.h V3.d V4 浮点寄存器 H0(半精度) S0(单精度) D0(双精度) 操作数标识符说明
标识 说明 备注 op 主要操作码 op2 第二个操作码 dreg 目标寄存器 sreg 源寄存器 只有一个源寄存器时的命名 sreg1 第一个源寄存器 sreg2 第二个源寄存器 type 操作数的类型 表示操作数的长度和数据类型 stype 源操作数类型 dtype 目标操作类型 a1_type 第一个参数类型 只适用于ALLOC指令 a2_type 第二个参数类型 只适用于ALLOC指令 a1_sreg 第一个参数的寄存器 只适用于ALLOC指令 mreg 内存操作数的寄存器 内存访问指令STR/LDR creg 条件码寄存器 CMP指令 count 元素数量 PHI指令[val, lab]的数量、GEP表示[index]的数量、SWITCH表示case的元素数量 branch 分支 表未基本块的起始标签 ftype 函数类型 只适用于CALL指令, 类型中描述了函数的返回值、参数数量、参数类型 retreg 返回值寄存器 只适用于CALL指令, 保存函数的返回值的寄存器 ereg 调用目标寄存器 只适用于CALL指令, 保存了需要调用的目标地址。例如call 0x1234、call reg areg 参数寄存器 只适用于CALL指令 treg 用于比较的目标寄存器 只适用于SWITCH指令 defbranch 默认分支基本块标签 只适用于SWITCH指令 casereg SWITCH的case常量 只适用于SWITCH指令,casereg寄存器保存了case立即数 branch SWITCH的代码基本块标签 只适用于SWITCH指令 brtype 表示分支指令的类型 值0时无跳转指令,值1时有条件跳转 tbranch 真值分支 只用于J/JCC指令 fbranch 假值分支 只用于J/JCC指令 treg 真值寄存器 freg 假值寄存器 只用于CSEL指令 breg 基址寄存器 只用于GEP指令 index 元素索引寄存器 只用于GEP指令,index保存了访问元素成员的值 指令集
算术指令
助记符 语法 操作数格式 说明 XOR XOR V0, V1, V2 MOV dreg, sreg1, sreg2 SUB SUB V0.b, V1.b, V2.b MOV dreg, sreg1, sreg2 UDIV UDIV V0.h, V1.h, V2.h UDIV dreg, sreg1, sreg2 ADD ADD V0.d, V1.d, V2.d ADD dreg, sreg1, sreg2 OR OR V0, V1, V2 OR dreg, sreg1, sreg2 SMOD SMOD V0.b, V1.b, V2.b SMOD dreg, sreg1, sreg2 SDIV SDIV V0.h, V1.h, V2.h SDIV dreg, sreg1, sreg2 UMOD UMOD V0.d, V1.d, V2.d UMOD dreg, sreg1, sreg2 ASR ASR V0, V1, V2 ASR dreg, sreg1, sreg2 LSL LSL V0.b, V1.b, V2.b LSL dreg, sreg1, sreg2 MOV指令
助记符 语法 操作数格式 说明 MOV XOR V0, V1 MOV dreg, sreg 数据移动 MOV.T MOV.T V0, V1.b MOV.T dreg, sreg 将V1操作截断为8位移动到V0 MOV.Z MOV.Z V0, V1.d MOV.Z dreg, sreg 将32位操作数V1.d零扩展到64位操作数V0 MOV.S MOV.S V0, V1.d MOV.S dreg, sreg 将32位操作数V1.d带符号扩展到64位操作数V0 MOV指令辅助操作
操作符 描述 T 数据截断 Z 零拓展 S 符号拓展 CALLOC指令
内存分配指令,向堆申请内存
助记符 语法格式 操作数格式 说明 CALLOC CALLOC (0x1, 0x20), V21 CALLOC (num, size), RetVal 功能与libc中的calloc一致 内存访问指令
助记符 语法格式 操作数格式 说明 STR STR V0.b, [V3] STR dreg, [mreg] 与arm指令相同 LDR LDR V5, [V80] LDR dreg, [mreg] 与arm指令相同 比较指令
FCMP指令用到的很少暂不列入
助记符 语法格式 操作数格式 说明 CMP.EQ CMP.EQ V3.b, V0, V3 CMP.EQ creg, sreg1, sreg2 比较并将结果EQ条件码存入creg CMP.NE CMP.NE V3.b, V0, V3 CMP.NE creg, sreg1, sreg2 比较并将结果NE条件码存入creg CMP.CC CMP.CC V3.b, V0, V3 CMP.CC creg, sreg1, sreg2 比较并将结果CC条件码存入creg CMP.LT CMP.LT V3.b, V0, V3 CMP.LT creg, sreg1, sreg2 比较并将结果LT条件码存入creg 分支数据选择指令
指令说明:BSEL指令检查当前指令来自哪个前驱分支BranchIndex,将匹配到的分支中的reg赋值给dreg,通常它是循环的开始位置(循环第一条指令)类似for循环的init语句块和inc自增块。
详情参考llvm ir中的phi指令。
助记符 语法格式 操作数格式 说明 BSEL.PHI BSEL.PHI V8, [(V0, #0x3), ...] BSEL.PHI dreg, [(reg, branch), ...] ()是成对出现的,一般二对数据| 调用子程序指令
助记符 语法格式 操作数格式 说明 CALL CALL V3, [V0, V8, V21,...], V33 CALL dreg, [areg, areg,...], retreg 调用子程序,参数和返回值是可选的 分支指令
基本块的后继指令
助记符 语法格式 操作数格式 说明 RET RET V8 RET [retreg] 返回子程序, 返回值寄存器retreg是可选的 SWITCH SWITCH V3, #0x1234, [(V2, #0x5678)] SWITCH treg, #defbranch, [(reg, #branch), ...] 可以理解为c语言中的switch语句 J J 0x1234 J address 无条件跳转指令 JCC JCC<V8.b> 0x1234, 0x5678 JCC 有条件跳转,当条件码等于1时为真 条件选择指令
助记符 语法格式 操作数格式 说明 CSEL CSEL<V3.b> V6, V7, V9 CSEL arm64中的CSEL指令类似 取元素指针指令
GEP是getelementptr指令的缩写,详细可以llvm ir中的getelementptr指令
助记符 语法格式 操作数格式 说明 GEP GEP V2, V3, [V8, V9, V20] GEP dreg, breg,[index, ...]
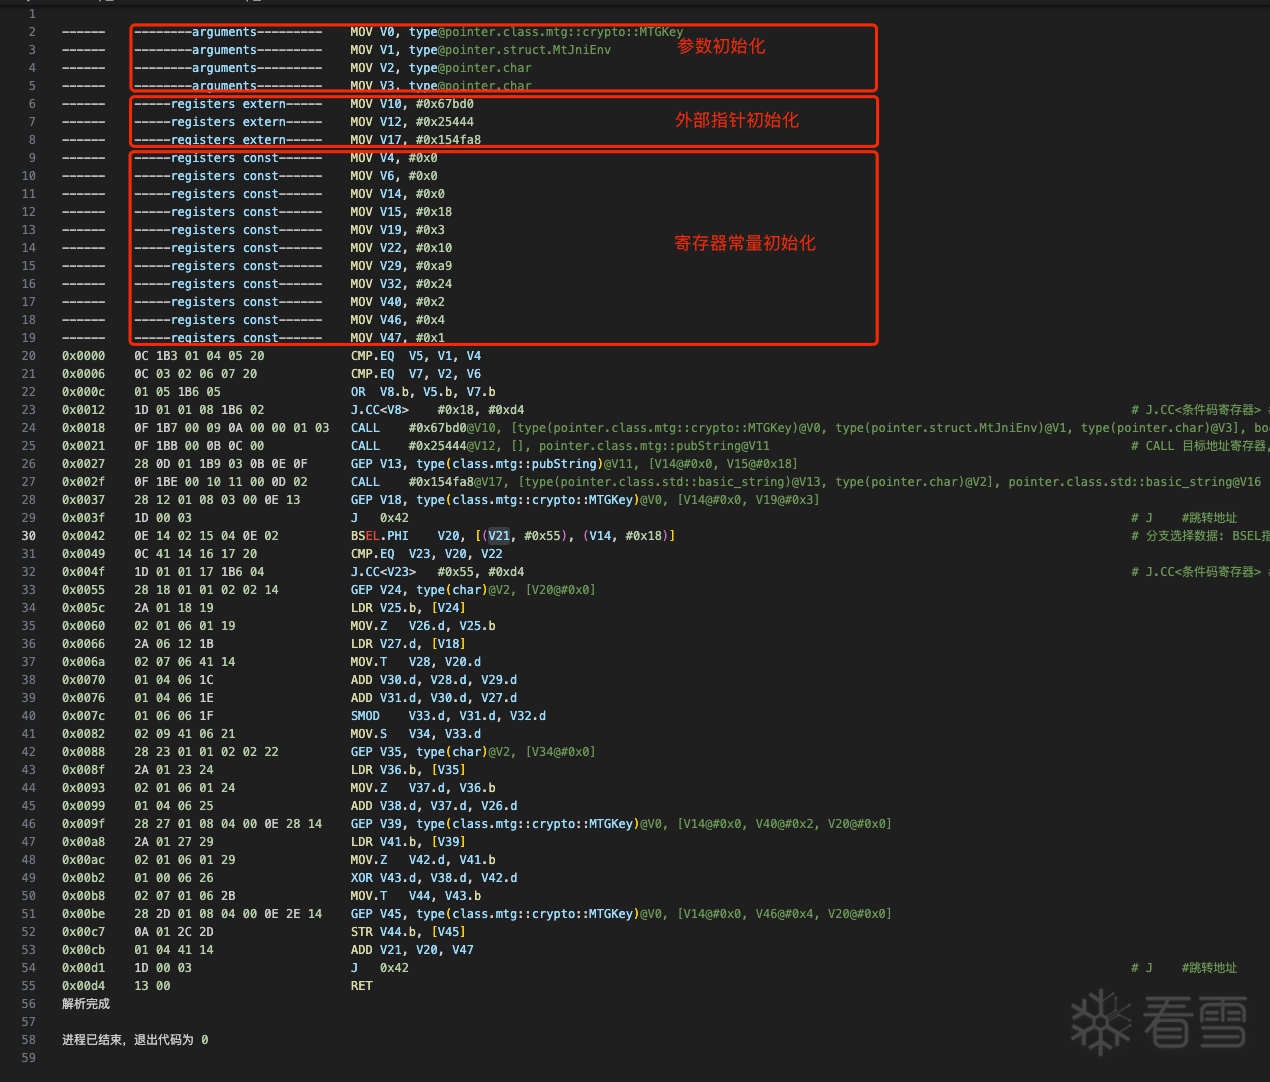
汇编
经过前面的自行设计的汇编代码和了解指令解码格式后,现在尝试解析指令数据将汇编指令打印出来,从代码中看出它并没有像传统的原生的汇编一样有堆栈指针寄存器,因为它是一个基于寄存器虚拟机。
还原到原生
目前还原到原生代码一共尝试了二种方案,第一种是将虚拟机指令构建到LLVM IR,再使用clang编译器编译.ll文件生成原生代码,目前来看这是最佳方案。第二种是构建反编译器的il中间语言还原到伪C代码,目前只是进行了初步尝试并没有写完,有兴趣的朋友可以进行尝试。
LLVMLIte
llvmlite实现了llvm ir大多数的功能对我来说还原已经足够用了,不喜欢的可以更换官方llvm或者其他的库。
安装:
1 | pip install llvmlite |
开源仓库:llvmlite
文档:llvmlite文档
构建LLVM IR
虚拟在初始化外部指针、寄存器常量赋值时寄存器的类型信息丢失,导致在后面构建IR时做了很多类型和数据长度的转换操作,在反汇编角度来说数据类型只要认1/2/4/8字节数据、指针等等就行,没有类型信息反而更好编写。
简单的IR操作基础知识:
还原的汇编有非常多的寄存器,不同的原生函数在被虚拟化后寄存器的数量还不一样,这些寄存器在阅读时可以当成变量来理解。在高级语言编码中定义一个变量完全不考虑寄存器的问题,因为编译器为我们自动分配了寄存器,同样IR语言中也不用考虑变量分配寄存器的问题。
定义变量:
C/C++定义一个局部变量是这样的,指定一个类型和变量名并未赋初值。
C/C++声明变量:
1 | int num; |
IR声明变量:
1 2 | t_int32 = ir.IntType(32)ptr_num = builder.alloca(t, name="num") |
高级语言中int num;编译器默认是在堆栈分配变量,而在IR中builder.alloca也是在堆栈分配变量,与高级语言不同的是返回值是一个指针int * ptr_num,想要把值拿出来使用必须使用builder.load把值取出来,这和高级语言中的指针取值运算类型*ptr_num类似。
加法运算:
c/c++;
1 2 3 | int a = 111;int b = 222;int c = a + b; |
IR:
1 2 3 4 5 6 7 8 9 10 11 12 13 | t = ir.IntType(32)# int a = 111;ptr_a = builder.alloca(t, name="a") # 定义变量a,返回一个堆栈的指针引用builder.store(ir.Constant(ir.IntType(32), 111), ptr_a)# int b = 222;ptr_b = builder.alloca(t, name="b") # 定义变量b,返回一个堆栈的指针引用builder.store(ir.Constant(ir.IntType(32), 111), ptr_b)# int c = a + b;a_value = builder.load(ptr_a) # 从堆栈中把变量a的值取出来b_value = builder.load(ptr_a) # 从堆栈中把变量a的值取出来result = builder.add(a_value, b_value) # 将a和b的值进行加法运算,返回的结果是一个值不是堆栈指针。ptr_c = builder.alloca(t, name="c") # 定义变量c,返回一个堆栈的指针引用builder.store(result, ptr_c) # c = a + b; |
简单的3行高级语言代码在IR中有不少行的逻辑,有点麻烦笨拙的感觉
数值扩展:
在IR中左值和右值类型或类型长度不至时是不能够直接参与运算的,需要进行转换后才能够使用。
c/c++:
1 2 | signed char c = 0xf8;signed int n = c; |
IR:
1 2 3 4 5 6 7 8 9 10 11 12 | t_i8 = ir.IntType(32)t_i32 = ir.IntType(32)# signed char c = 0xf8;ptr_c = builder.alloca(t_i8, name="c")builder.store(ir.Constant(ir.IntType(32), 0xf8), ptr_c)# signed int n = c;ptr_n = builder.alloca(t_i32, name="n")builder.store(ir.Constant(ir.IntType(32), 0xf8), ptr_n)sext_type = ir.IntType(32) # 定义一个需要扩展的目标类型intc_value = builder.load(ptr_c) # 从栈栈中取出c的值cast_value = builder.sext(c_value, sext_type) # 传入需要扩展的值和扩展的目标类型,注意返回值是值类型builder.store(cast_value, ptr_n) # 将转换后的值放入变量c |
定义函数:
想要向函数写入指令,首要声明函数类型并指定参数的类型和返回值类型,然后再定义函数对象,要知道函数对象承载了基本块对象而基本块承载了指令对象,只要向函数添加指令至少一个基本块之后才能向基本块写入指令,对于有多个基本块时要使用“指令指针”移动到该基本块,再向该基本块定入指令。
IR指令指针移动到向基本块的未尾:
1 | builder.position_at_end(curr_ir_basic_block) |
IR指令指针移动到向基本块的开始:
1 | builder.position_at_start(curr_ir_basic_block) |
常用的IR指令:
加减乘除:
1 2 3 4 5 | builder.add(lhs, rhs)builder.sub(lhs, rhs)builder.mul(lhs, rhs)builder.sdiv(lhs, rhs)builder.udiv(lhs, rhs) |
带符号取模操作:
1 2 | temp = builder.sdiv(lhs, rhs)result = builder.sub(lhs, builder.mul(temp, rhs)) |
指针类型之间的转换:
1 | builder.bitcast(ptr, target_type) |
整形转指针:
1 | builder.inttoptr(val, target_ptr_type) |
指针转整形:
1 | builder.ptrtoint(val, target_int_type) |
比较:
1 2 3 4 5 6 7 8 | builder.icmp_signed("==", lhs, rhs) # lhs和rhs是左值和右值,整形比较的不要使用堆批指针builder.icmp_signed("!=", lhs, rhs)builder.icmp_signed(">", lhs, rhs)builder.icmp_signed(">=", lhs, rhs)icmp_unsigned("==", lhs, rhs)icmp_unsigned("!=", lhs, rhs)icmp_unsigned("<", lhs, rhs)icmp_unsigned("<=", lhs, rhs)) |
无条件跳转:
1 | builder.branch(target_basic_block) |
有条件跳转:
1 | builder.cbranch(builder.load(ptr_cond), true_br, false_br) |
返回指令:
1 | builder.ret_void() |
1 2 | ret_val = builder.load(ptr_ret_val)builder.ret(ret_val) |
还原流程
我的还原方法不一定很好都多都是临时有想法加进去的,对IR非常熟悉的完全可以按照自己的想法去实现。
解码虚拟机指令字节数据
由于指令是不定变长的,这里把指令字节数据放到一张列表中,也方便在查找基本块时将指令加入到基本块中。
123vmState: VMState=BytecodeDecoder.build_vmp_state(filename, offset, size, extern_list)instructions=vmState.deocde_instruction()创建基本块
这里的基本块是还原后的虚拟机基本块,基本块的终止符指令有:ret、switch、j、jcc指令,从第一条指令开始扫描这些指令,并记录下这些指令的真假和多路跳转目标地址,这些跳转地址是基本块的起始地址,当遇到终止符指令结束基本块并把基本块的信息保存到基本块列表中。
123456789101112131415161718192021222324252627282930313233343536373839404142434445464748495051525354555657585960defget_jump_targets(insn):jump_targets=[]match insn[0]:case0x16:# switchopcode, treg,type, defbranch, element_count, switch_branches=insn# [deftar, casetar, casetar, ...]jump_targets.append(defbranch)jump_targets.extend(switch_branches)case0x1d:# jcctruebr=insn[2]jump_targets.append(truebr)returnjump_targetsdefis_successors_insn(insn):match insn[0]:# 指令的opcodecase0x13|0x16|0x1d:# ret: 0x13 | switch: 0x16 | jmp/jcc: 0x1dreturnTruecase _:returnFalsedeffind_basic_blocks(instructions):"""识别基本块"""jump_targets=set()basic_blocks=[]current_block=[]# 先找出所有跳转目标forinsnininstructions:targets=get_jump_targets(insn)iftargets:jump_targets.update(targets)pc=start=end=0forinsnininstructions:insn_len=get_insn_length(insn)print(f"{pc:#x}, {insn_len}")# 如果当前指令是跳转目标,开始新块ifpcinjump_targetsandcurrent_block:basic_block_info={"start_hex": f"{start:#x}","end_hex": f"{pc + insn_len:#x}","start": start,"end": pc+insn_len,"basic_block": current_block}basic_blocks.append(basic_block_info)current_block=[]start=pc+insn_lenprint(f"{'-' * 50}")current_block.append(insn)# 检查是否是基本块终止指令ifis_successors_insn(insn):basic_block_info={"start_hex": f"{start:#x}","end_hex": f"{pc + insn_len:#x}","start": start,"end": pc+insn_len,"basic_block": current_block}basic_blocks.append(basic_block_info)current_block=[]start=pc+insn_lenprint(f"{'-' * 50}")end+=insn_lenpc+=insn_len# 添加最后一个块(如果有)ifcurrent_block:basic_block_info={"start_hex": f"{start:#x}","end_hex": f"{pc + len(insn):#x}","start": start,"end": pc+len(insn),"basic_block": current_block}basic_blocks.append(basic_block_info)returnbasic_blocks初始化模块
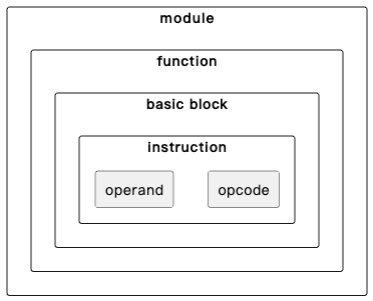
创建IR模块并初始化一些基本参数,一个模块包含多个函数,一个函数包含多个基本块,一个基本块包含多条指令,而指令中包含操作码和一个或多个操作数。IR模块是一个顶级模块,只要有模块对象就可以拿任何想要的数据。
创建模块并设置要编译的架构和目标平台:12module=ir.Module(f"{filename}_{size:#x}_{extern_list:#x}")module.triple="aarch64-unknown-linux-gnu"# 目标架构为linux aarch64声明外部函数声明
告诉它函数中会调用calloc需要调用,从dump的汇编代码来看,CALLOC的申请的内存大小基本上都小于0x100,其实对于比较小的数据可以把CALLOC的内存转移到堆栈中,我并没有这么做原因太懒了写完还要去验证代码。
123size=0xa8t_array=ir.ArrayType(ir.IntType(8), size)buffer=builder.alloca(t_array, name="buffer")声明一个函数类型填好参数和返回值的类型,然后创建一个函数对象指令外部符号名称"calloc"。
123456defdeclare_external_calloc(module: ir.Module):declare_calloc=ir.FunctionType(ir.PointerType(ir.IntType(8)), [ir.IntType(32), ir.IntType(32)])fn_calloc=ir.Function(module, declare_calloc,"calloc")fn_calloc.args[0].name="num"fn_calloc.args[1].name="size"returnfn_calloc定义一个入口函数
虚拟机所有的指令将会使用IR接口向函数写入指令。
123456789defini_entry_function(vmState: VMState, module: ir.Module, alloca_regs:dict):entry_func_define=create_type(vmState.entry_function)entry_func=ir.Function(module, entry_func_define,"entry_func")foriinrange(vmState.entry_function.argumentCount):name="A"+str(i)entry_func.args[i].name=namealloca_regs[name]=entry_func.args[i]# entry_func.append_basic_block("entry")returnentry_func为入口函数创建所有的基本块
调用func.append_basic_block为函数添加基本块,此时所有的基本块还未写入指令,因此它们是空的。
123defcreate_all_basic_blocks(func: ir.Function, basic_blocks):forbbinbasic_blocks:func.append_basic_block(f"bb_{bb["start"]:x}")在create_all_basic_blocks函数返回后,在调试控制台输入print(entry_func)回车后打印该函数已经写入的所有IR信息。
1234567definevoid@"entry_func"(i8* %"A0", i32 %"A1", i8* %"A2"){bb_0:bb_32d:bb_340:bb_342:}为模块创建一个IR构建器
在函数添加一个新的基本块func.append_basic_block()时,基本块对象成员中会有与之关联的上层的函数对象:parent,同样函数对象成员会一个上层的模块对象,因此创建IR构建器参数是一个基本块,很容易就可以关联到为模块创建一个构建器。
1builder=ir.IRBuilder(entry_func.blocks[0])初始化外部指针
在上面一章还原的汇编代码中会将外部的指针设置到寄存器中,因此要为这些变量(虚拟寄存器)设置初值。之前有提到过
外部地址和初始化寄存这二个步骤是没有类型信息的,这里暂时设置类型为32位的整形常量。
1234defset_extern_regs(vmState: VMState, builder: ir.IRBuilder, alloca_regs):foriinrange(0,len(vmState.extern.targetRegs)):v=get_register_ptr(alloca_regs, builder, vmState.extern.targetRegs[i], ir.IntType(32))builder.store(ir.Constant(ir.IntType(32), vmState.extern.externalAddress[i]), v)初始化寄存器
为寄存器设置初始化值,这个初始化的值是一个常量,常量在后面指令执行时到结束都不会改变寄存器的值。前面说过这里常量来自未加密前原生汇编中的常量例如: MOV X3, #0x88,#0x88就是一个常量它的值是不会发生改变的,生成虚拟化代码后可能就是MOV V20, #0x88,初始化寄存不止有MOV指令还有会其他指令对目标寄存进行初始化。
目前只添加了遇到的指令:
123456789101112131415161718192021222324252627282930313233343536defset_inial_regs(vmState: VMState, builder: ir.IRBuilder, alloca_regs):inial=vmState.inialtypes=vmState.typesforiinrange(0,len(inial.opcodes)):match inial.opcodes[i]:case0|0xb|0x17:ptr_breg=get_register_ptr(alloca_regs, builder, inial.sRegs[i])ifisinstance(ptr_breg, ir.Argument):val_breg=ptr_bregelse:t=types[inial.type[i]]ift.tag !=0xf:ir_type=ir.PointerType(create_type(t))else:ir_type=create_type(t)val_breg=builder.bitcast(ptr_breg, ir_type)index_table=[]foridxininial.imm[i]:index_table.append(ir.Constant(ir.IntType(32), idx))ele_ptr=builder.gep(val_breg, index_table)builder.store(ele_ptr, get_register_ptr(alloca_regs, builder, inial.dRegs[i], ele_ptr.type))case7:v=get_register_ptr(alloca_regs, builder, inial.dRegs[i], ir.IntType(32))builder.store(ir.Constant(ir.IntType(32), inial.imm[i]), v)case8:t=types[inial.type[i]]ift.tag !=0xe:v=get_register_ptr(alloca_regs, builder, inial.dRegs[i], ir.IntType(32))builder.store(ir.Constant(ir.IntType(32),0), v)else:raiseException("error")case0x15:print(f"{'-' * 6:<} {'-' * 5}registers const{'-' * 6} MOV\tV{inial.dRegs[i]}.T@{Decoder.get_type_annotation(types[inial.type[i]])}, V{inial.sRegs[i]}")case _:raiseException("error")预分配
这个是为了生成的代码好看,先让IR代码开始的位置分配堆栈变量先把堆栈坑给占了,编译器编译后自动计算这个坑的内存大小,例如:sub sp, sp, #0x240,#0x240就大小就是编译器在生成的函数时就为我们计算出的坑大小。如果不在函数开头不预分配会发生什么样的情况呢,在代码生成的中间部分会临时修改堆栈的指针分配堆栈的内存,这个频率会非常的多,这会大大降低了汇编代码的可读性,尽管反编译器生成伪C代码的优化会把它掉,后面的章节会有校验虚拟机汇编和生成的原生汇编逻辑是否一致,通过对比来验证我们生成IR代码是否有问题。
遍历虚拟机指令先把指令中的目标寄存先分配了:1234567891011121314151617181920212223242526272829303132333435363738394041424344454647484950515253545556575859606162636465666768697071727374757677787980818283848586878889defget_register_ptr(alloca_regs, builder: ir.IRBuilder, reg, t: ir.Type=ir.IntType(64)):name=f"V{reg}"arg_name=f"A{reg}"ifalloca_regs.get(arg_name,None)isNone:ifalloca_regs.get(name,None)isNone:alloca_regs[name]=builder.alloca(t, name=name)# 这分配堆栈变量returnalloca_regs[name]else:returnalloca_regs[arg_name]defpreallocation_registers(basic_blocks, types:list[Type], alloca_regs, builder, vmState: VMState):pc=0forbbinbasic_blocks:forinsninbb["basic_block"]:print(f"prealloc regs addr: {pc:#x}")opcode=insn[0]match (opcode):case0x1:# ARITHt=types[insn[2]]sreg1=insn[3]sreg2=insn[4]dreg=insn[5]get_register_ptr(alloca_regs, builder, dreg, create_type(t))case0x2:# MOVop2=insn[1]dtype=types[insn[2]]stype=types[insn[3]]sreg=insn[4]dreg=insn[5]match op2:case0|5|0xA|0xC:get_register_ptr(alloca_regs, builder, dreg, create_type(stype))case _:get_register_ptr(alloca_regs, builder, dreg, create_type(dtype))case0x6:# CALLOCa2_type=types[insn[1]]a1_type=types[insn[2]]sreg=insn[3]dreg=insn[4]t2_type=create_type(a2_type)get_register_ptr(alloca_regs, builder, dreg, ir.PointerType(t2_type))# get_register_ptr(alloca_regs, builder, dreg, t2_type)case0xa:# STRtype=types[insn[1]]sreg=insn[2]mreg=insn[3]# get_register_ptr(alloca_regs, builder, sreg, create_type(type))get_register_ptr(alloca_regs, builder, mreg, create_type(PointerType(type)))case0xc:# CMPdreg=insn[4]get_register_ptr(alloca_regs, builder, dreg, ir.IntType(1))# case 0xe: # BSEL.PHIcase0xf:# CALLfunc_define: FunctionType=types[insn[1]]iffunc_define.returnValueType.tag !=0:ret_reg=insn[3]t_ret_val=create_type(func_define.returnValueType)get_register_ptr(alloca_regs, builder, ret_reg, t_ret_val)case0x13:# RETret_type=types[insn[1]]ifret_type.tag !=0:ret_reg=insn[2]get_register_ptr(alloca_regs, builder, ret_reg, create_type(ret_type))case0x16:# SWITCHraiseException("not implemented")case0x1d:# JCCcond=insn[1]jmpTrue=insn[2]ifcond !=0:flagReg=insn[3]t=types[insn[4]]get_register_ptr(alloca_regs, builder, flagReg, create_type(t))case0x1e:# CSELdreg=insn[6]type=types[insn[3]]get_register_ptr(alloca_regs, builder, dreg, create_type(type))case0x28:# GEPdreg=insn[1]t=types[insn[3]]# for idx in insn[6]:# if not vmState.is_static_reg(idx):# ptr_reg = get_register_ptr(alloca_regs, builder, idx)# gep_idx = builder.load(ptr_reg)# get_register_ptr(alloca_regs, builder, dreg, create_type(t))case0x2a:# LDRt=types[insn[1]]dreg=insn[3]get_register_ptr(alloca_regs, builder, dreg, create_type(t))pc+=get_insn_length(insn)获取虚拟机指令中的所有PHI指令和PHI参数信息
从所有基本块一个一个查找PHI指令,找到后先把PHI的result值在堆栈中先分配占坑预分配堆栈,然后从phi指令参 数中取出前驱基本块和前驱基本块对应的值。1234567891011121314151617181920212223defget_phi_nodes(state: VMState, alloca_regs, builder: ir.IRBuilder, func: ir.Function, basic_blocks, ):phi_nodes=[]forbbinbasic_blocks:bb_name=f"bb_{bb["start"]:x}"ir_basic_block=get_ir_basic_block_by_name(func, bb_name)forinsninbb["basic_block"]:match insn[0]:case0xe:# 初始化phi结果(目标)寄存器phi_store_reg=insn[1]builder.store(ir.Constant(ir.IntType(64),0), get_register_ptr(alloca_regs, builder, phi_store_reg, ir.IntType(64)))# 获取phi信息phi_node_info=[]fornodeininsn[3]:val=node[0]ifnotstate.is_static_reg(val):# 当值是变量寄存器则分配一个堆栈变量并赋值为0ptr_val=get_register_ptr(alloca_regs, builder, val, ir.IntType(64))builder.store(ir.Constant(ir.IntType(64),0), ptr_val)ir_bb=get_basic_block(func, node[1])phi_node_info.append([val, ir_bb])phi_nodes.append({"phi_basic_block": ir_basic_block,"phi_store_reg": phi_store_reg,"phi_node_info": phi_node_info})returnphi_nodes为所有基本块中的指令添加IR指令
经过前面所有的准备步骤后,终于可以添加IR指令了,前面说过了要添加指令必须要让builder的指令指向基本块的一个位置,在基本块迭代的开头位置首先指定要写入指令的基本块。
基本块经过前面的寄存器初始化后已经写入了一些指令了,现在要指令指针移动到基本块的尾部builder.position_at_end(curr_ir_basic_block)。1234forbbinbasic_blocks:bb_name=f"bb_{bb["start"]:x}"curr_ir_basic_block=get_ir_basic_block_by_name(entry_func, bb_name)# 当前指令所在的基本块builder.position_at_end(curr_ir_basic_block)从基本块中取出指令开始遍历虚拟机指令生成IR代码,为了方面阅读下面只是框架的部分代码:
123456789101112131415161718192021222324252627282930313233343536373839404142434445464748495051525354555657585960616263646566676869707172737475767778798081828384858687888990919293949596979899100101102103104105106107108109110111112113114115116117118119120121122123124125126127128129130131132133forbbinbasic_blocks:bb_name=f"bb_{bb["start"]:x}"curr_ir_basic_block=get_ir_basic_block_by_name(entry_func, bb_name)# 当前指令所在的基本块builder.position_at_end(curr_ir_basic_block)# 构建器指针移动到新的基本块未尾forinsninbb["basic_block"]:print(f"addr: {pc:#x}")opcode=insn[0]match (opcode):case0x1:# ARITHop2=insn[1]t=types[insn[2]]sreg1=insn[3]sreg2=insn[4]dreg=insn[5]match op2:case0:# XOR# TODO IRcase0x1:# SUB# TODO IRcase0x2:# LSR# TODO IRcase0x3:# UDIV# TODO IRcase0x4:# ADD# TODO IRcase0x5:# OR# TODO IRcase0x6:# SMOD# TODO IRcase0x7:# SIDV# TODO IRcase0x8:# UMODcase0xA:# ASR# TODO IRcase0xC:# LSL# TODO IRcase _:# TODO Handler Not Implcase0x2:# MOVop2=insn[1]dtype=types[insn[2]]stype=types[insn[3]]sreg=insn[4]dreg=insn[5]match op2:case0|5|0xA|0xC:# 保持两个操作操作数类型一致性# TODO IR MOV dreg, sregcase0x1:# 扩展# TODO IR MOV dreg, sreg.8case0x7:# 截取# TODO IR MOV dreg.d, sreg.8case0x9:# TODO IRcase _:# TODO Handler Not Implcase0x6:# CALLOCa2_type=types[insn[1]]a1_type=types[insn[2]]sreg=insn[3]dreg=insn[4]# TODO call calloc(num, size)case0xa:# STRtype=types[insn[1]]sreg=insn[2]mreg=insn[3]# TODO STR sreg, [mreg]case0xc:# CMPt=types[insn[1]]reg1=insn[2]reg2=insn[3]dreg=insn[4]op2=insn[5]match op2:case0x20:# CMP_EQ# TODOcase0x21:# CMQ_NEraiseException(f"CMP.NE not impl")case0x24:# CMP_CCraiseException(f"CMP.CC not impl")case0x28:# CMP_LTraiseException(f"CMP.LT not impl")case _:input(f"未识别的CMP指令op2={op2:#x}")case0xe:# BSEL.PHIphi_basic_blocks.append(curr_ir_basic_block)# 记录phi指令所在的基本块case0xf:# CALL# TODOcase0x13:# RETret_type=types[insn[1]]ifret_type.tag==0:# TODO 没有返回值时else:# TODO 有返回值时case0x16:# SWITCHraiseException("not implemented")case0x1d:# JCC# ------ 查找当前节点是否PHI中的参数前驱节点 ------# 到了终止符指令了,在写入终止符前遍历PHI节点的前驱节点参数label是否在当前基本块,如果找到则# 1.保存当前基本块信息,# 2. 并取出PHI参数节点变量# ------ 然后才开始处理跳转指令 ------cond=insn[1]jmpTrue=insn[2]ifcond==0:# jmp# TODO IR 连接后续基本块else:# j.condflagReg=insn[3]t=types[insn[4]]jmpFalse=insn[5]# TODO IR 连接真和假块case0x1e:# CSELntype=insn[pc+1]ifntype.tag==0x10:raiseException("error")creg=insn[pc+2]type=insn[pc+3]treg=insn[pc+4]freg=insn[pc+5]dreg=insn[pc+6]# TODO IRcase0x28:# GEPdreg=insn[pc+1]none=insn[pc+2]type=insn[pc+3]count=insn[pc+4]breg=insn[pc+5]# TODO IRcase0x2a:# LDRtype=insn[pc+1]mreg=insn[pc+2]dreg=insn[pc+3]# TODO IR在写入完所有指令后开始处理PHI指令,PHI指令必须是基本块的第一条指令位置,因此将IR指令指针移动到基本块最前方的位置,然后再添加PHI组合参数(变量,基本块<label>),最后保存PHI结果变量。
量。123456789101112# 最后处理phi指令ifphi_basic_blocks:forbbinphi_basic_blocks:forphi_nodeinphi_nodes:ifphi_node["phi_basic_block"]==bb:builder.position_at_start(bb)# 基本块的最前面插入phi指令phi=builder.phi(int64_type, f"phi_var_{bb.name}")fornodeinphi_node["phi_node_info"]:val=node[0]phi.add_incoming(val, node[1])dreg_ptr=get_register_ptr(alloca_regs, builder, phi_node["phi_store_reg"], int64_type)builder.store(phi, dreg_ptr)最后打印IR保存:
1print(module)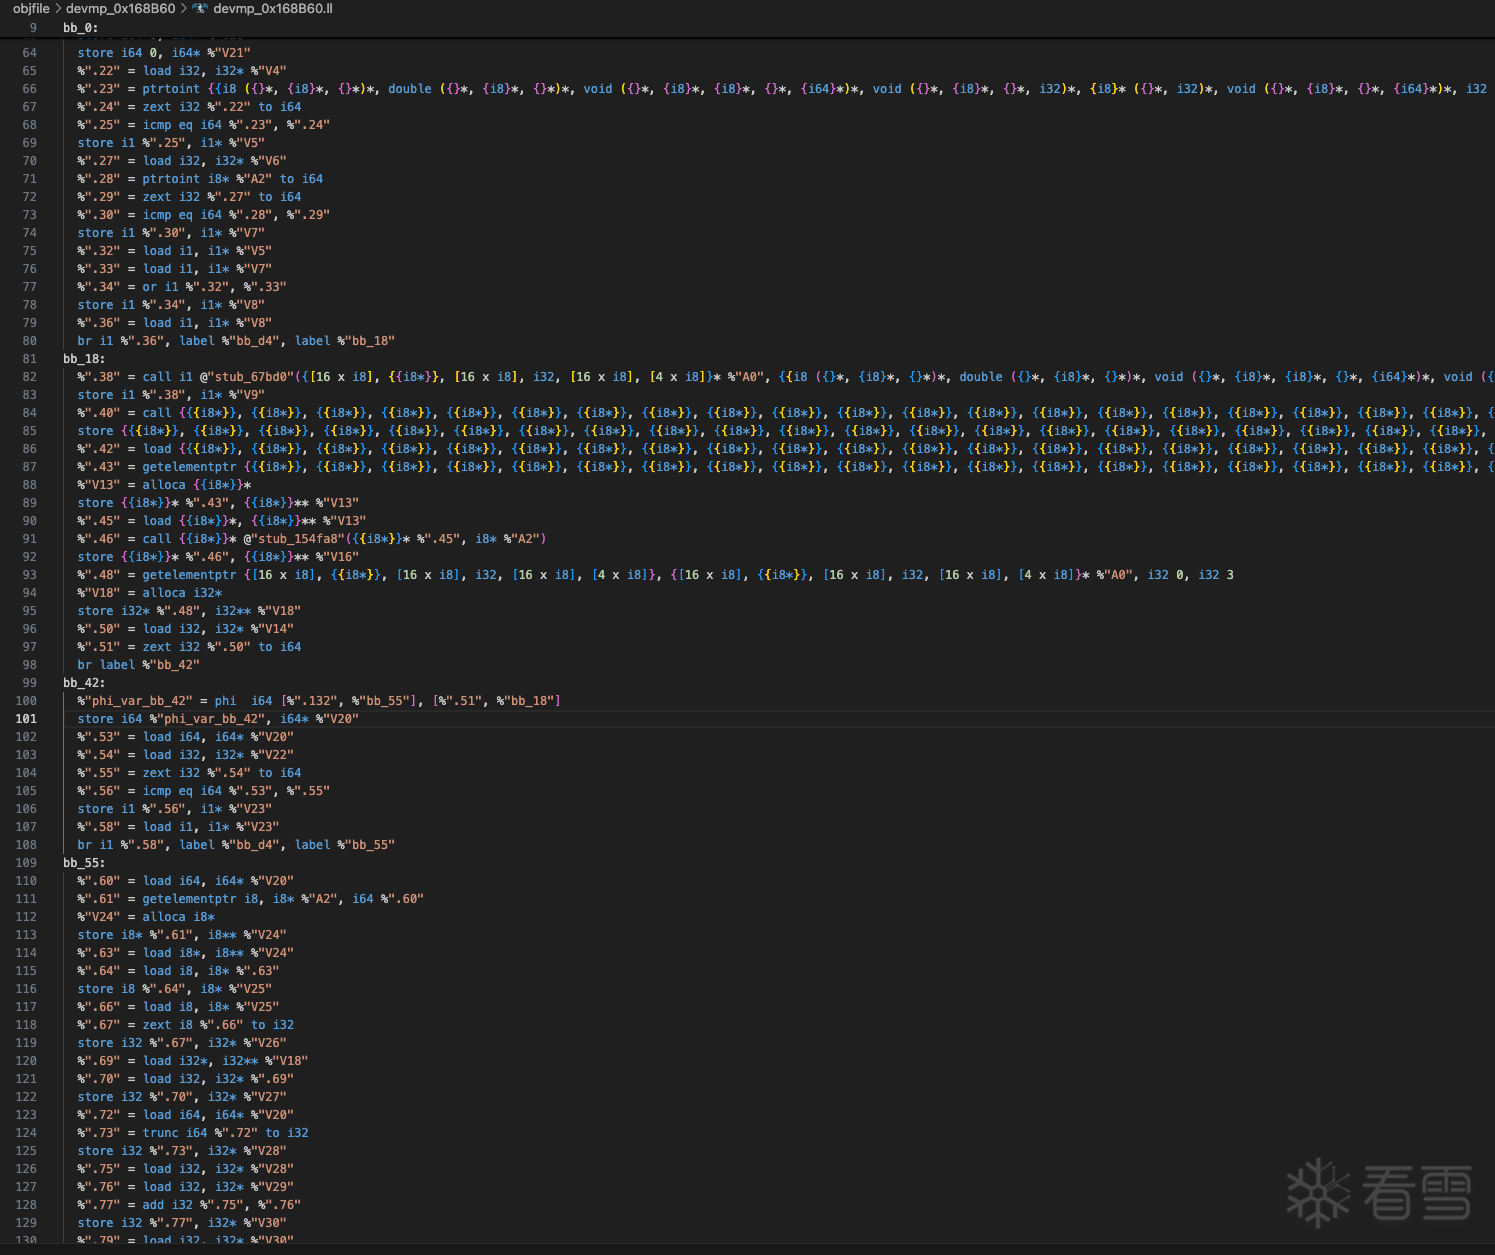
编译IR
为了验证编译IR生成的原生代码编译不被编译器优化删减,添加参数禁用优化-O0,没有定义main函数编译为动态库:-shared。
clang -O0 -shared devmp_0x168B60.ll -o devmp_0x168B60_O0.o
反汇编校对逻辑
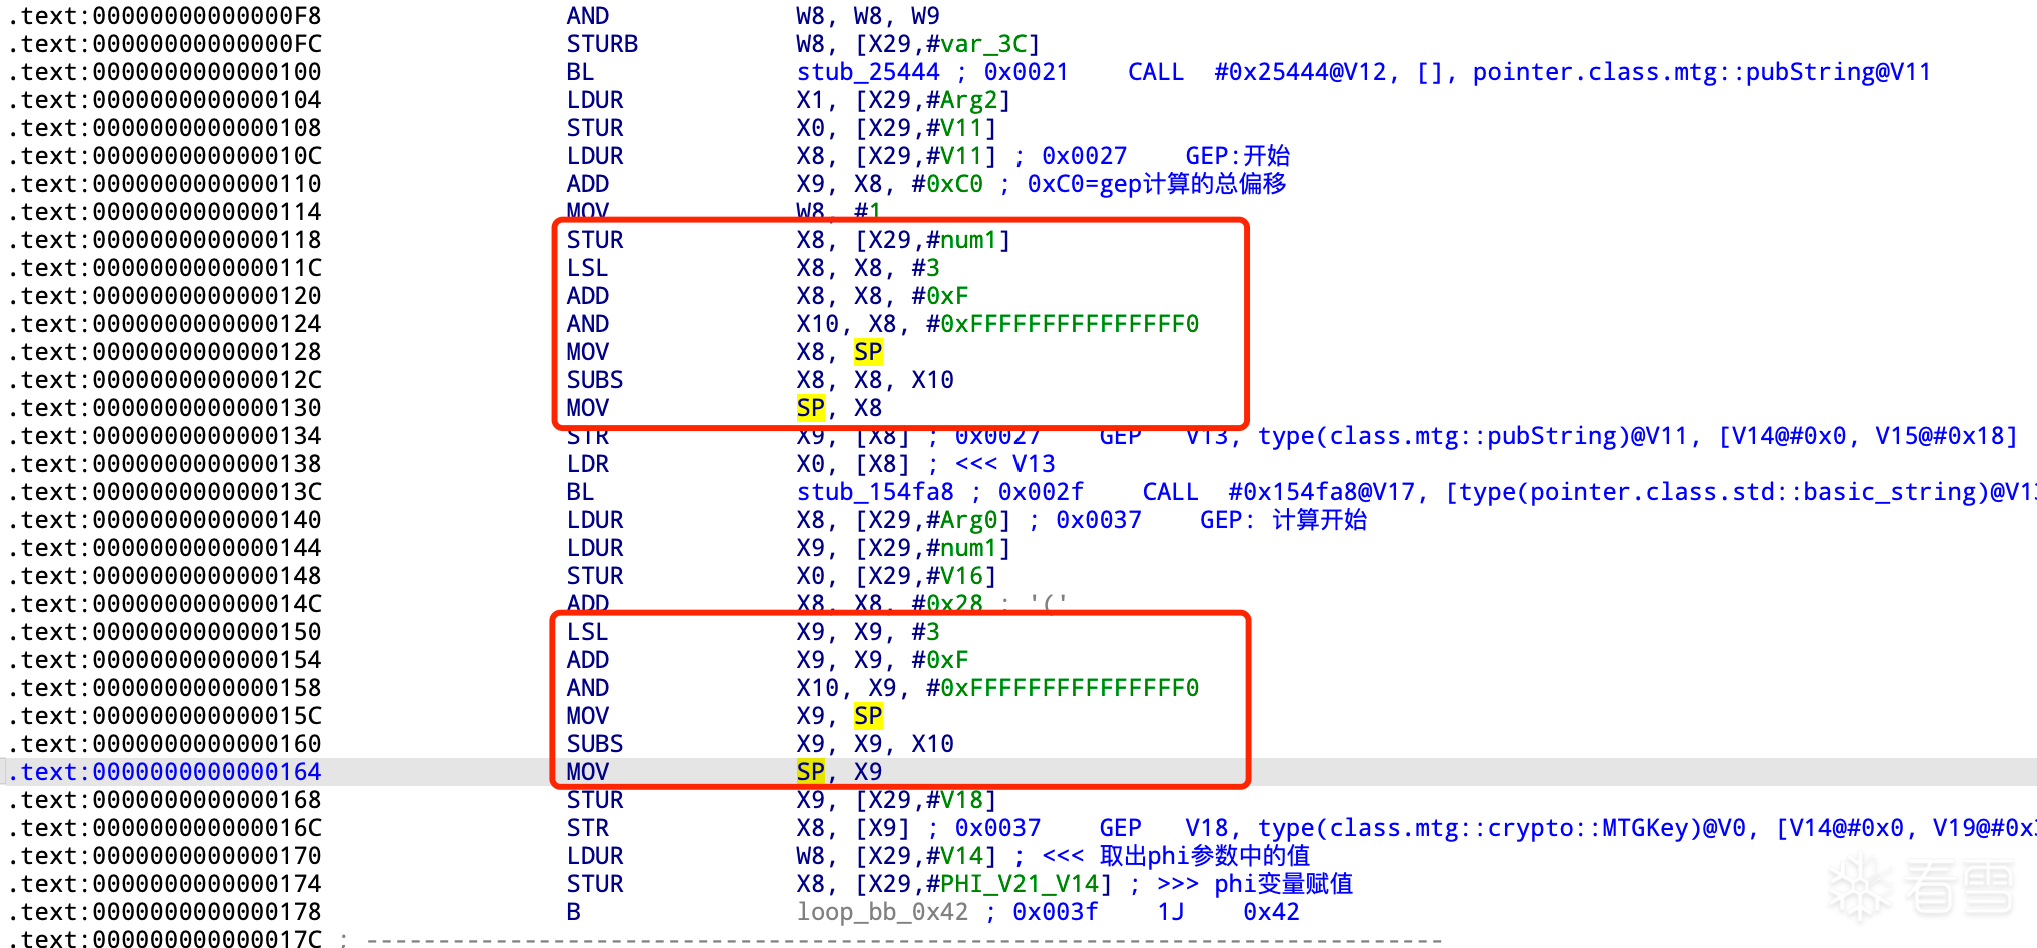
IDA PRO载入devmp_0x168B60_O0.o,查看还原的原生代码和虚拟机汇编逻辑是否一致。

禁用优化的伪C代码
优化编译
优化参数调整为O1生成目标代码
1 | clang -O1 -shared devmp_0x168B60.ll -o devmp_0x168B60_O0.o |
打开优化查看原生汇编,发现代码被精减了好多。
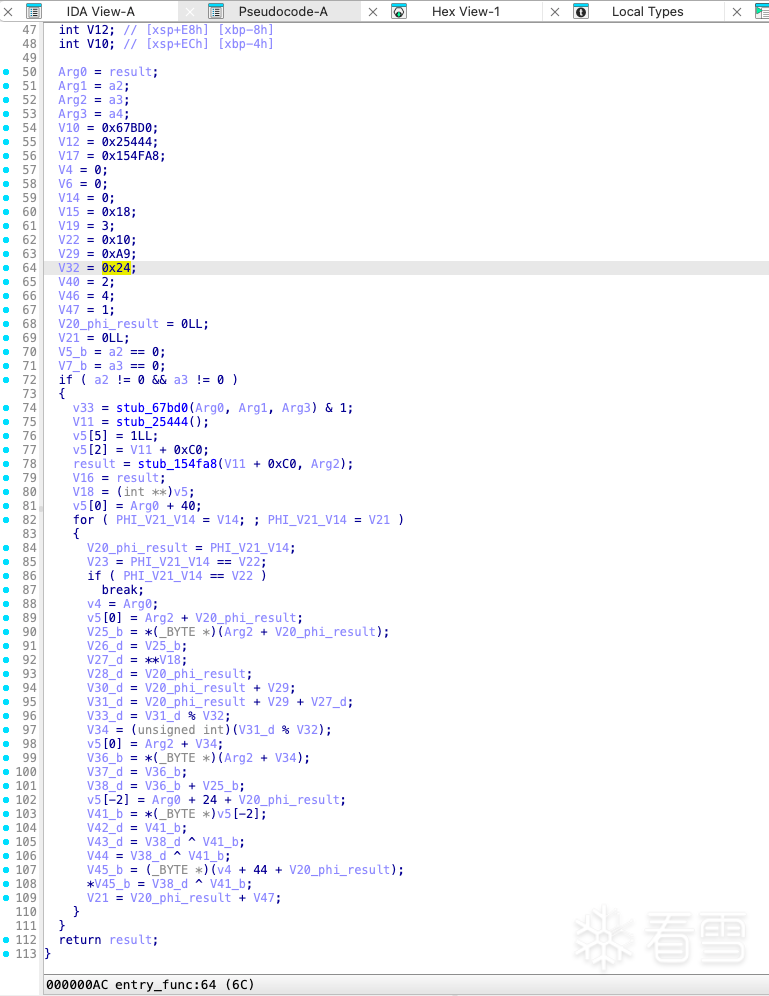
F5查看优化编译后的伪C代码逻辑清晰了。
构建Binary Ninja IL
但它不乏也是一种还原思路,目前做了尝试使用Binary Ninja构建IL进行还原只做了少部分几条指令没有时间做下去了,从还原的几条指令效果来看,这个方法是行得通的,但没有还原到llvm IR效果那么好,llvm编译器优化做的非常到位,甚至有的时候能够将非常多的指令精简到难以想像的结果,精简后代码量少了非常方便于进行阅读分析指令。有兴趣的可以参考附加的文件DecodeBNIL.py
虚拟机和llvm bitcode虚拟机
IR中有一个指令getelementprt和虚拟机中的一条指令逻辑非常像,之前这条指令名叫ADD.MO,MO是member offset的简写,查找llvm相关代码发现虚拟机和llvm bitcode有非常大的关系,发现bitcode中的指令、字节码的解析、解释器等等两者的逻辑和虚拟机非常的相似,想必大家已经猜了它是由什么改造而来的吧,文章写到止已经非常庞大了不做过多介绍了,有兴趣的可以阅读llvm bitcode的相关代码。
总结
判断是否虚拟机
单从cfg控制流图中是否很难判断出来,目前我没有快速的方法去判断,虚拟机保护的目的是隐藏真实的代码执行,如果想要确定虚拟机或混淆或者还是混淆中包含虚拟机,在确定是否虚拟机之前要提前了解混淆的原理和特征去排除纯混淆代码。
虚拟机在执行时有取指、解码、执行的handler三个步骤,三个步骤之间有时还会有switch分发表的连接(刻意隐藏的除外),一个完整的虚拟机保护handler会有完整的指令集模拟支持,这意味着hanler数量会非常的多:数据移动MOV类、算术运算加减乘除、逻辑运算与或非取反、调用子程序(外部函数)、内存访问等等,执行完handler会返回到取指令的位置,根据虚拟机的一些特性去综合判断,通常都是要分析一部分代码的逻辑才能确认,如果发现此类指令的模拟基本上可以确认是虚拟机了。总之来说需要分析经验的积累,简单的可能需要1-3天,复杂的可以要1-3周才能确定。关于分析时间
很多人都喜欢问这个分析了多久,的确这是一个非常重要的时间考量。对于简单的虚拟机分析在1-2周的工作日,国内大厂的一般在2-4周工作日左右,还有一些国外的世界级国际大厂,对于国际大厂他们做的非常好强度是非常高的则需要时间2-4个月,按这个时间成本来算的话已经达到了强不可催的目的了。
之前的短视频虚拟分析和还原脚本大约3.5周的工作日时间,合计18天左右,另外加上写文章1.5周的工作日,总耗时约5周的工作日,文中分析的so是一个未经混淆并且字节码未加密的虚拟机,实际上在其他位置so中的虚拟机是一套东西,只不过混淆有所加强字节码被加密了,分析难度虽说有加强但也不是非常大。
此app的虚拟机分析和汇编还原脚本合计总耗时大约4周的工作日,IR编写大约1.5周的工作日,总耗时接近6周。
关于还原的理论
对于任何虚拟机指令接近原生指令的可以借用原生汇编指令还原到汇编,而对于虚拟机拥有自定义指令集的,理论来说都可以先还原到中间语言然后再还原到原生汇编。
更多【Android安全-用魔法打败魔法:互联网大厂虚拟机分析还原】相关视频教程:www.yxfzedu.com
相关文章推荐
- CTF对抗-Realworld CTF 2023 ChatUWU 详解 - Android安全CTF对抗IOS安全
- Android安全-frida源码编译详解 - Android安全CTF对抗IOS安全
- 软件逆向- PE格式:新建节并插入代码 - Android安全CTF对抗IOS安全
- 加壳脱壳- UPX源码学习和简单修改 - Android安全CTF对抗IOS安全
- 二进制漏洞-win越界写漏洞分析 CVE-2020-1054 - Android安全CTF对抗IOS安全
- Pwn-2022长城杯决赛pwn - Android安全CTF对抗IOS安全
- 软件逆向-Wibu Codemeter 7.3学习笔记——Codemeter服务端 - Android安全CTF对抗IOS安全
- Pwn-沙箱逃逸之google ctf 2019 Monochromatic writeup - Android安全CTF对抗IOS安全
- 软件逆向-Wibu Codemeter 7.3学习笔记——AxProtector壳初探 - Android安全CTF对抗IOS安全
- 企业安全-学习Kubernetes笔记——暴露站点服务(Ingress) - Android安全CTF对抗IOS安全
- 企业安全-学习Kubernetes笔记——部署数据库站点(MySql) - Android安全CTF对抗IOS安全
- 企业安全-学习Kubernetes笔记——部署web站点环境(PHP+Nginx) - Android安全CTF对抗IOS安全
- 企业安全-学习Kubernetes笔记——安装NFS驱动 - Android安全CTF对抗IOS安全
- 企业安全-学习Kubernetes笔记——kubeadm安装Kubernetes - Android安全CTF对抗IOS安全
- 软件逆向-wibu软授权(四) - Android安全CTF对抗IOS安全
- 软件逆向-使用IDAPython开发复制RVA的插件 - Android安全CTF对抗IOS安全
- 2-wibu软授权(三) - Android安全CTF对抗IOS安全
- 软件逆向-wibu软授权(二) - Android安全CTF对抗IOS安全
- 软件逆向-wibu软授权(一) - Android安全CTF对抗IOS安全
- 软件逆向- PE格式:分析IatHook并实现 - Android安全CTF对抗IOS安全
2):严禁色情、血腥、暴力
3):严禁发布任何形式的广告贴
4):严禁发表关于中国的政治类话题
5):严格遵守中国互联网法律法规
6):有侵权,疑问可发邮件至service@yxfzedu.com