VsCode配置Wdk7600开发环境 以及 "自动编译" 和 sources文件简单介绍..
推荐 原创VsCode配置Wdk7600开发环境 以及 "自动编译" 和 sources文件简单介绍..
一丶 简介
虽然Wdk7600已经过时,但还是有很多项目是使用Wdk7600编写的. 而很多老项目配置环境有很多种方式. 如配置在visual studio 中编写. 配置在 notepad++中编写. 搜索全网也没看到有VsCode配置的方式. 索性这里就写一下.
注意: 不讨论文章技术.对你有用你就看,对你无用就无需看. 且 不要站在现在很多人都用Vs2019 vs2022的IDE去写项目的角度去看. 个人写代码用什么IDE都可以. Vs2019也不错.也很推荐.
但本文章也主要讲解WDK7600的配置. 很多企业人员有很多项目为了稳定不会贸然升级驱动. 所以WDK7600用的还是蛮多.
1.2 软件安装
如果配置此环境请下好以下软件.
1.WDK7600(在官网中表示为
wdk 7.1.0)2.VsCode
3.VsCode中的C++插件
请将 Wdk7600 安装到默认目录 等熟悉后可以将其修改为你自定义的目录. 或者先通读此片文章之后再进行配置.
1.3 开发环境配置步骤
1.添加路径包含项
点击设置-设置里面搜索
System include然后在里面添加项.
|
1
2
3
|
C:\WinDDK\
7600.16385
.
1
\inc\crt
C:\WinDDK\
7600.16385
.
1
\inc\ddk
C:\WinDDK\
7600.16385
.
1
\inc\api
|

- 2.新建一个驱动文件,和对应sources文件,查看是否可以使用驱动文件
sources文件内容如下:
|
1
2
3
4
5
6
7
8
|
TARGETNAME
=
TestDriver
TARGETPATH
=
.
TARGETTYPE
=
DRIVER
MSC_WARNING_LEVEL
=
/
W3
/
WX
SOURCES
=
Driver.c
|
driver.c文件内容如下
|
1
2
3
4
5
6
7
|
#include <ntifs.h>
NTSTATUS DriverEntry(PDRIVER_OBJECT DriverObject,
PUNICODE_STRING RegistryPath) {
DbgPrint(
"Hello, world!\n"
);
return
STATUS_SUCCESS;
}
|
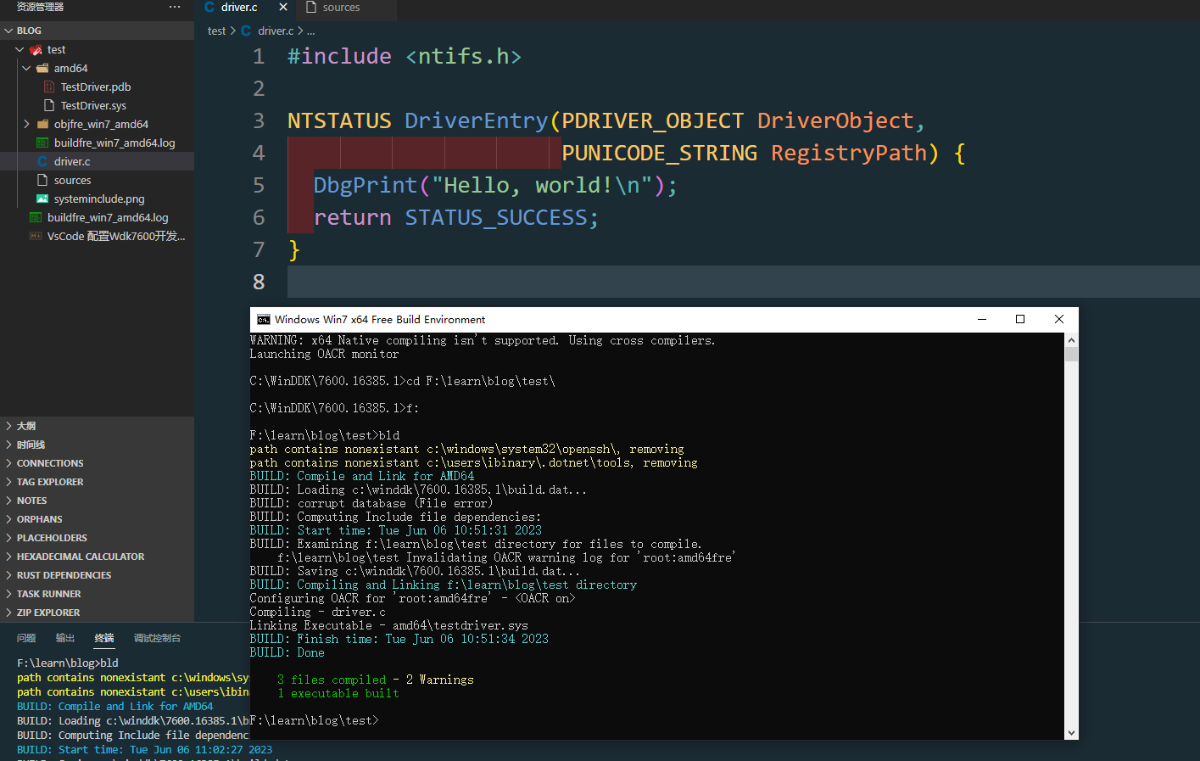
在命令行中启动 编译环境. 然后cd到驱动文件所在目录. 直接输入 build -cez 或者 bld即可.


可以看到可以正常输出. 到这一步说明VsCode的开发环境已经配置好了. 可以放心写代码了.
但有一点不足, 每次编译都要另外一个CMD窗口启动吗? 这样显得会很麻烦. 如果能集成到VsCode中那么是不是就很好了.
1.4 集成终端编译
1.4.1 集成任务
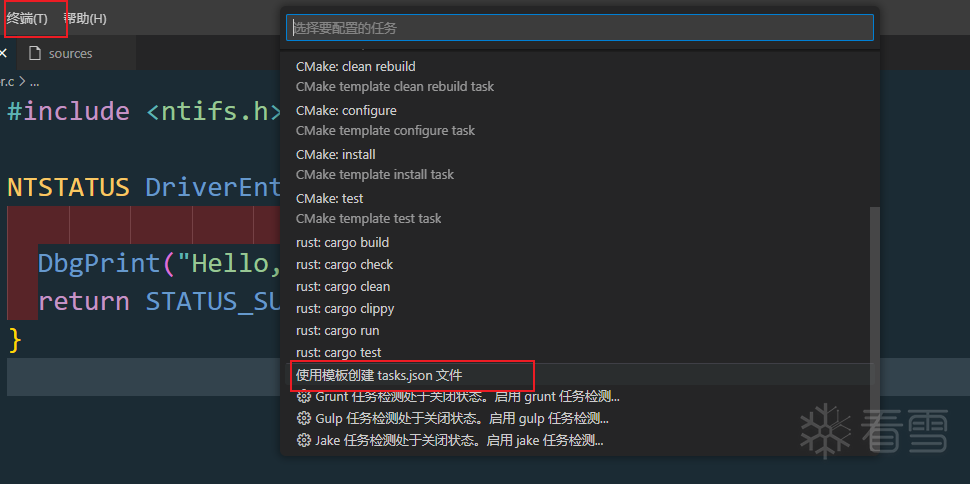
这一点经过我的研究已经实现. 我们需要使用VsCode中的 任务 在VsCode中有一个 终端,终端选项中有一个配置任务. (task) 我们只需要生成一个task. 然后将task替换为我给的即可.
注意,这里使用的路径是默认路径,如果你修改过wdk的安装目录.请手动更改此json.

生成的tasks.json使用我给定的即可.
|
1
2
3
4
5
6
7
8
9
10
11
12
13
14
15
16
17
18
19
20
21
22
23
24
25
26
27
28
29
30
31
32
33
34
35
36
37
38
39
40
41
42
43
44
45
46
47
48
49
50
51
52
53
54
55
56
57
58
59
60
61
62
63
64
65
66
67
68
69
70
71
72
73
74
75
76
77
78
79
80
81
82
83
84
85
86
87
88
89
|
{
"version"
:
"2.0.0"
,
"tasks"
: [
{
"label"
:
"BuildDebug64_Win7OrHigh"
,
"type"
:
"shell"
,
"command"
:
"C:\\Windows\\System32\\cmd.exe"
,
"args"
: [
"/k"
,
"pushd \".\" && call \"C:\\WinDDK\\7600.16385.1\\bin\\setenv.bat \" C:\\WinDDK\\7600.16385.1\\ chk x64 WIN7\" && popd"
],
"group"
:
"build"
,
"presentation"
: {
"reveal"
:
"always"
},
"problemMatcher"
:
"$msCompile"
},
{
"label"
:
"BuildRelease64_Win7OrHigh"
,
"type"
:
"shell"
,
"command"
:
"C:\\Windows\\System32\\cmd.exe"
,
"args"
: [
"/k"
,
"pushd \".\" && call \"C:\\WinDDK\\7600.16385.1\\bin\\setenv.bat \" C:\\WinDDK\\7600.16385.1\\ fre x64 WIN7\" && popd"
],
"group"
:
"build"
,
"presentation"
: {
"reveal"
:
"always"
},
"problemMatcher"
:
"$msCompile"
},
{
"label"
:
"BuildDebug32_Win7OrHigh"
,
"type"
:
"shell"
,
"command"
:
"C:\\Windows\\System32\\cmd.exe"
,
"args"
: [
"/k"
,
"pushd \".\" && call \"C:\\WinDDK\\7600.16385.1\\bin\\setenv.bat \" C:\\WinDDK\\7600.16385.1\\ chk x86 WIN7\" && popd"
],
"group"
:
"build"
,
"presentation"
: {
"reveal"
:
"always"
},
"problemMatcher"
:
"$msCompile"
},
{
"label"
:
"BuildRelease32_Win7OrHigh"
,
"type"
:
"shell"
,
"command"
:
"C:\\Windows\\System32\\cmd.exe"
,
"args"
: [
"/k"
,
"pushd \".\" && call \"C:\\WinDDK\\7600.16385.1\\bin\\setenv.bat \" C:\\WinDDK\\7600.16385.1\\ fre x86 WIN7\" && popd"
],
"group"
:
"build"
,
"presentation"
: {
"reveal"
:
"always"
},
"problemMatcher"
:
"$msCompile"
},
{
"label"
:
"BuildDebug_WinXP"
,
"type"
:
"shell"
,
"command"
:
"C:\\Windows\\System32\\cmd.exe"
,
"args"
: [
"/k"
,
"pushd \".\" && call \"C:\\WinDDK\\7600.16385.1\\bin\\setenv.bat \" C:\\WinDDK\\7600.16385.1\\ chk x86 WXP \" && popd"
],
"group"
:
"build"
,
"presentation"
: {
"reveal"
:
"always"
},
"problemMatcher"
:
"$msCompile"
},
{
"label"
:
"BuildRelease_WinXP"
,
"type"
:
"shell"
,
"command"
:
"C:\\Windows\\System32\\cmd.exe"
,
"args"
: [
"/k"
,
"pushd \".\" && call \"C:\\WinDDK\\7600.16385.1\\bin\\setenv.bat \" C:\\WinDDK\\7600.16385.1\\ fre x86 WXP \" && popd"
],
"group"
:
"build"
,
"presentation"
: {
"reveal"
:
"always"
},
"problemMatcher"
:
"$msCompile"
}
]
}
|
1.4.2 设置为全局任务.
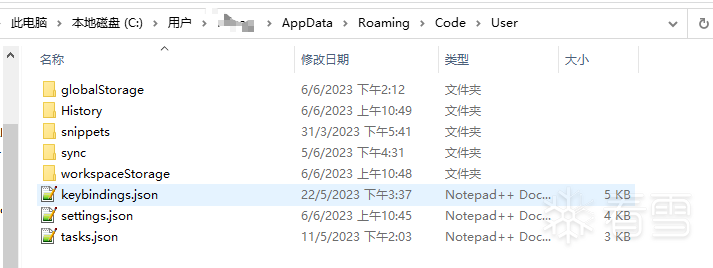
上面生成好的task.json 请放到
C:\Users\YourComputerName\AppData\Roaming\Code\User
如下图所示:

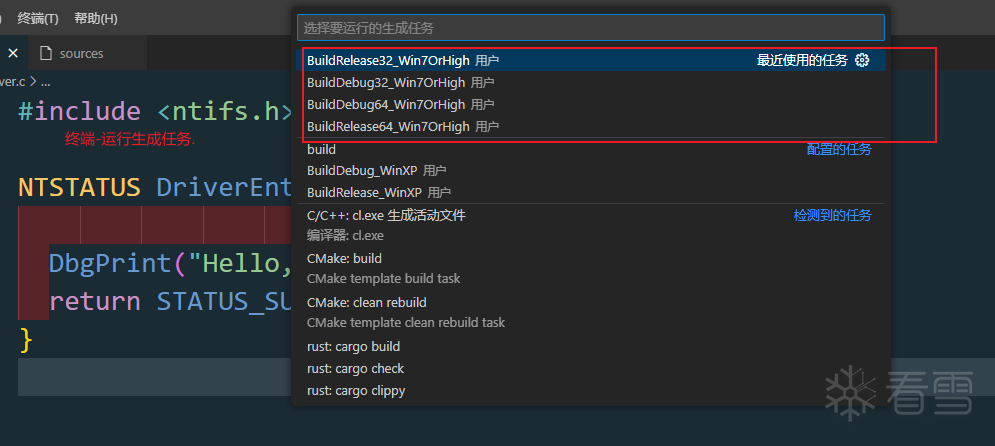
最后 在终端中运行任务. 任务则选择你配置好的编译环境即可.


在终端的右侧 则有你运行的任务. 现在你可以在你想要的任务中 运行 bld 命令进行编译.
再也不需要 单独打开一个cmd窗口进行编译了.
如你想要编译 win7release64版本则切换到此任务编译即可. 想编译32位版本则切换到32即可. 任务可以开多个.需要哪个在那个里面执行 bld命令即可.
二丶Sources 文件编程
下面的内容可看可不看.我是写到一起做个记录.
2.1 INCLUDES 字段
主要作用: 处理Include与CPP文件分离得情况
场景:
目录A存放着 xxx.h文件.
目录B(主目录)存放着 xxx.cpp得实现文件
目录B中有目录A
那么对应sources应该改为如下:
|
1
2
3
4
5
6
7
8
9
10
11
12
|
TARGETNAME
=
testDriver1
TARGETPATH
=
.
TARGETTYPE
=
DRIVER
MSC_WARNING_LEVEL
=
/
W3
/
WX
INCLUDES
=
\
.
/
test1
SOURCES
=
Driver.cpp\
test.cpp
|
目录A则是 test1 这里主要使用了 INCLUDES 命令指明了 .h所在得目录.
当然也可以指向系统得目录.
|
1
2
3
4
5
6
7
8
9
|
INCLUDES
=
$(INCLUDES) \
$(DDK_INC_PATH); \
..\common; \
..\..\util;
INCLUDES
=
$(DDK_INC_PATH);\
DDK_INC_PATH
=
=
WDKROOT\inc\ddk
|
- 目录A(test1)中 .h文件内容如下:
|
1
2
3
4
5
6
7
8
9
10
11
12
13
14
15
|
#ifdef __cplusplus
extern
"C"
{
#endif
#include <ntifs.h>
#include <ntddk.h>
#include <Ntstrsafe.h>
#include "ntimage.h"
#ifdef __cplusplus
}
#endif
PVOID testprint();
|
主目录实现.cpp内容如下
driver.c
12345678910111213141516171819#include <ntifs.h>#include <ntddk.h>#include "test.h"VOID DriverUnLoad(PDRIVER_OBJECT DriverObject){KdPrint(("Exit"));}extern"C"NTSTATUS DriverEntry(PDRIVER_OBJECT pDriverObj,PUNICODE_STRING pReg){UNREFERENCED_PARAMETER(pDriverObj);UNREFERENCED_PARAMETER(pReg);KdBreakPoint();testprint();//引用了Test.h中的函数returnSTATUS_SUCCESS;}test.cpp
1234567#include "test.h"PVOID testprint(){DbgPrint("testprint");returnNULL;}
如果sources中不使用 INCLUDES知名.则会报错,无法找到xxx.h 亦或者 .h和.cpp都放在同一目录下.(主目录下) 则不需要使用 INCLUDES
2.2 i386_SOURCES 32位驱动使用内联汇编
- 用法一,cpp中使用内联汇编.
在32位驱动中可以让我们使用 内联汇编.
设: test.cpp test.h driver.cpp都在同一目录. 所以不需要使用 INCLUDES字段了.
例子如下:
Driver.cpp
|
1
2
3
4
5
6
7
8
9
10
11
12
13
14
15
16
17
18
19
|
#include <ntifs.h>
#include <ntddk.h>
#include "test.h"
VOID DriverUnLoad(
PDRIVER_OBJECT DriverObject)
{
KdPrint((
"Exit"
));
}
extern
"C"
NTSTATUS DriverEntry(
PDRIVER_OBJECT pDriverObj,
PUNICODE_STRING pReg)
{
UNREFERENCED_PARAMETER(pDriverObj);
UNREFERENCED_PARAMETER(pReg);
KdBreakPoint();
test();
return
STATUS_SUCCESS;
}
|
test.h
|
1
2
3
4
5
6
7
8
9
10
11
12
13
14
|
#ifdef __cplusplus
extern
"C"
{
#endif
#include <ntifs.h>
#include <ntddk.h>
#include <Ntstrsafe.h>
#include "ntimage.h"
#ifdef __cplusplus
}
#endif
PVOID test();
|
test.cpp (内部使用了内联汇编)
|
1
2
3
4
5
6
7
8
|
#include "test.h"
PVOID __declspec(naked) test()
{
_asm {
mov eax,eax
ret
}
}
|
- 用法二 直接指定 .asm文件
上面是使用得内联汇编,如果我们想将自己写好得 纯 asm文件也参与编译.
那么需要写为如下:
|
1
|
I386_SOURCES
=
i386\test86.asm
|
注意: xxx.asm一定要在 i386目录下. 如果没有此目录我们需要新建一个目录. 存放我们得.asm文件.
如果想要使用 xx.asm中的函数. 那么只需要声明即可.
|
1
|
extern
"C"
int
__cdecl MyAdd(
int
x,
int
y);
|
test.asm 如下:
|
1
2
3
4
5
6
7
8
9
10
11
12
|
.
386
.model flat,stdcall
option casemap:none
.const
.data
.code
MyAdd proc c ,n1:DWORD,n2:DWORD
mov eax,n1
add eax,n2
ret
MyAdd endp
End
|
2.3 AMD64_SOURCES 使用64位汇编
上面讲了32位汇编的使用,在64位下.已经无法使用内联汇编了. 需要我们单独提供汇编然后参与编译.
这里就使用到了 AMD64_SOURCES
注意: xxx.asm 必须放在相对于主目录下的 asm64目录下.
文件内容如下:
|
1
2
3
4
5
6
7
8
9
10
11
12
13
14
15
|
TARGETNAME
=
UseX86AndX64Asm
TARGETPATH
=
Build
TARGETTYPE
=
DRIVER
USER_C_FLAGS
=
$(USER_C_FLAGS)
/
FAcs
LINKER_FLAGS
=
/
INTEGRITYCHECK
INCLUDES
=
.
C_DEFINES
=
$(C_DEFINES)
/
wd4996
/
wd4995
AMD64_SOURCES
=
amd64\myAdd.asm
SOURCES
=
start.cpp \
|
start.cpp 是驱动的代码,(DriverEntry) 如果想要在DriverEntry中使用那么我们就要声明 xxx.asm中的函数才可以. 且 需要声明为 fastcall.
asm测试代码
|
1
2
3
4
5
6
7
8
9
|
.CODE
myAdd PROC
add rcx,rdx
mov rax,rcx
ret
myAdd ENDP
END
|
start.cpp实现.
|
1
2
3
4
5
6
7
8
9
10
11
12
13
14
15
16
17
18
19
20
|
#include "start.h"
#include <ntstrsafe.h>
VOID DriverUnload(PDRIVER_OBJECT pDriverObj)
{
KdPrint((
"Unload Driver\n"
));
}
extern
"C"
long
long
myAdd(
long
long
a,
long
long
b);
extern
"C"
NTSTATUS DriverEntry(
IN PDRIVER_OBJECT pRootDriverObj,
IN PUNICODE_STRING pRegPath)
{
NTSTATUS status
=
STATUS_UNSUCCESSFUL;
pRootDriverObj
-
>DriverUnload
=
DriverUnload;
ULONG majIndex
=
0
;
KdBreakPoint();
myAdd(
1
,
2
);
return
status;
}
|
目录结构为:
|
1
2
3
4
|
RootDir
amd64(
DIR
)
myadd.asm
start.cpp (驱动入口代码)
|
2.4 多驱动编译
如果驱动项目较多,想一下全部进行编译. 那么就需要使用 DIRS字段.
编译方法如下.
首先建立一个DIRS文件. 文件的内容指明你想编译的驱动的文件目录即可.
但是你的目录里面要指明sources文件.亦或者是新的DIRS.DIRS
|
1
2
3
4
|
DIRS
=
\
A \
B \
C
|
上述意思代表编译 A B C 三个文件目录下的驱动
如果A目录下有SOURCES则会读取SOURCES文件进行编译.A目录. 如果B目录又有内嵌的文件夹且有DIRS 那么会优先读取DIRS继续寻找B目录中的内嵌文件夹.直到找到有SOURCES存在的目录进行编译.
2.5 编译等级设置
如果你想让你的驱动编译的时候检测严格一点.则可以在SOURCES中定义如下字段.
|
1
|
MSC_WARNING_LEVEL
=
/
W3
/
WX
|
/W3 是警告级别 /W1 /W2 /W3 /W4 /W4等级最为严格. 如果参数不使用则需要使用
UNREFERENCED_PARAMETER(pDriverObj); 来进行包含 否则在/w4登记下无法编译通过.
/WX 是警告视为错误.
2.6 将驱动编译为库
驱动代码也可以变成库代码,可以给别的驱动使用. 在高版本中的VS则直接生成即可. wdk7600则必须我们使用 sources指定了.
分为以下几点讲解.
我们可以将我们的驱动编译为库. 这里涉及到库开发.
分别是:
- 驱动中如何生成库
- 驱动中如何使用自定义的库
2.6.1 驱动中如何生成库
首先如果你是以C/C++ 开发的话 那么就要给一个.h和一个.cpp文件.
假设以 test.h test.cpp为例
那么驱动的sources文件内容应该如下:
|
1
2
3
4
5
6
7
8
9
10
11
12
|
TARGETNAME
=
test
TARGETPATH
=
.
TARGETTYPE
=
LIBRARY
DRIVERTYPE
=
FS
MSC_WARNING_LEVEL
=
/
W3
/
WX
INCLUDES
=
\
.
/
test
SOURCES
=
test.cpp
|
其中我的目录结构为:
|
1
2
3
4
|
ROOTDIR
test(
DIR
)
test.h
test.cpp
|
test.h如下:
|
1
2
3
4
5
6
7
8
9
10
11
12
13
14
15
16
17
18
19
20
21
|
#ifdef __cplusplus
extern
"C"
{
#endif
#include <ntddk.h>
#ifdef __cplusplus
}
#endif
class
test
{
private:
/
*
data
*
/
public:
test(
/
*
args
*
/
);
~test();
PVOID testprint();
};
|
test.cpp
|
1
2
3
4
5
6
7
8
9
10
11
12
13
14
15
|
#include "test.h"
test::test(
/
*
args
*
/
)
{
}
test::~test()
{
}
PVOID test::testprint()
{
DbgPrint(
"testprint"
);
return
NULL;
}
|
生成后则会生成test.lib库
2.6.2 驱动中使用库
使用库就很简单了.将头文件拷贝过来.
然后在SOURCE里面指明即可.
sources如下:
|
1
2
3
4
5
6
7
8
9
10
11
12
13
|
TARGETNAME
=
test1
TARGETPATH
=
.
TARGETTYPE
=
DRIVER
MSC_WARNING_LEVEL
=
/
W3
/
WX
INCLUDES
=
\
.
/
test
TARGETLIBS
=
.\libs\test.lib
SOURCES
=
Driver.cpp
|
test.h同上一样.
Driver.cpp如下:
|
1
2
3
4
5
6
7
8
9
10
11
12
13
14
15
16
17
18
19
20
|
#include "test\test.h"
VOID DriverUnLoad(
PDRIVER_OBJECT DriverObject)
{
KdPrint((
"Exit"
));
}
extern
"C"
NTSTATUS DriverEntry(
PDRIVER_OBJECT pDriverObj,
PUNICODE_STRING pReg)
{
UNREFERENCED_PARAMETER(pDriverObj);
UNREFERENCED_PARAMETER(pReg);
KdBreakPoint();
pDriverObj
-
>DriverUnload
=
DriverUnLoad;
test t;
t.testprint();
return
STATUS_SUCCESS;
}
|
如果是C语言则直接编译即可.
关于TARGETLIBS 还可以包含路径.
例如如下:
|
1
2
3
4
5
6
7
8
9
10
|
TARGETLIBS
=
$(DDK_LIB_PATH)\xxx1.lib\
$(DDK_LIB_PATH)\xxx2.lib\
例如包含 ntstrsafe.lib库
TARGETLIBS
=
$(DDK_LIB_PATH)\ntstrsafe.lib
系统提供的路径有如下:
DDK_LIB_PATH
=
=
WDKROOT\lib\Version\
*
SDK_LIB_PATH
=
=
WDKROOT\lib\Version\
*
CRT_LIB_PATH
|
2.7 C常量定义
在SOURCES文件中可以使用 C_DEFINES
它的意思则是等价于你在.c文件中使用了#define来声明宏
|
1
2
3
4
5
6
7
8
9
10
11
12
13
14
15
16
|
TARGETNAME
=
test1
TARGETPATH
=
.
TARGETTYPE
=
DRIVER
MSC_WARNING_LEVEL
=
/
W3
/
WX
!IFDEF DDKBUILDENV
C_DEFINES
=
$(C_DEFINES)
-
DDDK_BUILD
!ENDIF
INCLUDES
=
\
.
/
test
TARGETLIBS
=
.\libs\test.lib
SOURCES
=
Driver.cpp
|
例子2:
|
1
|
C_DEFINES
=
$(C_DEFINES)
/
wd4996
|
2.8 SOURCES指明编译的文件 以及条件宏
WDK中找的. 可以为驱动编译资源 可以定义两个SOURCE分别指向要编译的文件
然后最终引用
例子:
|
1
2
3
4
5
6
7
8
9
10
11
12
13
14
15
16
|
!
if
$(IA64)
xxxxx 条件使用 IA64
!endif
DIR_SOURCES
=
wacompen.c \
wacompen.rc \
oempen.c \
errcodes.mc
STB_SOURCES
=
hid.c \
pnp.c \
serial.c \
errlog.c
SOURCES
=
$(DIR_SOURCES) $(STB_SOURCES)
|
更多【 VsCode配置Wdk7600开发环境 以及 "自动编译" 和 sources文件简单介绍..】相关视频教程:www.yxfzedu.com
相关文章推荐
- 编程技术-加载了对应的调试符号文件也看不了函数名?也许是 fastlink 搞的鬼 - 游戏逆向游戏开发编程技术加壳脱壳
- 编程技术-跨平台重构Cobaltstrike Beacon,行为对国内主流杀软免杀 - 游戏逆向游戏开发编程技术加壳脱壳
- 智能设备-关于thumb2指令下函数运行地址对齐问题及验证固件分析 - 游戏逆向游戏开发编程技术加壳脱壳
- Android安全-某黑盒某请求参数分析 - 游戏逆向游戏开发编程技术加壳脱壳
- Android安全- 60秒学会用eBPF-BCC hook系统调用 - 游戏逆向游戏开发编程技术加壳脱壳
- 编程技术-驱动保护-EAC内核调试检测分析 - 游戏逆向游戏开发编程技术加壳脱壳
- Android安全-Android 系统源码下载编译刷机 - 游戏逆向游戏开发编程技术加壳脱壳
- Android安全-编译frida16.0.2 python 模块 - 游戏逆向游戏开发编程技术加壳脱壳
- 软件逆向-DASCTF X GFCTF 2022十月挑战赛 cuteRE WriteUp - 游戏逆向游戏开发编程技术加壳脱壳
- Android安全-攻防世界Mobile通关记录_apk逆向12_RememberOther_Ph0en1x-100_ill-intentions_wp - 游戏逆向游戏开发编程技术加壳脱壳
- 编程技术- 驱动开发:内核运用LoadImage屏蔽驱动 - 游戏逆向游戏开发编程技术加壳脱壳
- 软件逆向-wibu证书 - 安全证书(一) - 游戏逆向游戏开发编程技术加壳脱壳
- 二进制漏洞-CVE-2018-17463详细分析及复现 - 游戏逆向游戏开发编程技术加壳脱壳
- CTF对抗-2022秋季赛题目提交 - 游戏逆向游戏开发编程技术加壳脱壳
- Android安全-某当网apk加固脱个so - 游戏逆向游戏开发编程技术加壳脱壳
- 软件逆向-360ini.dll注入explorer技术分析 - 游戏逆向游戏开发编程技术加壳脱壳
- 二进制漏洞-CVE-2022-23613复现与漏洞利用可能性尝试 - 游戏逆向游戏开发编程技术加壳脱壳
- 编程技术-过EAC HV检测 - 游戏逆向游戏开发编程技术加壳脱壳
- 智能设备-Qiling框架模拟运行固件配合IDA动态调试 - 游戏逆向游戏开发编程技术加壳脱壳
- 编程技术- 驱动开发:内核枚举进程与线程ObCall回调 - 游戏逆向游戏开发编程技术加壳脱壳
2):严禁色情、血腥、暴力
3):严禁发布任何形式的广告贴
4):严禁发表关于中国的政治类话题
5):严格遵守中国互联网法律法规
6):有侵权,疑问可发邮件至service@yxfzedu.com
- 算法-1049. 最后一块石头的重量 II
- python-根据json生成Java类
- 运维-支撑企业数字化经营,《2023指标平台白皮书》正式发布
- safari-新的iLeakage攻击从Apple Safari窃取电子邮件和密码
- 网络-聊一聊 tcp/ip 在.NET故障分析的重要性
- .net-我的MQTT操作类(M2Mqtt.Net)
- 论文阅读-Count-based exploration with neural density models论文笔记
- 爬虫-在Kotlin中设置User-Agent以模拟搜索引擎爬虫
- elasticsearch-搜索引擎Elasticsearch基础与实践
- flink-flink1.18.0 macos sql-client.sh启动报错