Android安全- 60秒学会用eBPF-BCC hook系统调用
推荐 原创(备注1: 为了格式工整, 前面都是废话, 建议直接从11 hello world开始看)
(备注2: 60秒指的是在Linux上, 如果是Android可能要在基础再上加点)
目录
整理自2022/10 (bcc Release v0.25.0)
(1) BPF是什么?
(2) eBPF是什么?
(3) BCC是什么?
(4) IO Visor是什么?
(5) BCC在内核调试技术栈中的位置?
(6) 不同Linux内核版本对eBPF的支持?
(7) 官方文档
(8) 其他参考
(9) 安装BCC二进制包 (Ubuntu) (测试发现没法用)
(10) 自行编译安装 (Ubuntu) (推荐)
(11) hello world!
(12) 如何用监控open()函数的执行?
(13) 如何hook 任意system call?
(14) 更新
.
.
1 BPF是什么?
Linux内核中运行的虚拟机,
可以在外部向其注入代码执行.
.
.
2 eBPF是什么?
理解成BFP PLUS++
.
.
3 BCC是什么?
BPF虚拟机只运行BPF指令, 直接敲BPF指令比较恶心.
BCC可以理解成辅助写BPF指令的工具包,
用python和c语言间接生成EBPF指令.
.
.
4 IO Visor是什么?
指的是开源项目&&开发者社区,
BCC是IOVisor项目下的编译器工具集.
.
.
5 BCC在内核调试技术栈中的位置?
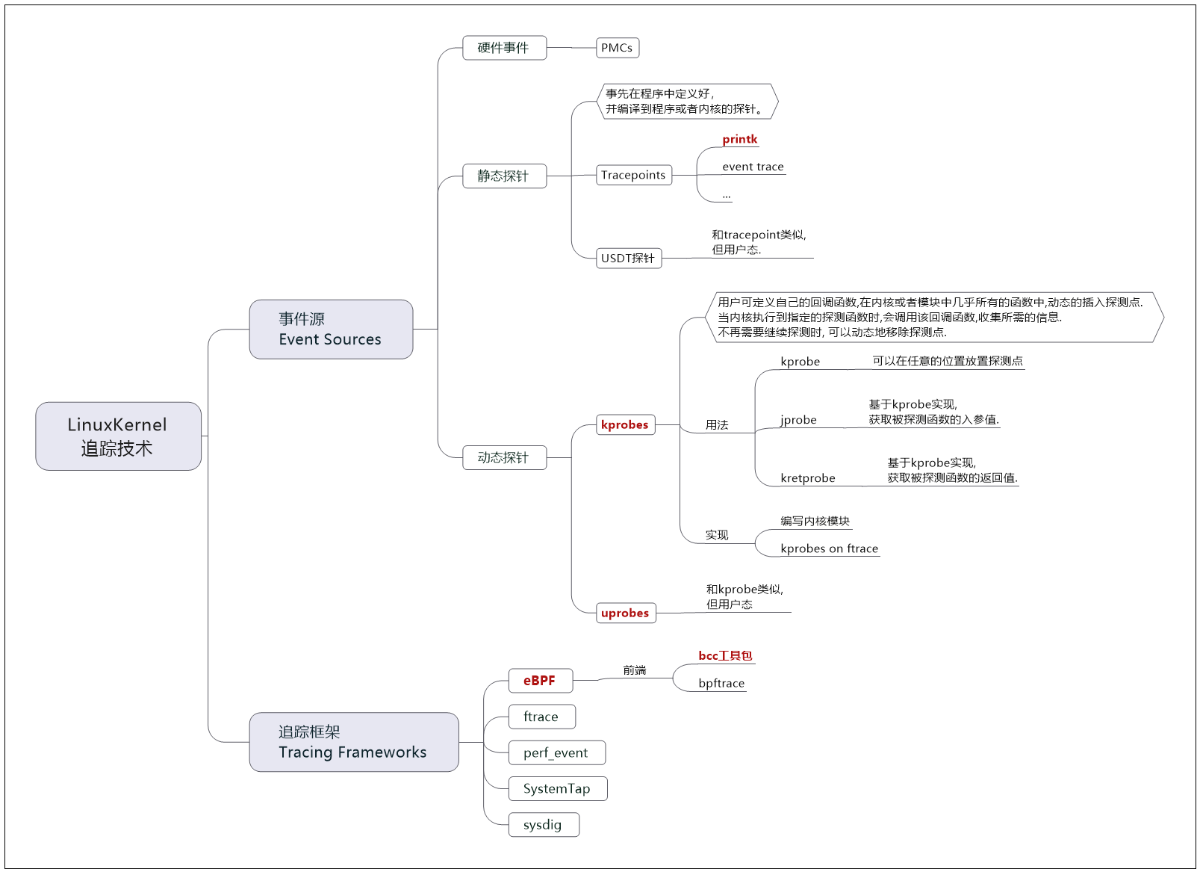
.
.
6 不同Linux内核版本对eBPF的支持?
参考官方文档
https://github.com/iovisor/bcc/blob/master/docs/kernel-versions.md
.查看自己Linux 内核版本 (ubuntu)
12xxx@ubuntu:~/Desktop/bcc/build$ uname-aLinux ubuntu5.15.0-52-generic#58~20.04.1-Ubuntu SMP Thu Oct 13 13:09:46 UTC 2022 x86_64 x86_64 x86_64 GNU/Linux.
.
7 官方文档
- 项目地址
https://github.com/iovisor/bcc
. - 使用bcc快速排除性能/故障/网络问题的例子
https://github.com/iovisor/bcc/blob/master/docs/tutorial.md
. - API指南
https://github.com/iovisor/bcc/blob/master/docs/reference_guide.md
. - python开发者教程
https://github.com/iovisor/bcc/blob/master/docs/tutorial_bcc_python_developer.md
. - examples
https://github.com/iovisor/bcc/tree/master/examples
.
.
8 其他参考
Brendan Gregg出品教程
https://www.brendangregg.com/ebpf.html
.linux内核调试追踪技术20讲
https://space.bilibili.com/646178510/channel/collectiondetail?sid=468091
.使用ebpf跟踪rpcx微服务
https://colobu.com/2022/05/22/use-ebpf-to-trace-rpcx-microservices/
.
eBPF监控工具bcc系列
一 启航
https://developer.aliyun.com/article/590484?spm=a2c6h.13262185.profile.109.74541f13UmhQiC
.二 性能问题定位
https://developer.aliyun.com/article/590865?spm=a2c6h.13262185.profile.108.74541f13UmhQiC
.三 自定义工具trace
https://developer.aliyun.com/article/590867?spm=a2c6h.13262185.profile.107.74541f13UmhQiC
.四 工具argdist
https://developer.aliyun.com/article/590869?spm=a2c6h.13262185.profile.106.74541f13UmhQiC
.五 工具funccount
https://developer.aliyun.com/article/590870?spm=a2c6h.13262185.profile.105.74541f13UmhQiC
.六 工具查询列表
https://developer.aliyun.com/article/591411?spm=a2c6h.13262185.profile.104.74541f13UmhQiC
.七 开发脚本
https://developer.aliyun.com/article/591412?spm=a2c6h.13262185.profile.103.74541f13UmhQiC
.八 BPF C
https://developer.aliyun.com/article/591413?spm=a2c6h.13262185.profile.102.74541f13UmhQiC
.九 bcc Python
https://developer.aliyun.com/article/591415?spm=a2c6h.13262185.profile.101.74541f13UmhQiC
.
.
9 安装BCC二进制包 (Ubuntu) (测试发现没法用)
具体参考官方文档
https://github.com/iovisor/bcc/blob/master/INSTALL.md
.iovisor版 (官网说这个比较旧)
1234sudo apt-key adv--keyserver keyserver.ubuntu.com--recv-keys4052245BD4284CDDecho"deb https://repo.iovisor.org/apt/$(lsb_release -cs) $(lsb_release -cs) main"| sudo tee/etc/apt/sources.list.d/iovisor.listsudo apt-get updatesudo apt-get install bcc-tools libbcc-examples linux-headers-$(uname-r).
Nightly版
123echo"deb [trusted=yes] https://repo.iovisor.org/apt/xenial xenial-nightly main"| sudo tee/etc/apt/sources.list.d/iovisor.listsudo apt-get updatesudo apt-get install bcc-tools libbcc-examples linux-headers-$(uname-r).
安装后目录结构
bcc路径为/usr/share/bcc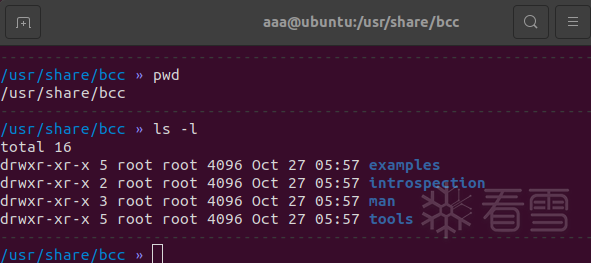
.
.
10 自行编译安装 (Ubuntu) (推荐)
确定版本自己ubuntu版本代码
123456lsb_release-aNo LSB modules are available.DistributorID: UbuntuDescription: Ubuntu20.04.5LTSRelease:20.04Codename: focal.
官网找对应ubuntu版本的依赖
123# For Focal (20.04.1 LTS)sudo apt install-y bison build-essential cmake flex git libedit-dev \libllvm12 llvm-12-dev libclang-12-dev python zlib1g-dev libelf-dev libfl-dev python3-distutils.
下载编译
12345678910git clone https://github.com/iovisor/bcc.gitmkdir bcc/build; cd bcc/buildcmake ..makesudo make installcmake-DPYTHON_CMD=python3 ..# build python3 bindingpushd src/python/makesudo make installpopd.
.
11 hello world!
运行hello_world.py
进入bcc/examples目录,
运行脚本sudo python3 hello_world.py,
它的逻辑是, hook了某个syscall, 每当运行该syscall, 就输出helloworld.
你随便点点鼠标, 就能触发它显示日志了.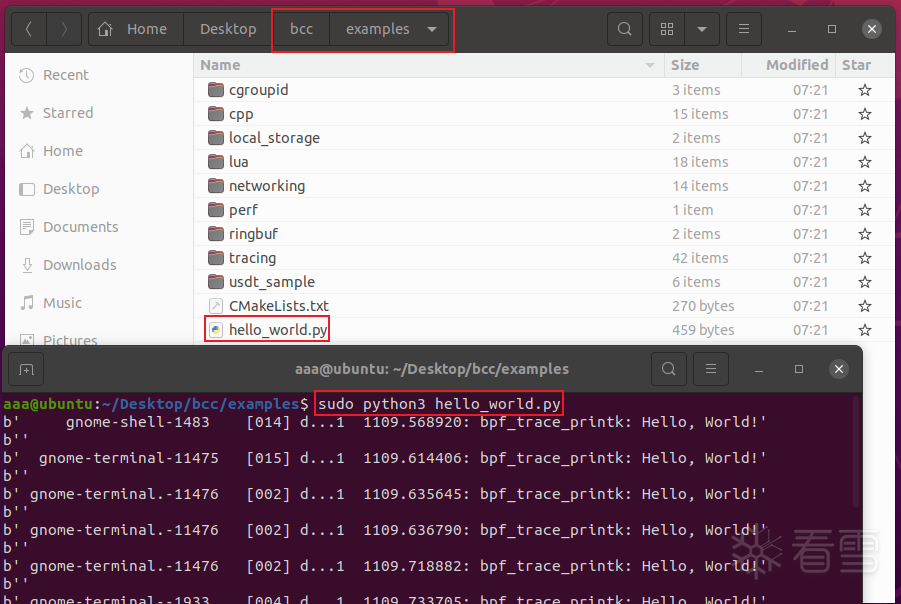
.运行hello_fields.py
这个脚本是一样的逻辑, 不过输出格式对齐了,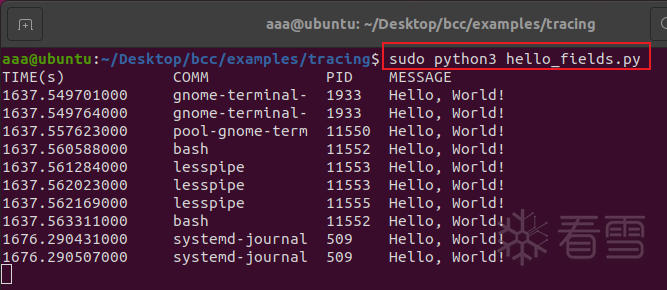
.
.
12 如何用BCC监控open()函数的执行?
进入bcc/tools/目录,运行opensoop.py脚本.
然后自己开clion编一个demo,
调用open触发eBFP的callback.
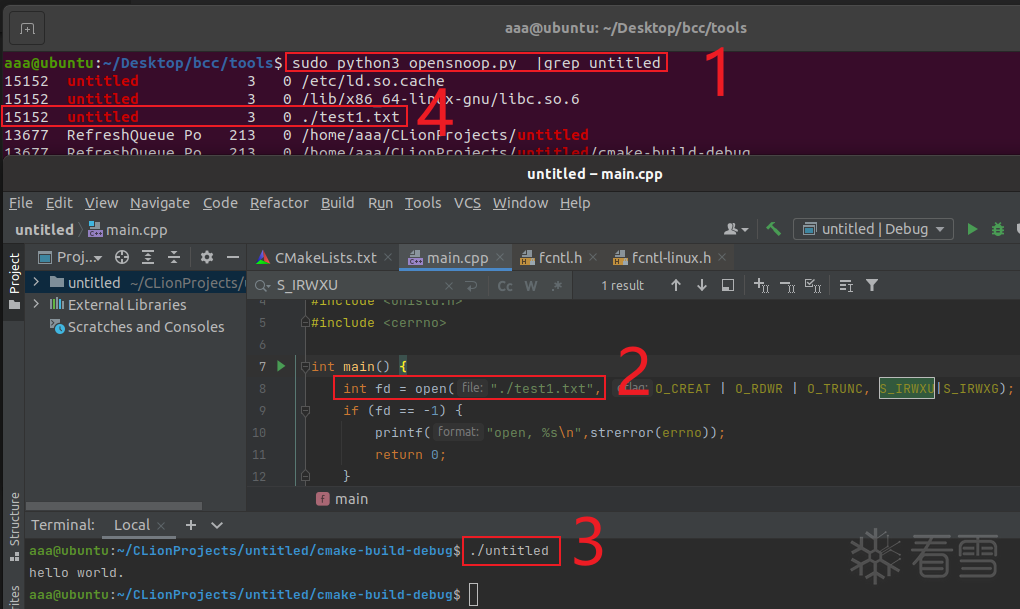
.
.
13 如何hook 任意system call?
opensoop.py的实现
ok, 上面这样eBPF就算跑起来了,
然后, 直奔主题, 就说上面那个脚本是怎么hook的open?
.
我打开那个脚本看了一下, 一大堆基本都在处理兼容和格式.
把不关心的东西都删了, 留下核心的代码, 写好注释放这里了.
.
.如何任意的hook syscall?
只关心4点:
(1)怎么写before?
(2)怎么写after?
(3)怎么注册hook?
(4)怎么输出日志?
(跟xposed差不多的叙事结构)
|
1
2
3
4
5
6
7
8
9
10
11
12
13
14
15
16
17
18
19
20
21
22
23
24
25
26
27
28
29
30
31
32
33
34
35
36
37
38
39
40
41
42
43
44
45
46
47
48
49
50
51
52
53
54
55
56
57
58
59
60
61
62
63
64
65
66
67
68
69
70
71
72
73
74
75
76
77
78
79
80
81
82
83
84
85
86
87
88
89
90
91
92
93
94
95
96
97
98
99
100
101
102
103
|
#!/usr/bin/env python
# 该代码在ubuntu 20环境里运行通过
from
__future__
import
print_function
from
bcc
import
ArgString, BPF
from
bcc.containers
import
filter_by_containers
from
bcc.utils
import
printb
import
argparse
from
collections
import
defaultdict
from
datetime
import
datetime, timedelta
import
os
# 注入到eBPF虚拟机的代码
bpf_text
=
'''
#include <uapi/linux/ptrace.h>
#include <uapi/linux/limits.h>
#include <linux/sched.h>
// hook到参数和返回值,放在这两个结构里
struct val_t {
u64 id;
char comm[TASK_COMM_LEN];
const char *fname;
};
// 同上
struct data_t {
u64 id;
int ret;
char comm[TASK_COMM_LEN];
char name[NAME_MAX];
};
// 创建一个events (hook到东西后就用它通知python那个callback输出)
BPF_PERF_OUTPUT(events);
// 这个api是在创建一个map变量,变量名为infotmp
// 因为你不能在eBPF里用std::map, 只能用它提供的这种东西.
BPF_HASH(infotmp, u64, struct val_t);
// after函数
int after_openat(struct pt_regs *ctx) {
u64 id = bpf_get_current_pid_tgid(); // 获取tid
struct val_t *valp;
struct data_t data = {};
valp = infotmp.lookup(&id); // 在map中查询id
if (valp == 0) {
return 0;
}
// 从map中读取至局部变量
bpf_probe_read_kernel(&data.comm, sizeof(data.comm), valp->comm);
bpf_probe_read_user_str(&data.name, sizeof(data.name), (void *)valp->fname);
data.id = valp->id;
data.ret = PT_REGS_RC(ctx); // before里读取了参数,此时在after里补充返回值
events.perf_submit(ctx, &data, sizeof(data)); // 提交perf poll事件来让perf输出(作用就是,调用它会通知python中那个callback输出日志)
infotmp.delete(&id); // 从map中删除id
return 0;
}
int syscall__before_openat(struct pt_regs *ctx, int dfd,
const char __user *filename, int flags) {
struct val_t val = {};
u64 id = bpf_get_current_pid_tgid();
u32 pid = id >> 32;
// 获取当前进程名
if (bpf_get_current_comm(&val.comm, sizeof(val.comm)) == 0) {
val.id = id;
val.fname = filename;
infotmp.update(&id, &val); // id插入map
}
return 0;
};
'''
# 注册hook
b
=
BPF(text
=
bpf_text)
b.attach_kprobe(event
=
"__x64_sys_openat"
, fn_name
=
"syscall__before_openat"
)
b.attach_kretprobe(event
=
"__x64_sys_openat"
, fn_name
=
"after_openat"
)
# 回调函数
def
my_callback(cpu, data, size):
temp
=
b[
"events"
].event(data)
if
temp.
id
is
not
None
:
print
(
"[pid]"
,temp.
id
&
0xffffffff
, end
=
" "
)
if
temp.name
is
not
None
:
print
(
"[path]"
,temp.name, end
=
" "
)
if
temp.ret
is
not
None
:
print
(
"[ret]"
,temp.ret, end
=
" "
)
if
temp.comm
is
not
None
:
print
(
"[comm]"
,temp.comm, end
=
" "
)
print
("")
b[
"events"
].open_perf_buffer(my_callback, page_cnt
=
64
)
while
True
:
try
:
# 等待数据, 触发open_perf_buffer指定的回调函数
b.perf_buffer_poll()
except
KeyboardInterrupt:
exit()
pass
|
.
.
14 更新第二篇, 在Android上跑
.
.
更多【 60秒学会用eBPF-BCC hook系统调用】相关视频教程:www.yxfzedu.com
相关文章推荐
- 编程技术-使用神经网络拟合数学函数 - Android安全CTF对抗IOS安全
- Android安全- Android 内存执行ELF研究 - Android安全CTF对抗IOS安全
- CTF对抗-KCTF2022秋季赛第二题题解 - Android安全CTF对抗IOS安全
- 软件逆向-RotaJakiro后门与Buni后门关联性分析 - Android安全CTF对抗IOS安全
- CTF对抗-2022KCTF秋季赛 第三题 水患猖獗 - Android安全CTF对抗IOS安全
- 二进制漏洞-linux内核pwn之基础rop提权 - Android安全CTF对抗IOS安全
- Android安全-Base64 编码原理 && 实现 - Android安全CTF对抗IOS安全
- 软件逆向-对双机调试下KdDebuggerNotPresent标志位的研究 - Android安全CTF对抗IOS安全
- CTF对抗-KCTF2022秋季赛第二题分析(4qwerty7) - Android安全CTF对抗IOS安全
- Pwn-从某新生赛入门PWN(一) - Android安全CTF对抗IOS安全
- CTF对抗-KCTF 2022 秋季赛 第二题 wp - 98k战队 - Android安全CTF对抗IOS安全
- Android安全- 60秒学会用eBPF-BCC hook系统调用 ( 2 ) hook安卓所有syscall - Android安全CTF对抗IOS安全
- Pwn-pwn题jarvisoj_fm - Android安全CTF对抗IOS安全
- 软件逆向-[分享]Hello,R3入R0 - Android安全CTF对抗IOS安全
- 编程技术-小工具_通过串口上传下载文件 - Android安全CTF对抗IOS安全
- Android安全-安卓协议逆向之frida hook百例二 - Android安全CTF对抗IOS安全
- Android安全-初试Unidbg demo - Android安全CTF对抗IOS安全
- 编程技术-DLL远程线程注入初尝试 - Android安全CTF对抗IOS安全
- CTF对抗- Go AST 浅析 - Android安全CTF对抗IOS安全
- CTF对抗-STL容器逆向与实战(N1CTF2022 cppmaster wp) - Android安全CTF对抗IOS安全
2):严禁色情、血腥、暴力
3):严禁发布任何形式的广告贴
4):严禁发表关于中国的政治类话题
5):严格遵守中国互联网法律法规
6):有侵权,疑问可发邮件至service@yxfzedu.com