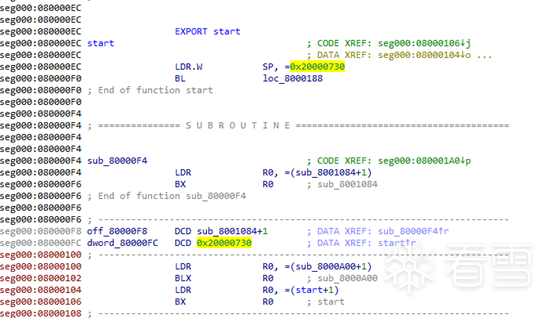
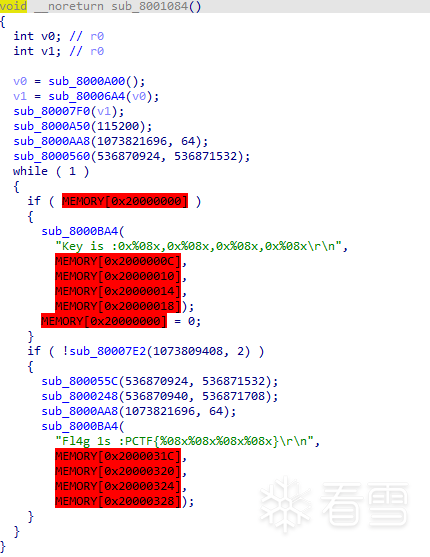
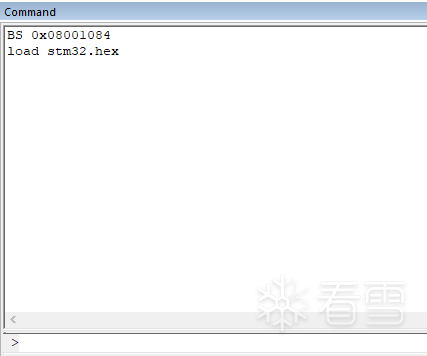
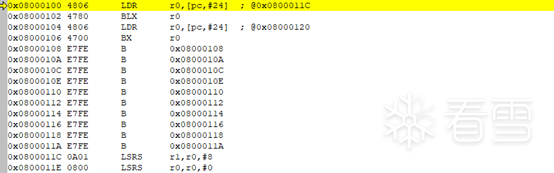
Arm裸机程序分析
推荐 原创


更多【Arm裸机程序分析】相关视频教程:www.yxfzedu.com
相关文章推荐
- 软件逆向- PE格式:新建节并插入代码 - Android安全CTF对抗IOS安全
- 加壳脱壳- UPX源码学习和简单修改 - Android安全CTF对抗IOS安全
- 二进制漏洞-win越界写漏洞分析 CVE-2020-1054 - Android安全CTF对抗IOS安全
- Pwn-2022长城杯决赛pwn - Android安全CTF对抗IOS安全
- 软件逆向-Wibu Codemeter 7.3学习笔记——Codemeter服务端 - Android安全CTF对抗IOS安全
- Pwn-沙箱逃逸之google ctf 2019 Monochromatic writeup - Android安全CTF对抗IOS安全
- 软件逆向-Wibu Codemeter 7.3学习笔记——AxProtector壳初探 - Android安全CTF对抗IOS安全
- 企业安全-学习Kubernetes笔记——暴露站点服务(Ingress) - Android安全CTF对抗IOS安全
- 企业安全-学习Kubernetes笔记——部署数据库站点(MySql) - Android安全CTF对抗IOS安全
- 企业安全-学习Kubernetes笔记——部署web站点环境(PHP+Nginx) - Android安全CTF对抗IOS安全
- 企业安全-学习Kubernetes笔记——安装NFS驱动 - Android安全CTF对抗IOS安全
- 企业安全-学习Kubernetes笔记——kubeadm安装Kubernetes - Android安全CTF对抗IOS安全
- 软件逆向-wibu软授权(四) - Android安全CTF对抗IOS安全
- 软件逆向-使用IDAPython开发复制RVA的插件 - Android安全CTF对抗IOS安全
- 2-wibu软授权(三) - Android安全CTF对抗IOS安全
- 软件逆向-wibu软授权(二) - Android安全CTF对抗IOS安全
- 软件逆向-wibu软授权(一) - Android安全CTF对抗IOS安全
- 软件逆向- PE格式:分析IatHook并实现 - Android安全CTF对抗IOS安全
- Android安全-安卓API自动化安全扫描 - Android安全CTF对抗IOS安全
- 二进制漏洞- Chrome v8 Issue 1307610漏洞及其利用分析 - Android安全CTF对抗IOS安全
记录自己的技术轨迹
文章规则:
1):文章标题请尽量与文章内容相符
2):严禁色情、血腥、暴力
3):严禁发布任何形式的广告贴
4):严禁发表关于中国的政治类话题
5):严格遵守中国互联网法律法规
6):有侵权,疑问可发邮件至service@yxfzedu.com
近期原创 更多