CTF对抗-攻城攻心的混淆大师——深入解析第十八届CISCN x 第二届长城杯初赛Reverse赛题vt
推荐 原创【CTF对抗-攻城攻心的混淆大师——深入解析第十八届CISCN x 第二届长城杯初赛Reverse赛题vt】此文章归类为:CTF对抗。
前言
在初赛结束近两月之际,笔者在复盘过程中意外发现了这道当时无人能解的难题。经过两日深入的探索与钻研,笔者终于成功地对这道赛题进行了全面的解构。在品味破译flag所带来的喜悦之余,笔者亦深感此题蕴含了诸多精妙之处,特撰此文与诸君分享。
一、 赛题初窥
拿到样本re.exe,照例先拖入DIE分析,结果让人大吃一惊: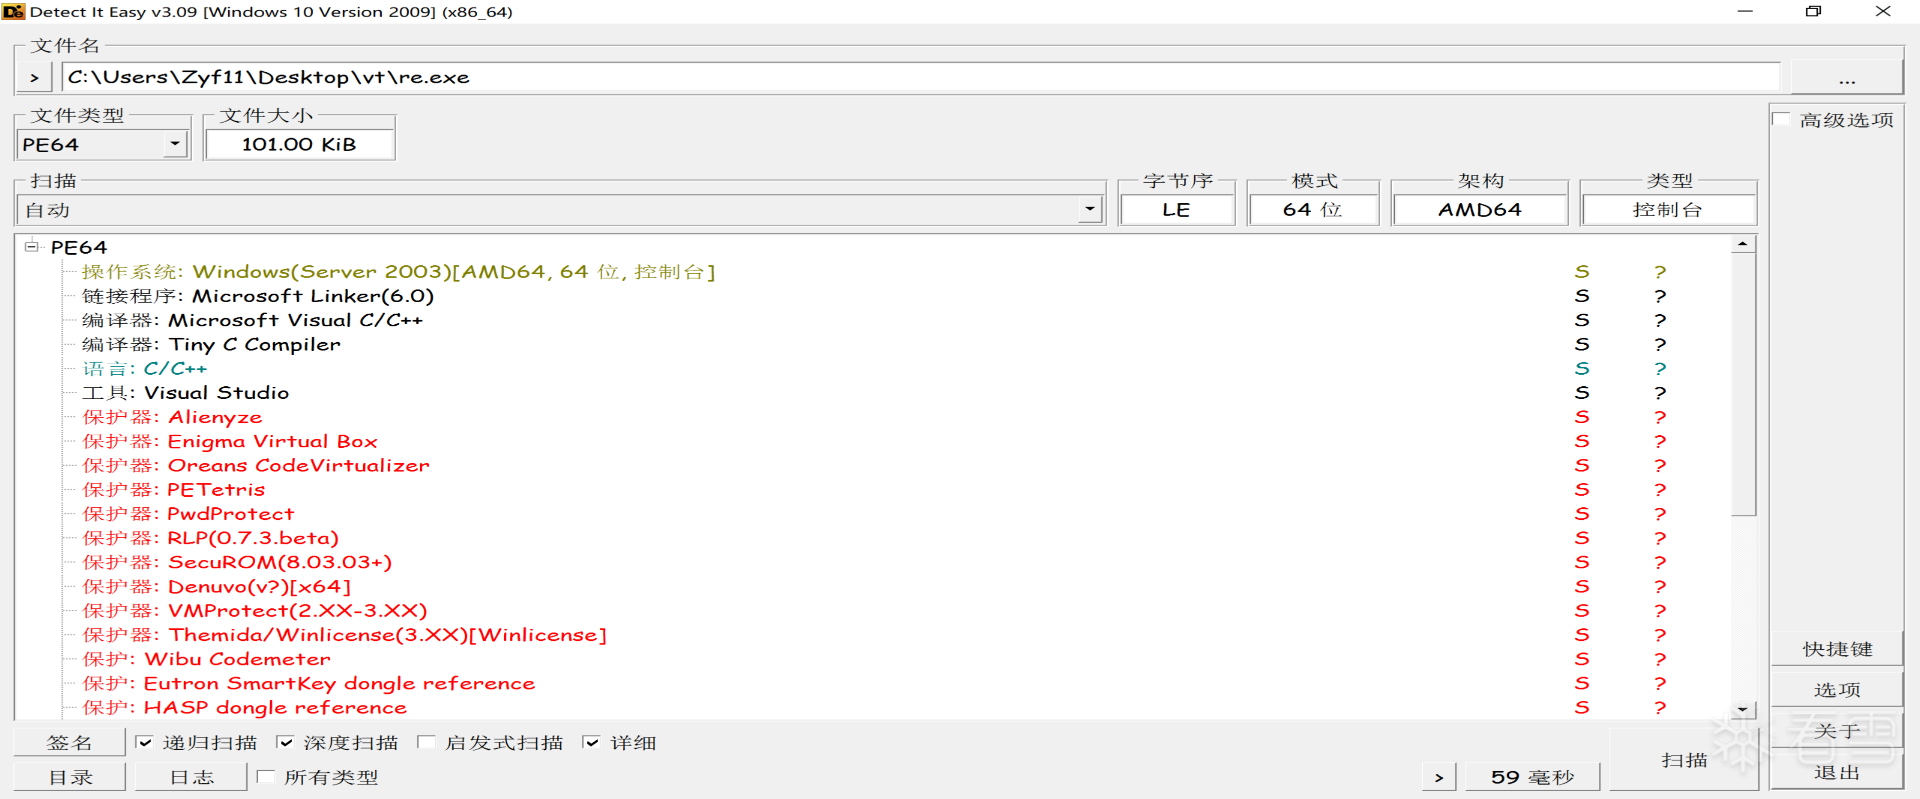
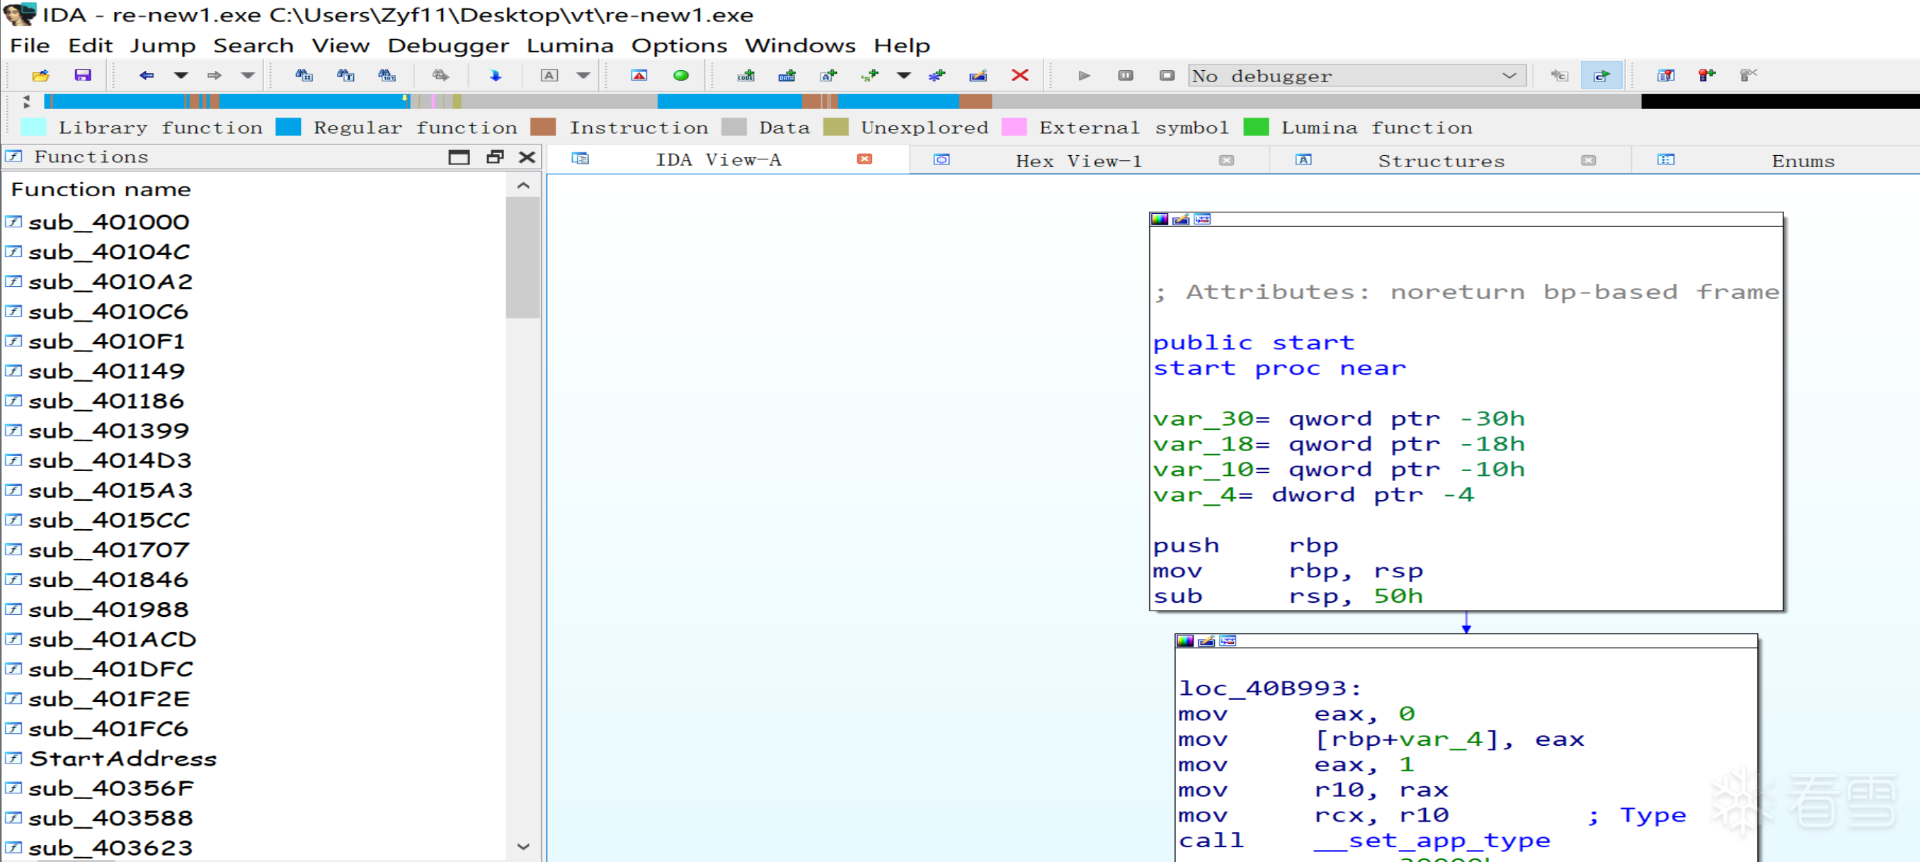
DIE检测出了如此多的保护器,几乎涵盖了平常见过的所有种类。再拖入IDA看一眼:
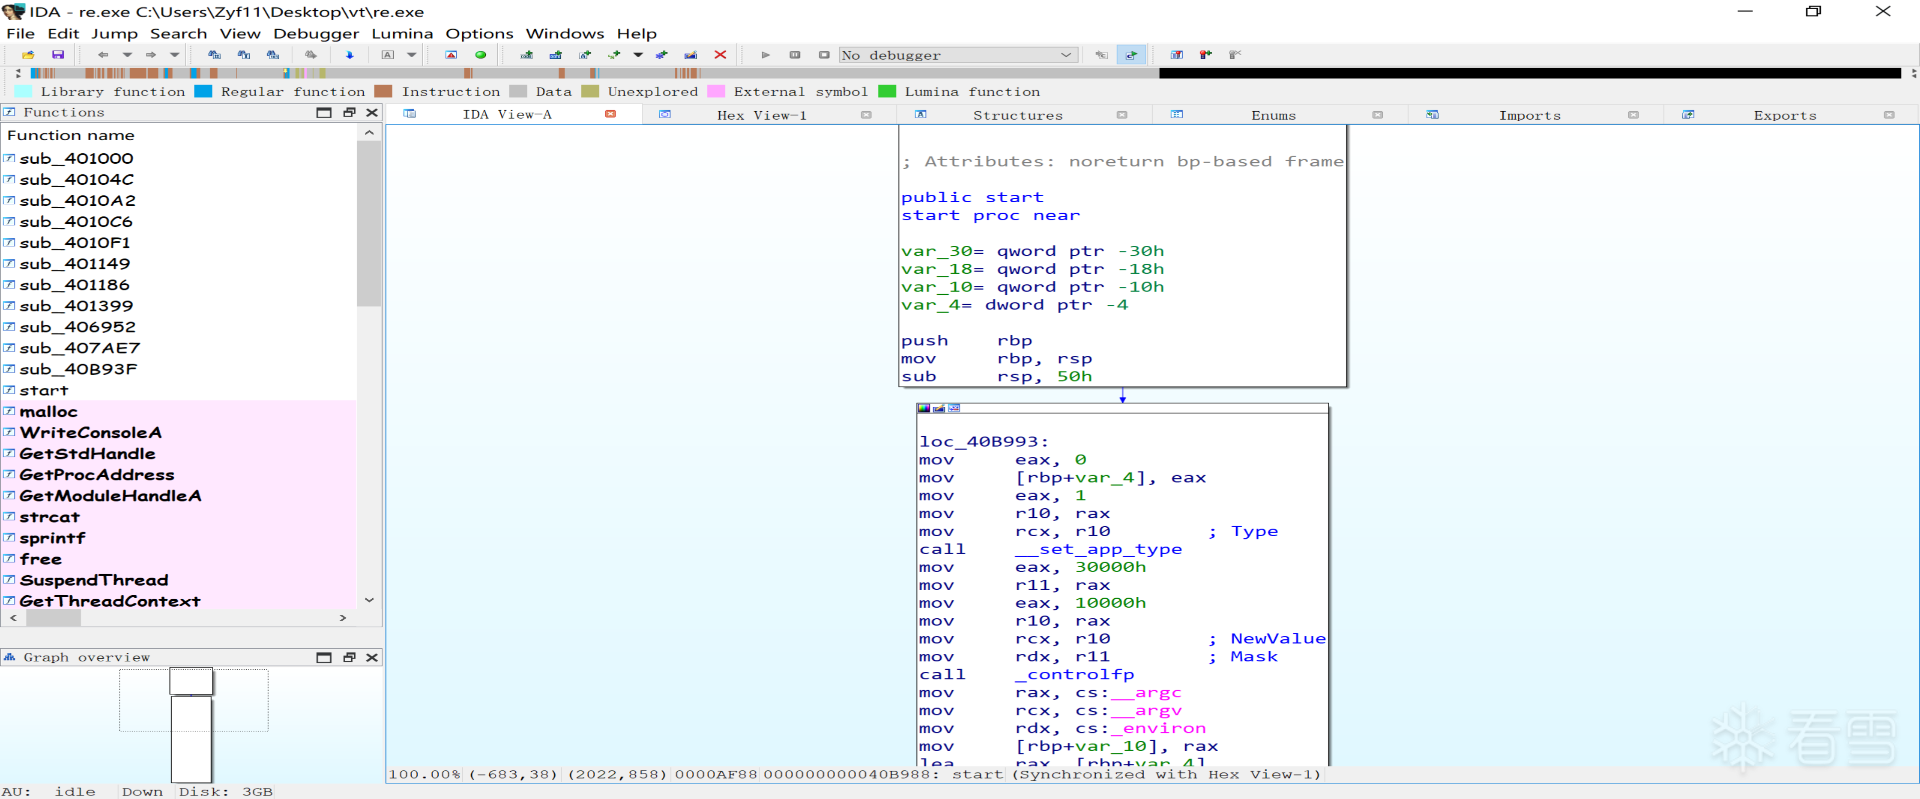
从上面灰色、红色的部分占据绝大部分可以看出,整个程序几乎没有多少正确识别的函数,似乎比较符合虚拟机保护的特征。倘若到此你直接将它拖入回收站的话,则正中出题人下怀,被其用精妙的心理战击退。仔细观察程序的代码,可以发现有意义的指令分别位于.text和UPX0段,且指令间存在很明显的被花指令混淆的痕迹,而其它与虚拟机有关的段(.vmp0、.winlice等)均没有任何代码,这表明程序并未使用虚拟化保护,只是采取增加特定段来欺骗DIE。此外,直接运行程序会迅速闪退,而调试运行程序会一直运行下去(比赛时运行了几个小时都没结束......),这都大大增强了“不战而屈人之兵”的效果。
二、 去除语法混淆
在初步分析后,我们可以发现不能像该比赛中的逆向dump赛题那样通过简单的黑盒测试分析结果,必须要先去除花指令的语法混淆,从而实现静态分析。由于程序使用了大量的花指令,逐个patch耗时且容易出错,笔者考虑使用idc脚本实现该功能。
该样本的花指令主要有以下几种类型:
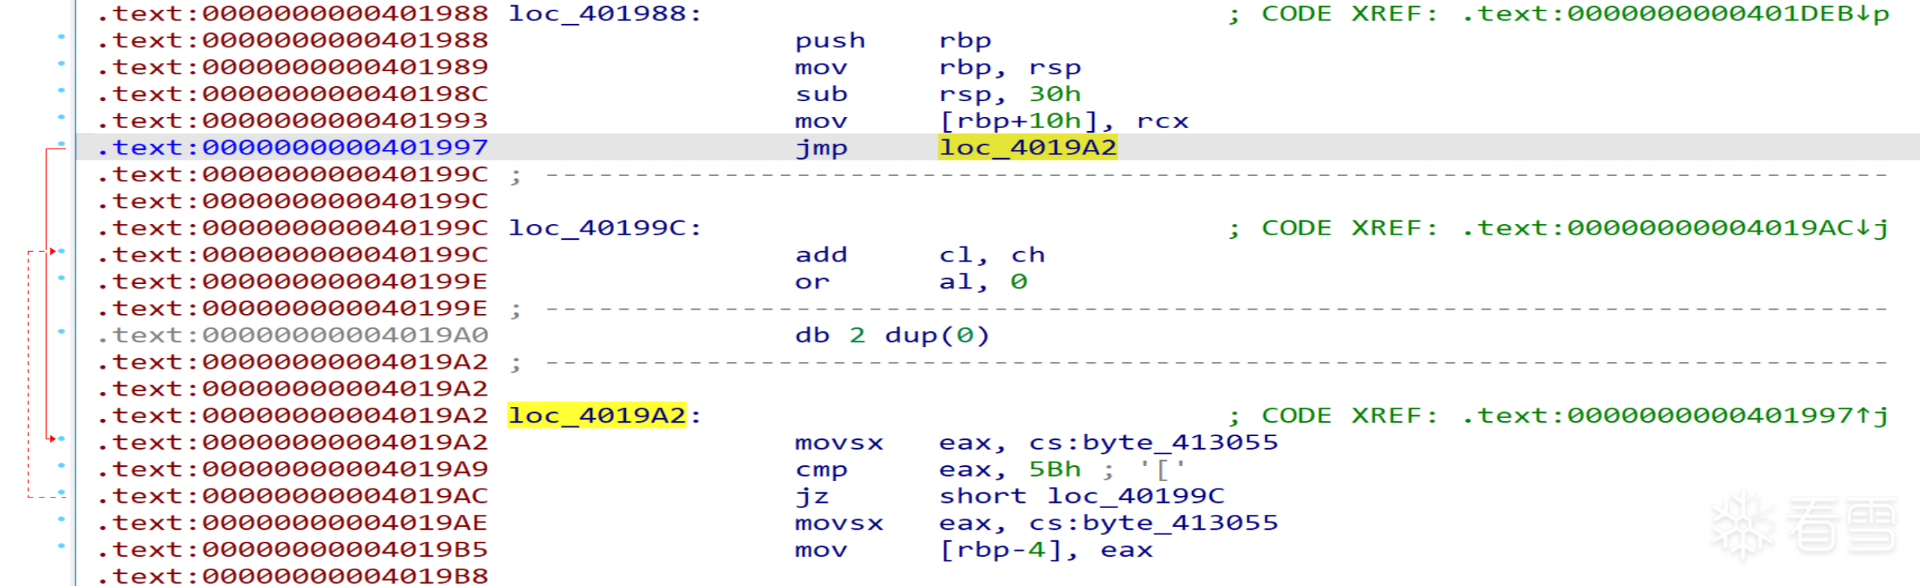
1. jz + 1
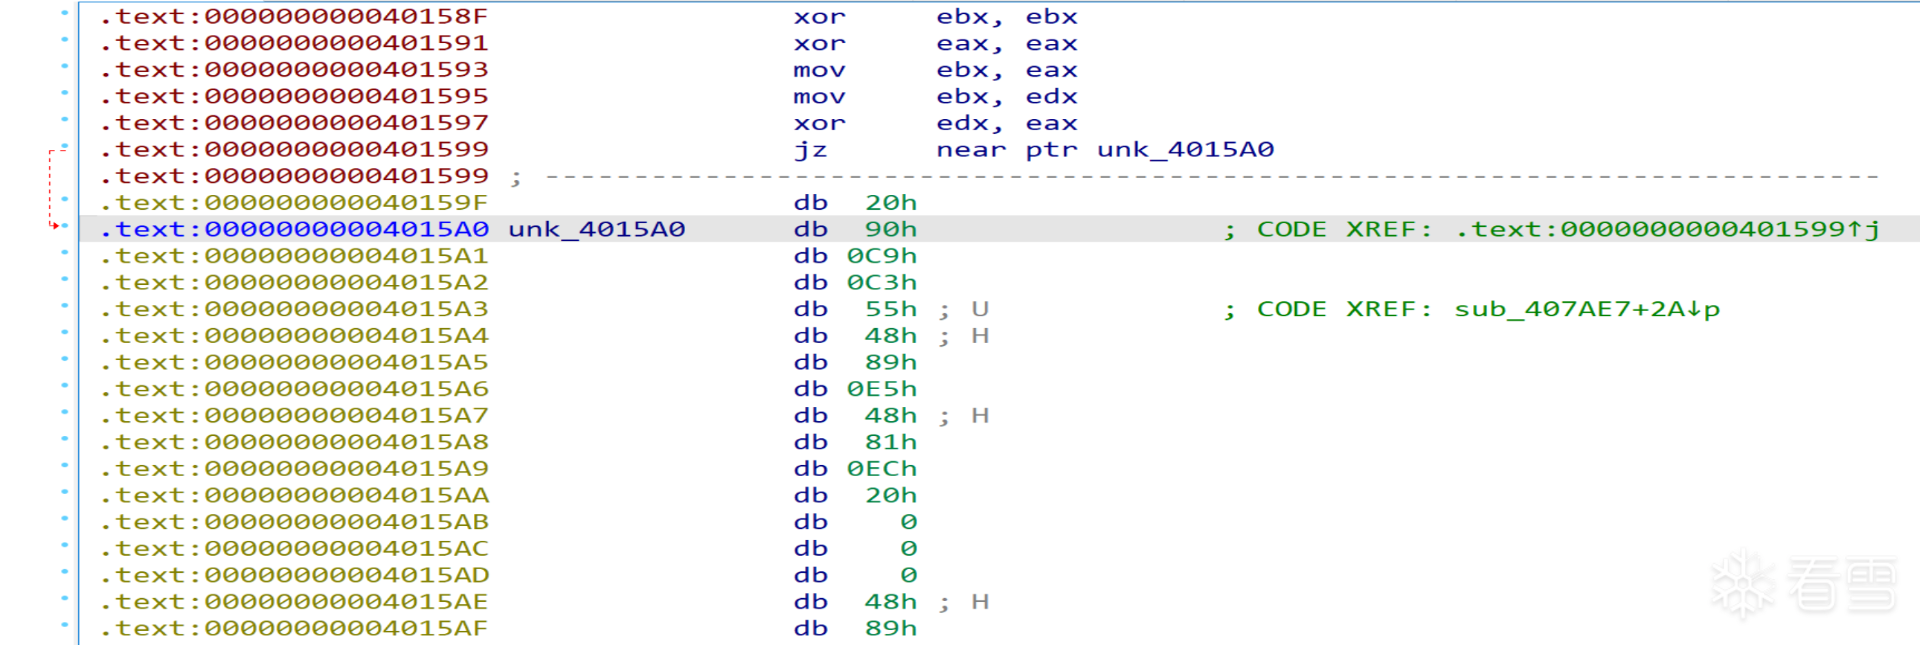
该类型花指令跳过了一个字节,特征码为0F 84 01 00 00 00。如图所示,由简单的数据流分析可知,0x401599处的指令一定会跳转,因此0x40159F处的指令永远不会到达,patch方法为直接nop该字节。
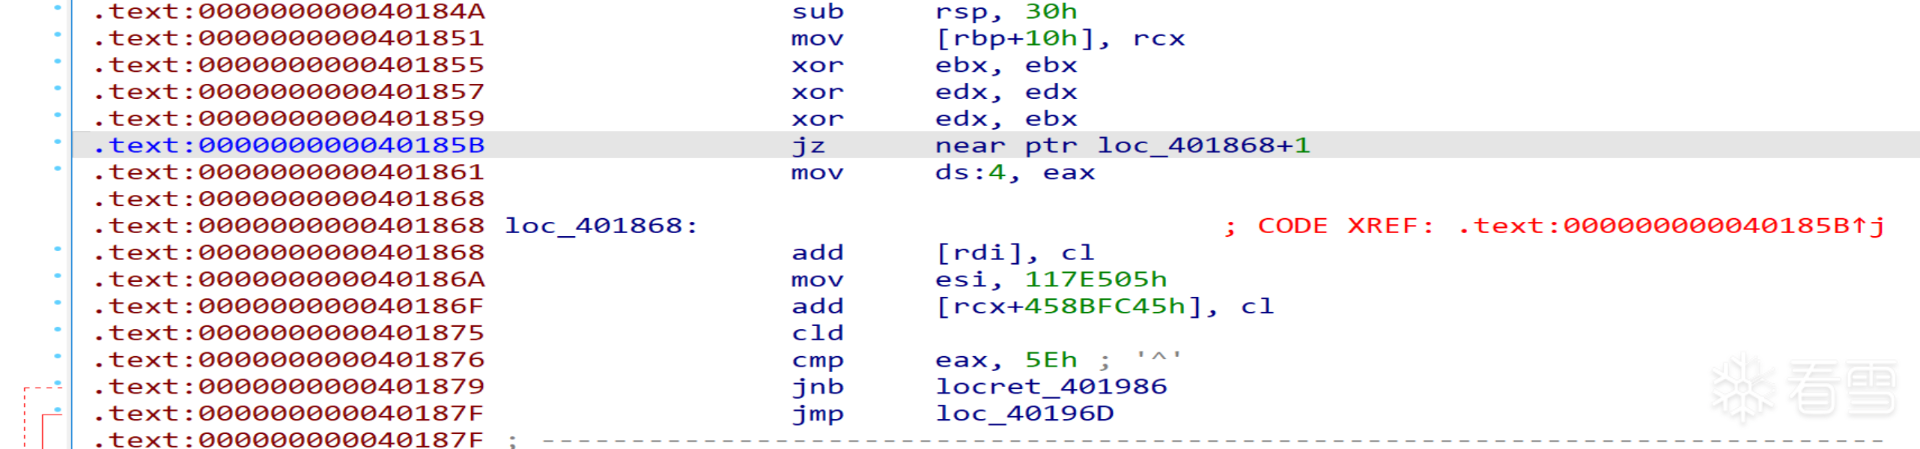
2. jz + 2

同jz + 1类型,特征码为0F 84 02 00 00 00,直接patch跳过的2个字节即可。
3. jz + 8
同jz + 1类型,特征码为0F 84 08 00 00 00,直接patch跳过的8个字节即可。
4. jge + 6
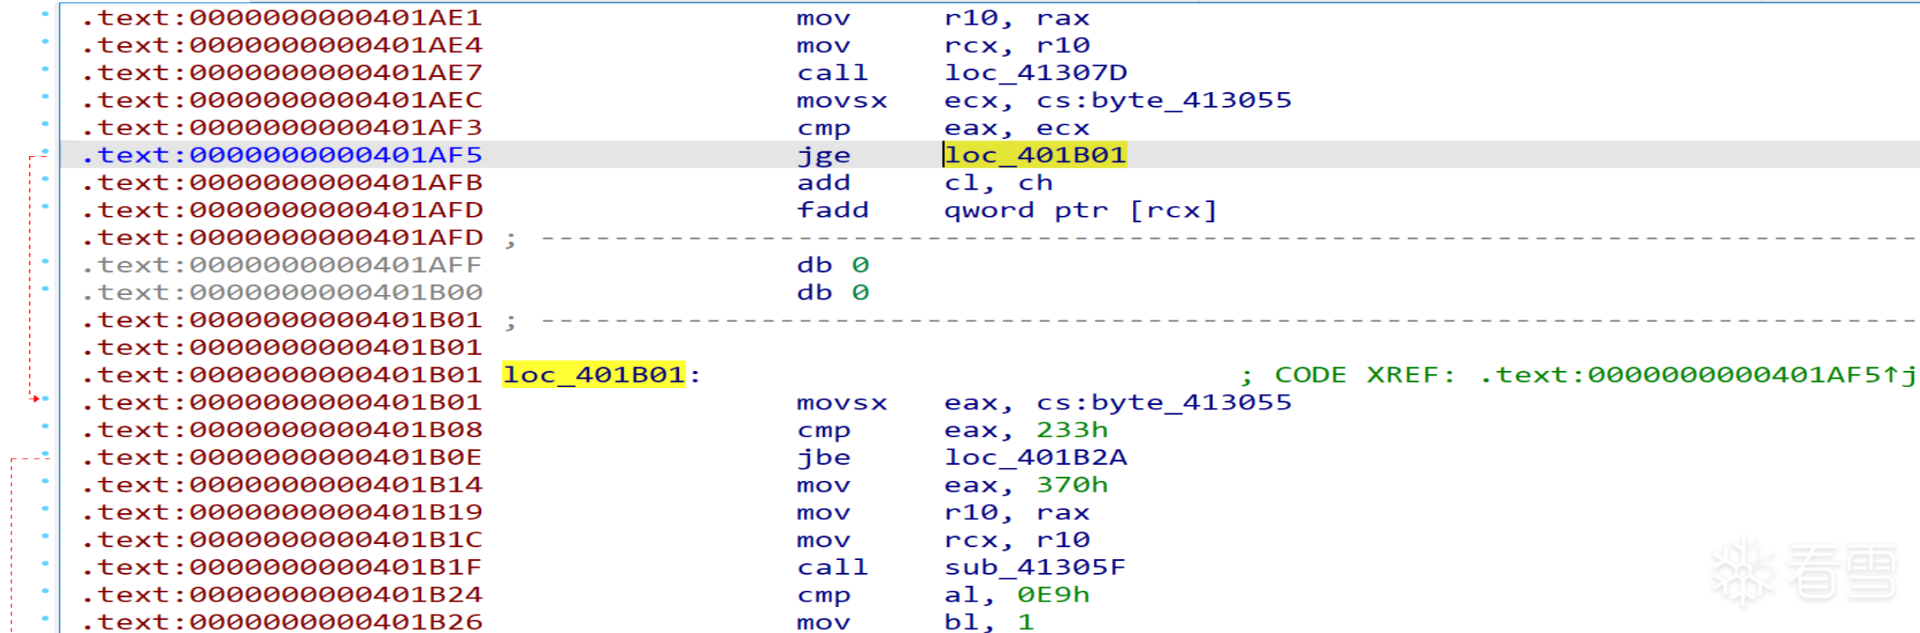
该类型花指令特征码为0F 8D 06 00 00 00,其不能像前几种一样通过数据流分析直接观察出一定跳转,但若程序执行到0x401AFB处,则最终一定会崩溃。笔者的做法偏向保守,将跳过的6个字节前2个patch为ud2指令,后4个指令patch为nop指令,这样静态分析得到的伪代码也能提示跳转到此处会产生BUG。
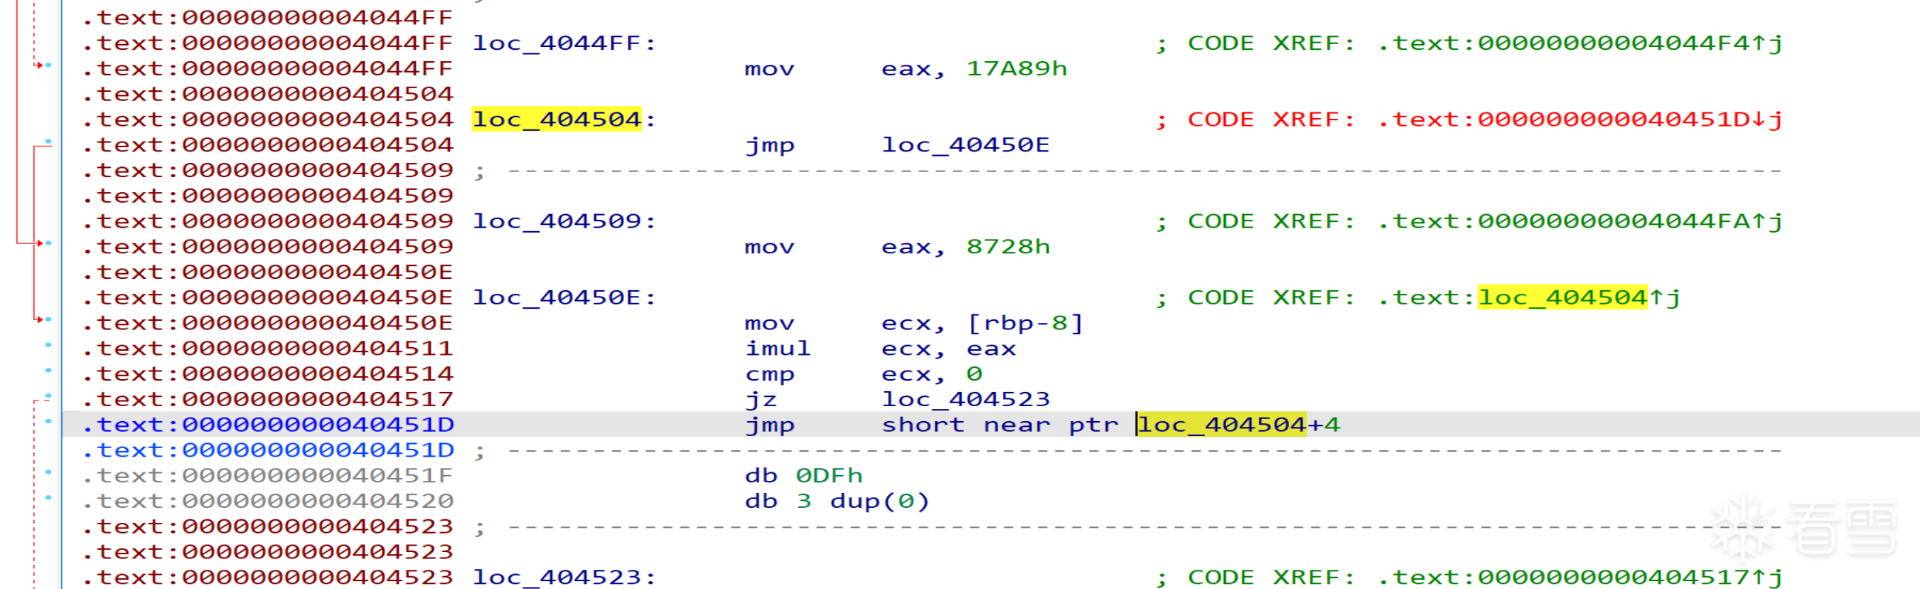
5. jmp + 6
同jz + 1类型,特征码为E9 06 00 00 00 00(多使用一个00避免误报),直接patch跳过的6个字节即可。
6. jmp - 23
同jge + 6类型,特征码为EB E9, 将该指令patch为ud2指令,其后的4个字节patch为nop指令。
7. cmp al, 0E9h
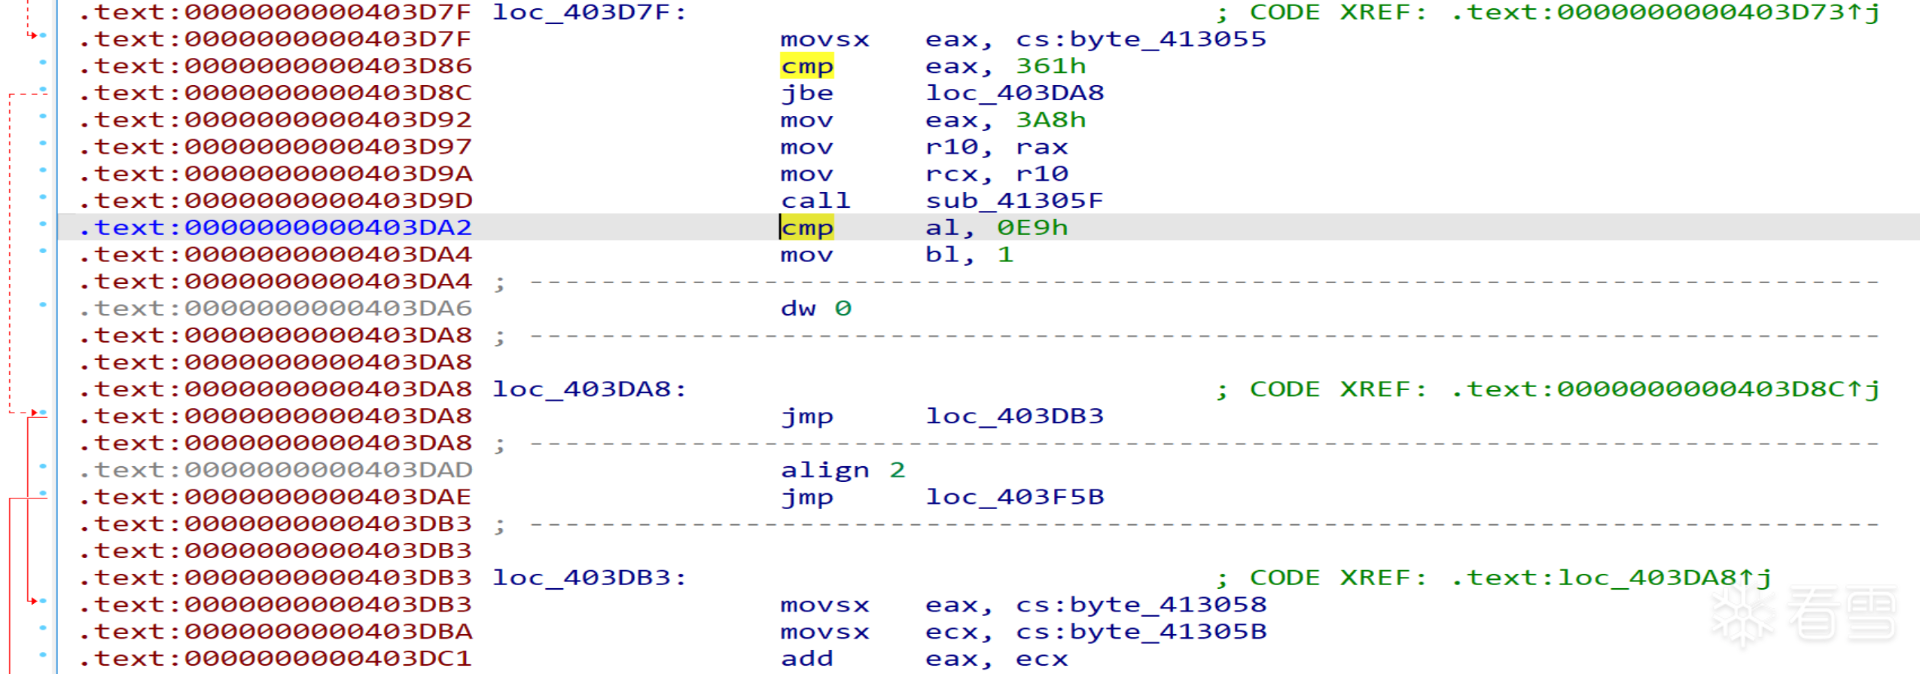
同jge + 6类型,特征码为3C E9, 将该指令patch为ud2指令,其后的4个字节patch为nop指令。
8. 特殊
0x413824处的指令jmp qword ptr cs:45BF481Dh非法,查找交叉引用发现0x413826处有跳转到这里的条件分支,因此将该处前2个字节patch为ud2指令。
0x41669E处的两个00直接patch为nop指令。
0x41878D处patch一个ud2指令加上9字节的nop,否则会干扰sub_418779的函数分析。
综上所述,我们可以编写出处理花指令混淆的解混淆idc脚本:
#include <idc.idc>

static main()
{
	auto seg, current_ea, ea;

	// 遍历所有段
	for (seg = get_first_seg(); seg != BADADDR; seg = get_next_seg(seg))
	{
		auto seg_name = get_segm_name(seg);

		// 检查段名是否符合要求
		if (seg_name != ".text" && seg_name != "UPX0")
		{
			//Message("跳过段: %s (0x%X)\n", seg_name, seg);
			continue;
		}

		Message("正在处理段: %s (0x%X)\n", seg_name, seg);

		// 获取段的起始和结束地址
		auto start_ea = seg;
		auto end_ea = get_segm_end(seg);

		current_ea = start_ea;
		auto pattern1 = "0F 84 01 00 00 00";
		while (1)
		{
			ea = find_binary(current_ea, SEARCH_DOWN, pattern1);
			if (ea > end_ea || ea == BADADDR)
				break;

			Message("Found pattern1 at 0x%X\n", ea);
			patch_byte(ea + 6, 0x90);
			current_ea = ea + 1;
		}

		current_ea = start_ea;
		auto pattern2 = "0F 84 02 00 00 00";
		while (1)
		{
			ea = find_binary(current_ea, SEARCH_DOWN, pattern2);
			if (ea > end_ea || ea == BADADDR)
				break;

			Message("Found pattern2 at 0x%X\n", ea);
			patch_word(ea + 6, 0x9090);
			current_ea = ea + 1;
		}

		current_ea = start_ea;
		auto pattern3 = "0F 84 08 00 00 00";
		while (1)
		{
			ea = find_binary(current_ea, SEARCH_DOWN, pattern3);
			if (ea > end_ea || ea == BADADDR)
				break;

			Message("Found pattern3 at 0x%X\n", ea);
			patch_qword(ea + 6, 0x9090909090909090);
			current_ea = ea + 1;
		}

		current_ea = start_ea;
		auto pattern4 = "0F 8D 06 00 00 00";
		while (1)
		{
			ea = find_binary(current_ea, SEARCH_DOWN, pattern4);
			if (ea > end_ea || ea == BADADDR)
				break;

			Message("Found pattern4 at 0x%X\n", ea);
			patch_word(ea + 6, 0x0B0F);
			patch_dword(ea + 8, 0x90909090);
			current_ea = ea + 1;
		}

		current_ea = start_ea;
		auto pattern5 = "E9 06 00 00 00 00";
		while (1)
		{
			ea = find_binary(current_ea, SEARCH_DOWN, pattern5);
			if (ea > end_ea || ea == BADADDR)
				break;

			Message("Found pattern5 at 0x%X\n", ea);
			patch_word(ea + 5, 0x0B0F);
			patch_dword(ea + 7, 0x90909090);
			current_ea = ea + 1;
		}

		current_ea = start_ea;
		auto pattern6 = "EB E9";
		while (1)
		{
			ea = find_binary(current_ea, SEARCH_DOWN, pattern6);
			if (ea > end_ea || ea == BADADDR)
				break;

			Message("Found pattern6 at 0x%X\n", ea);
			patch_word(ea, 0x0B0F);
			patch_dword(ea + 2, 0x90909090);
			current_ea = ea + 1;
		}

		current_ea = start_ea;
		auto pattern7 = "3C E9";
		while (1)
		{
			ea = find_binary(current_ea, SEARCH_DOWN, pattern7);
			if (ea > end_ea || ea == BADADDR)
				break;

			Message("Found pattern7 at 0x%X\n", ea);
			patch_word(ea + 2, 0x0B0F);				// ud2
			patch_word(ea + 4, 0x9090);				// nop
			current_ea = ea + 1;
		}

	}

	patch_word(0x413824, 0x0B0F);
	patch_word(0x41669E, 0x0B0F);
	patch_word(0x41878D, 0x0B0F);
	patch_qword(0x41878F, 0x9090909090909090);
	patch_byte(0x418797, 0x90);

	Message("Finished.\n");
}
运行脚本后,将patch后文件保存为re-new1.exe,IDA打开此文件后,发现大部分函数已经被识别出来:
手工把剩下没有自动识别成函数的位置按P键生成函数,至此我们完全实现了语法解混淆: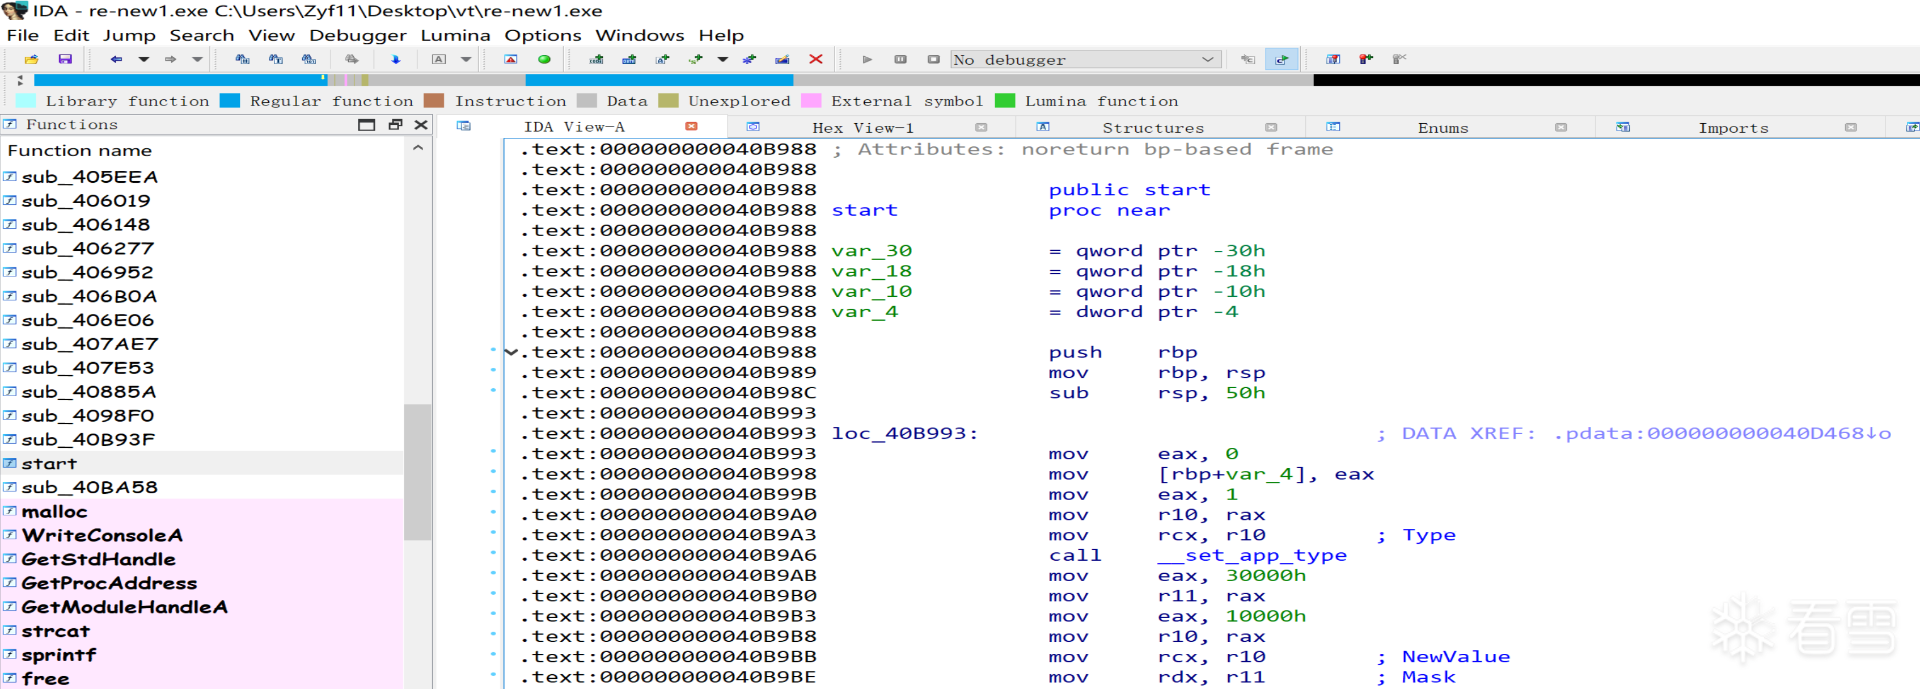
三、 去除语义混淆
从start函数中,不难发现sub_4098F0为main函数,F5反编译代码如下: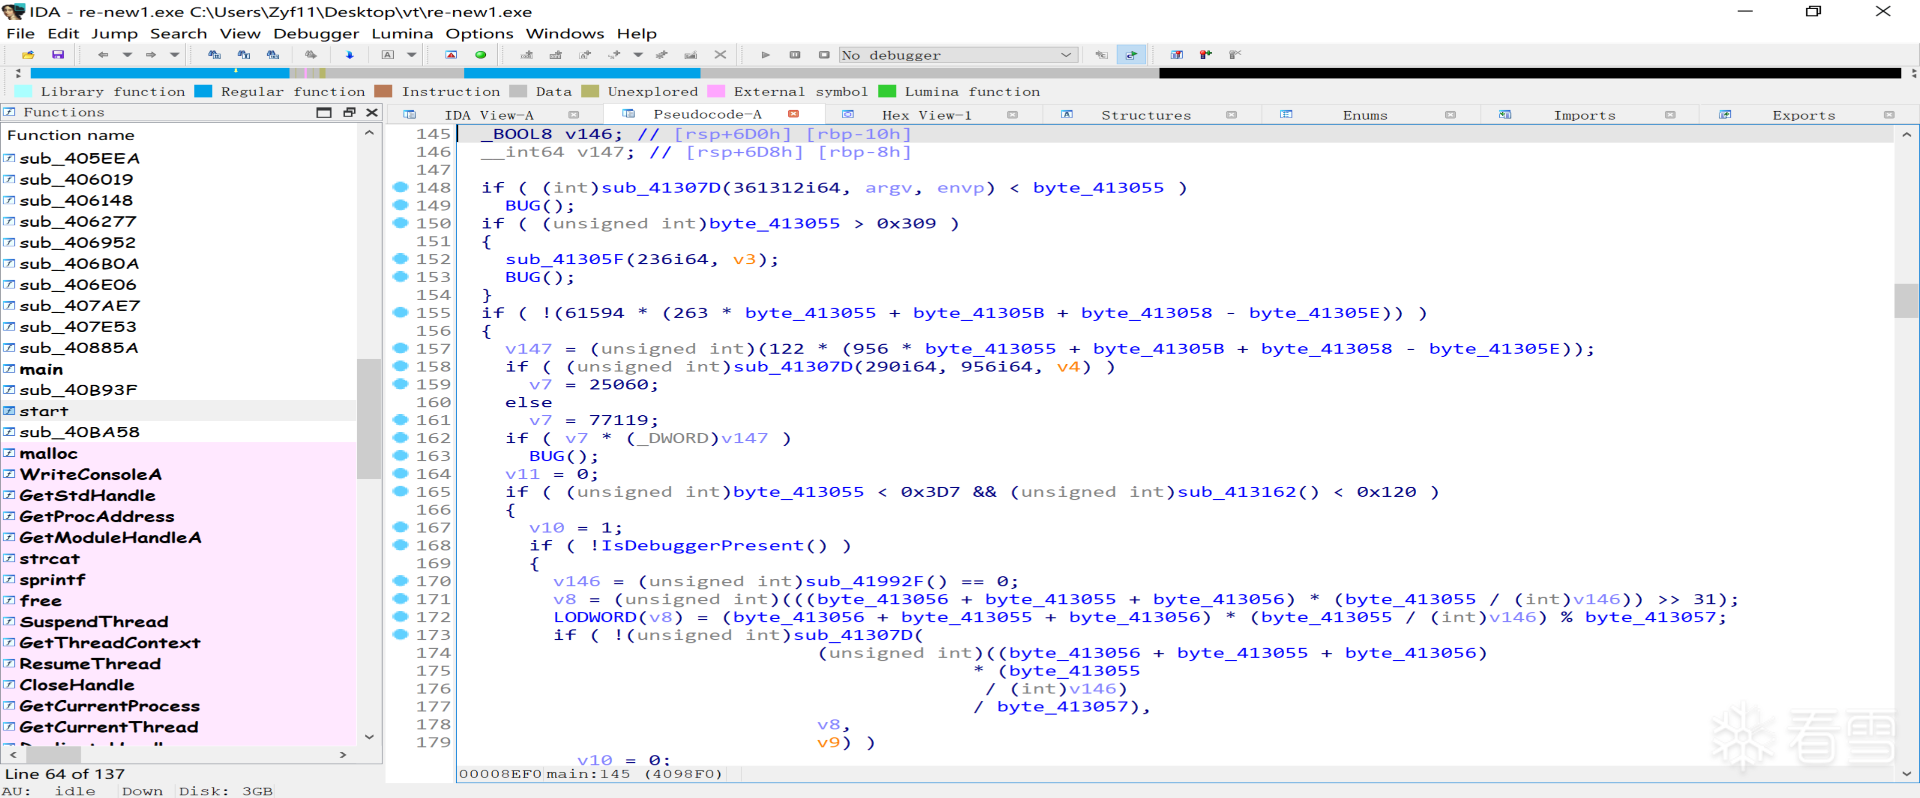
可以发现程序还是非常难以阅读,不过此时笔者发现下面区域的字节都是固定常数0-9: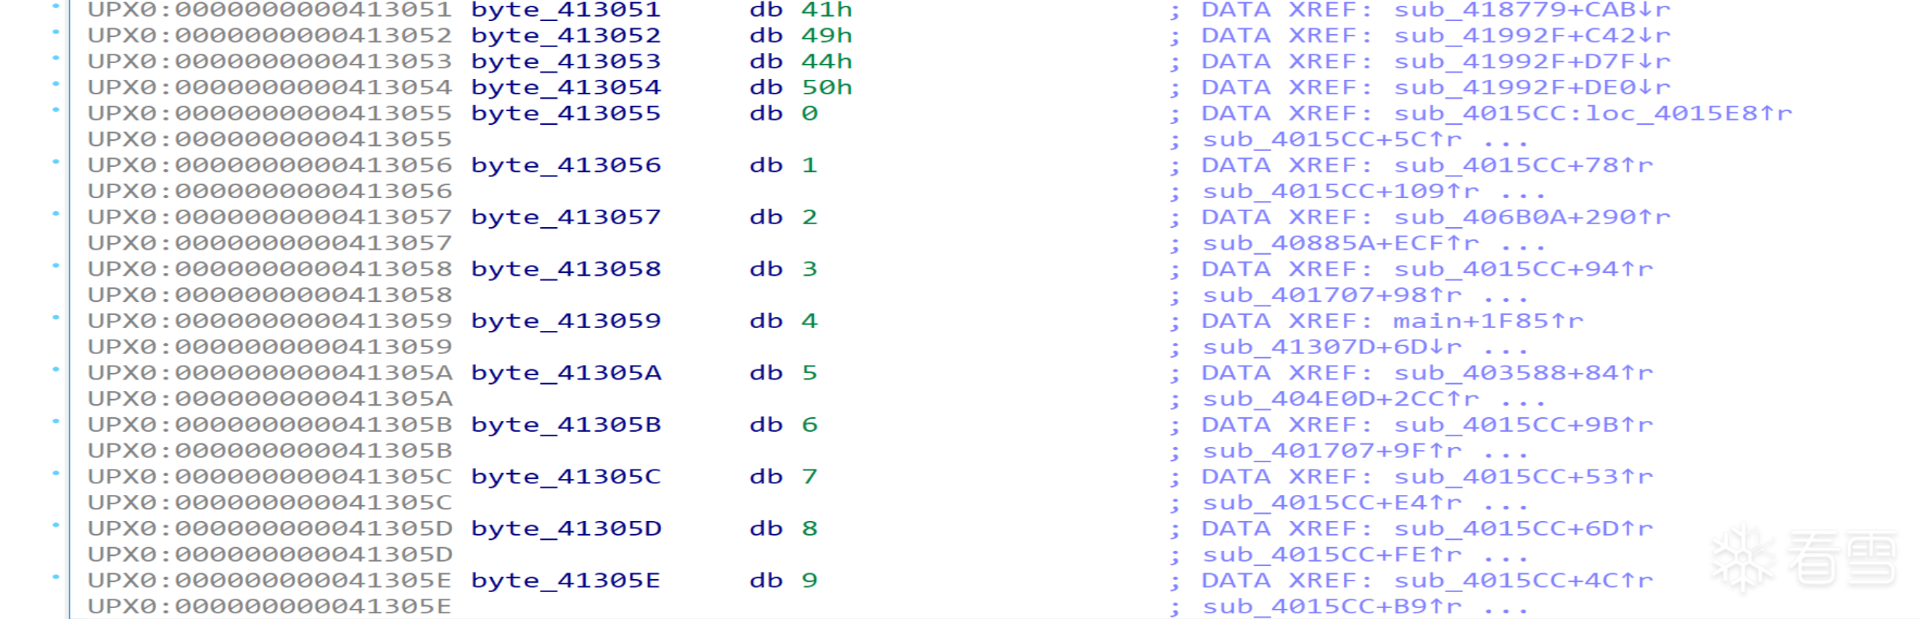
交叉引用发现它们只被读而没被写,因此可以分别重命名为byte0-9:
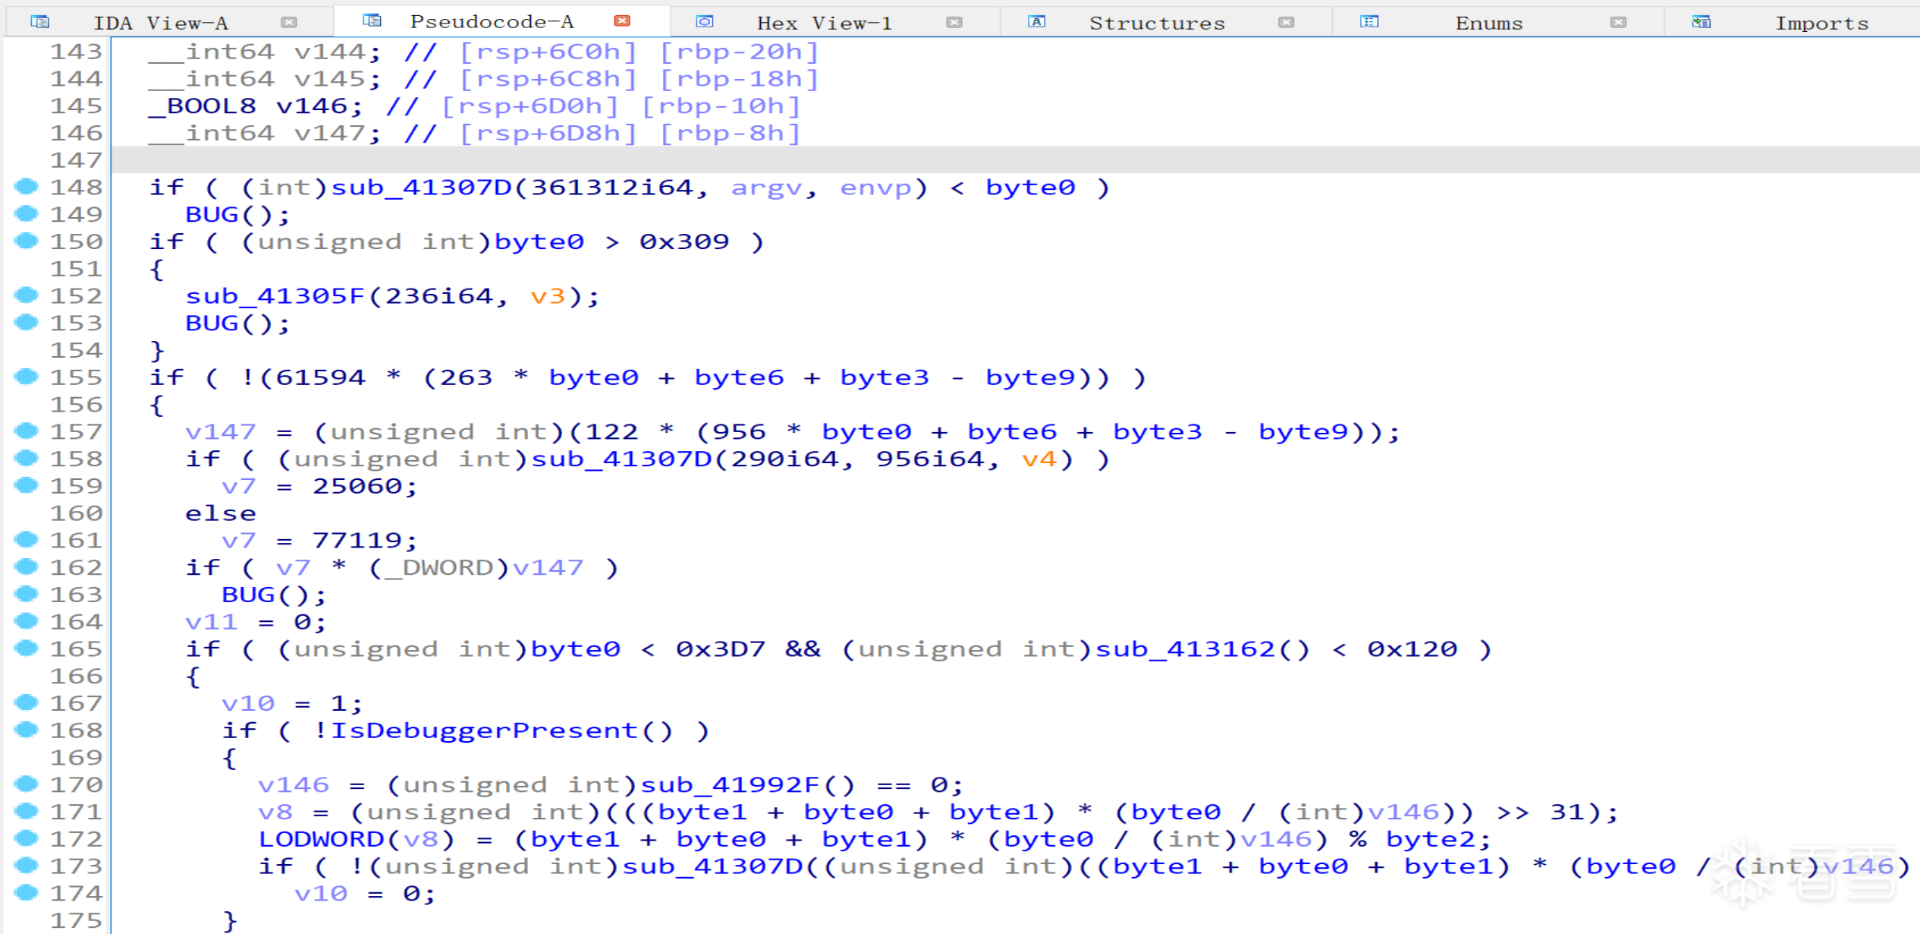
重新分析反编译代码,发现它们被用来实现语法混淆,例如155行的条件分支永远为真,v147永远为0等。因此我们可以考虑把对这些常量的引用的指令变成对常数引用的指令,利用IDA的优化来去除这些永真永假跳转。
以byte0为例,其指令形式为movsx ecx/eax/edx, cs:byte0,占7个字节,我们可以将其改为mov ecx/eax/edx, 0(占5个字节),再填充2字节的nop指令,对byte0-byte9使用idc脚本去除混淆,代码如下:
#include <idc.idc>

static main()
{
    auto seg, current_ea, mnemonic, op1, op2;

    // 遍历所有段
    for (seg = get_first_seg(); seg != BADADDR; seg = get_next_seg(seg))
    {
        auto seg_name = get_segm_name(seg);

        // 检查段名是否符合要求
        if (seg_name != ".text" && seg_name != "UPX0")
        {
            //Message("跳过段: %s (0x%X)\n", seg_name, seg);
            continue;
        }

        Message("正在处理段: %s (0x%X)\n", seg_name, seg);

        // 获取段的起始和结束地址
        auto start_ea = seg;
        auto end_ea = get_segm_end(seg);

        // 遍历段中的每一条指令
        current_ea = start_ea;
        while (current_ea < end_ea && current_ea != BADADDR)
        {
            // 获取指令的助记符和操作数
            mnemonic = print_insn_mnem(current_ea);
            op1 = print_operand(current_ea, 0);
            op2 = print_operand(current_ea, 1);

            // 检查是否是目标指令
            if (mnemonic == "movsx" && op2 == "cs:byte0")
            {
                Message("Target Ins at: 0x%X\n", current_ea);
                if (op1 == "eax")
                {
                    patch_byte(current_ea, 0xB8);       // mov eax, imm32 的操作码
                }
                else if (op1 == "ecx")
                {
                    patch_byte(current_ea, 0xB9);       // mov ecx, imm32 的操作码
                }
                else if (op1 == "edx")
                {
                    patch_byte(current_ea, 0xBA);       // mov edx, imm32 的操作码
                }

                // 设置 imm32 = 0
                patch_dword(current_ea + 1, 0);      // imm32 = 0
                patch_word(current_ea + 5, 0x9090);	// nop
                create_insn(current_ea);             // 重新分析指令
            }

            // 检查是否是目标指令
            if (mnemonic == "movsx" && op2 == "cs:byte1")
            {
                Message("Target Ins at: 0x%X\n", current_ea);
                if (op1 == "eax")
                {
                    patch_byte(current_ea, 0xB8);       // mov eax, imm32 的操作码
                }
                else if (op1 == "ecx")
                {
                    patch_byte(current_ea, 0xB9);       // mov ecx, imm32 的操作码
                }
                else if (op1 == "edx")
                {
                    patch_byte(current_ea, 0xBA);       // mov edx, imm32 的操作码
                }

                // 设置 imm32 = 1
                patch_dword(current_ea + 1, 1);      // imm32 = 1
                patch_word(current_ea + 5, 0x9090);	// nop
                create_insn(current_ea);             // 重新分析指令
            }

            // 检查是否是目标指令
            if (mnemonic == "movsx" && op2 == "cs:byte2")
            {
                Message("Target Ins at: 0x%X\n", current_ea);
                if (op1 == "eax")
                {
                    patch_byte(current_ea, 0xB8);       // mov eax, imm32 的操作码
                }
                else if (op1 == "ecx")
                {
                    patch_byte(current_ea, 0xB9);       // mov ecx, imm32 的操作码
                }
                else if (op1 == "edx")
                {
                    patch_byte(current_ea, 0xBA);       // mov edx, imm32 的操作码
                }

                // 设置 imm32 = 2
                patch_dword(current_ea + 1, 2);      // imm32 = 2
                patch_word(current_ea + 5, 0x9090);	// nop
                create_insn(current_ea);             // 重新分析指令
            }

            // 检查是否是目标指令
            if (mnemonic == "movsx" && op2 == "cs:byte3")
            {
                Message("Target Ins at: 0x%X\n", current_ea);
                if (op1 == "eax")
                {
                    patch_byte(current_ea, 0xB8);       // mov eax, imm32 的操作码
                }
                else if (op1 == "ecx")
                {
                    patch_byte(current_ea, 0xB9);       // mov ecx, imm32 的操作码
                }
                else if (op1 == "edx")
                {
                    patch_byte(current_ea, 0xBA);       // mov edx, imm32 的操作码
                }

                // 设置 imm32 = 3
                patch_dword(current_ea + 1, 3);      // imm32 = 3
                patch_word(current_ea + 5, 0x9090);	// nop
                create_insn(current_ea);             // 重新分析指令
            }

            // 检查是否是目标指令
            if (mnemonic == "movsx" && op2 == "cs:byte4")
            {
                Message("Target Ins at: 0x%X\n", current_ea);
                if (op1 == "eax")
                {
                    patch_byte(current_ea, 0xB8);       // mov eax, imm32 的操作码
                }
                else if (op1 == "ecx")
                {
                    patch_byte(current_ea, 0xB9);       // mov ecx, imm32 的操作码
                }
                else if (op1 == "edx")
                {
                    patch_byte(current_ea, 0xBA);       // mov edx, imm32 的操作码
                }

                // 设置 imm32 = 4
                patch_dword(current_ea + 1, 4);      // imm32 = 4
                patch_word(current_ea + 5, 0x9090);	// nop
                create_insn(current_ea);             // 重新分析指令
            }

            // 检查是否是目标指令
            if (mnemonic == "movsx" && op2 == "cs:byte5")
            {
                Message("Target Ins at: 0x%X\n", current_ea);
                if (op1 == "eax")
                {
                    patch_byte(current_ea, 0xB8);       // mov eax, imm32 的操作码
                }
                else if (op1 == "ecx")
                {
                    patch_byte(current_ea, 0xB9);       // mov ecx, imm32 的操作码
                }
                else if (op1 == "edx")
                {
                    patch_byte(current_ea, 0xBA);       // mov edx, imm32 的操作码
                }

                // 设置 imm32 = 5
                patch_dword(current_ea + 1, 5);      // imm32 = 5
                patch_word(current_ea + 5, 0x9090);	// nop
                create_insn(current_ea);             // 重新分析指令
            }

            // 检查是否是目标指令
            if (mnemonic == "movsx" && op2 == "cs:byte6")
            {
                Message("Target Ins at: 0x%X\n", current_ea);
                if (op1 == "eax")
                {
                    patch_byte(current_ea, 0xB8);       // mov eax, imm32 的操作码
                }
                else if (op1 == "ecx")
                {
                    patch_byte(current_ea, 0xB9);       // mov ecx, imm32 的操作码
                }
                else if (op1 == "edx")
                {
                    patch_byte(current_ea, 0xBA);       // mov edx, imm32 的操作码
                }

                // 设置 imm32 = 6
                patch_dword(current_ea + 1, 6);      // imm32 = 6
                patch_word(current_ea + 5, 0x9090);	// nop
                create_insn(current_ea);             // 重新分析指令
            }

            // 检查是否是目标指令
            if (mnemonic == "movsx" && op2 == "cs:byte7")
            {
                Message("Target Ins at: 0x%X\n", current_ea);
                if (op1 == "eax")
                {
                    patch_byte(current_ea, 0xB8);       // mov eax, imm32 的操作码
                }
                else if (op1 == "ecx")
                {
                    patch_byte(current_ea, 0xB9);       // mov ecx, imm32 的操作码
                }
                else if (op1 == "edx")
                {
                    patch_byte(current_ea, 0xBA);       // mov edx, imm32 的操作码
                }

                // 设置 imm32 = 7
                patch_dword(current_ea + 1, 7);      // imm32 = 7
                patch_word(current_ea + 5, 0x9090);	// nop
                create_insn(current_ea);             // 重新分析指令
            }

            // 检查是否是目标指令
            if (mnemonic == "movsx" && op2 == "cs:byte8")
            {
                Message("Target Ins at: 0x%X\n", current_ea);
                if (op1 == "eax")
                {
                    patch_byte(current_ea, 0xB8);       // mov eax, imm32 的操作码
                }
                else if (op1 == "ecx")
                {
                    patch_byte(current_ea, 0xB9);       // mov ecx, imm32 的操作码
                }
                else if (op1 == "edx")
                {
                    patch_byte(current_ea, 0xBA);       // mov edx, imm32 的操作码
                }

                // 设置 imm32 = 8
                patch_dword(current_ea + 1, 8);      // imm32 = 0
                patch_word(current_ea + 5, 0x9090);	// nop
                create_insn(current_ea);             // 重新分析指令
            }

            // 检查是否是目标指令
            if (mnemonic == "movsx" && op2 == "cs:byte9")
            {
                Message("Target Ins at: 0x%X\n", current_ea);
                if (op1 == "eax")
                {
                    patch_byte(current_ea, 0xB8);       // mov eax, imm32 的操作码
                }
                else if (op1 == "ecx")
                {
                    patch_byte(current_ea, 0xB9);       // mov ecx, imm32 的操作码
                }
                else if (op1 == "edx")
                {
                    patch_byte(current_ea, 0xBA);       // mov edx, imm32 的操作码
                }

                // 设置 imm32 = 9
                patch_dword(current_ea + 1, 9);      // imm32 = 9
                patch_word(current_ea + 5, 0x9090);	// nop
                create_insn(current_ea);             // 重新分析指令
            }


            // 移动到下一条指令(避免死循环)
            auto next_ea = next_head(current_ea, end_ea);
            if (next_ea == BADADDR || next_ea <= current_ea)
                break;

            current_ea = next_ea;
        }
    }

    Message("Finished.\n");
}
执行后发现程序反编译得到的代码中去除了很多用于混淆的永真永假分支: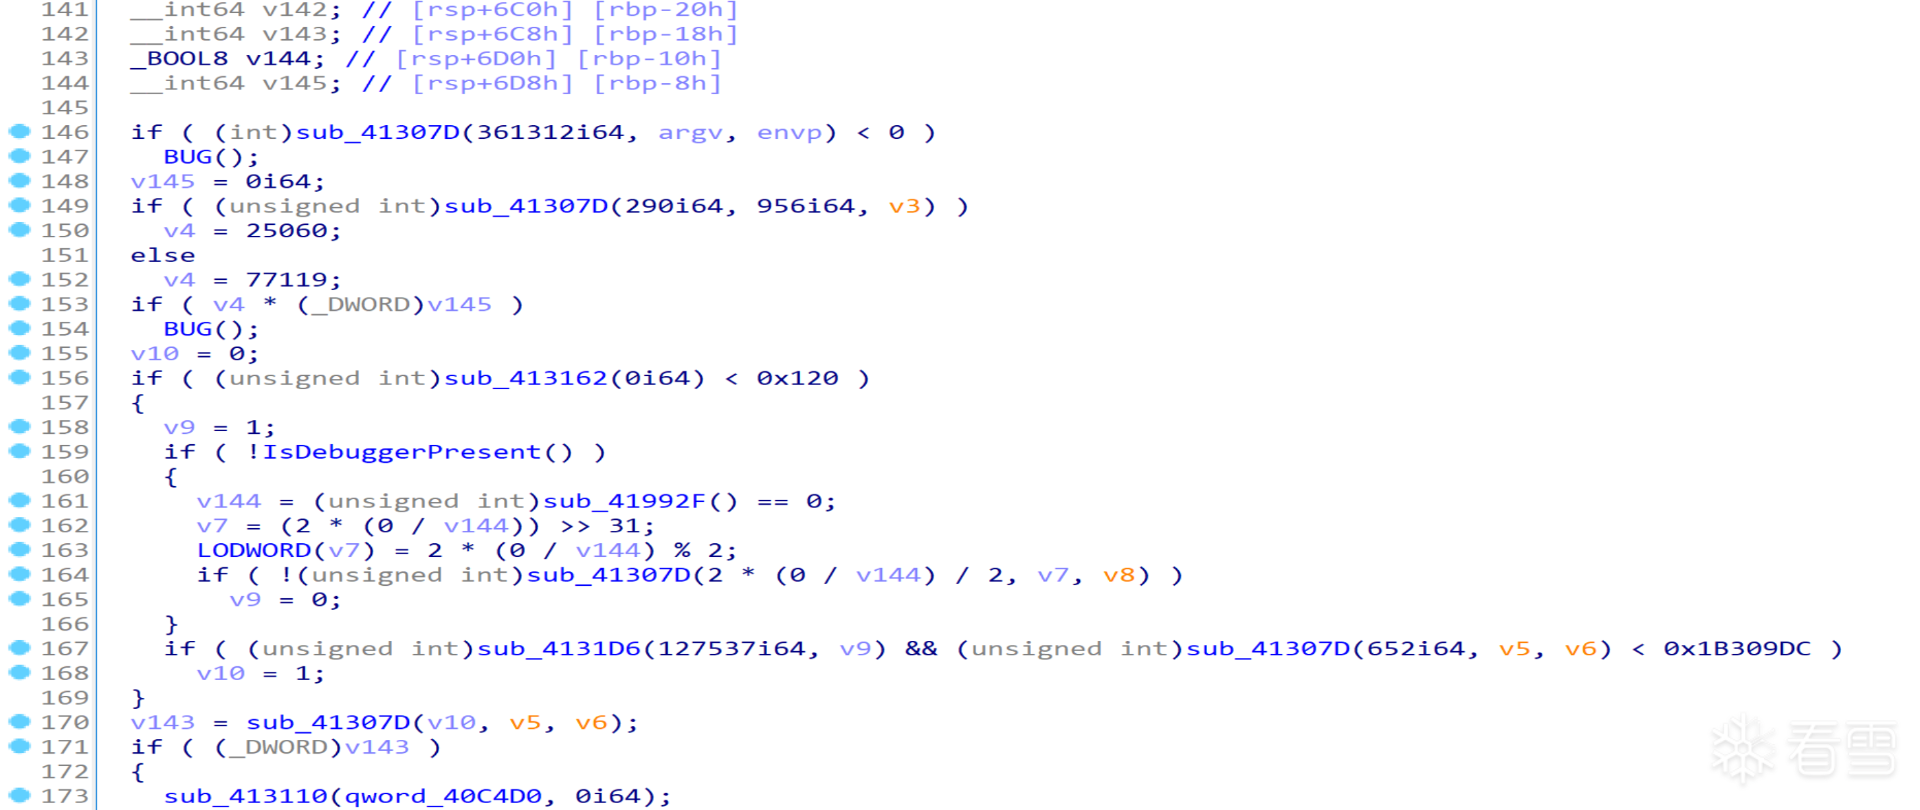
此时,笔者发现三个使用频率最高的函数也使用了语义混淆,例如sub_41307D(重命名为return_arg1)返回第一个参数的值: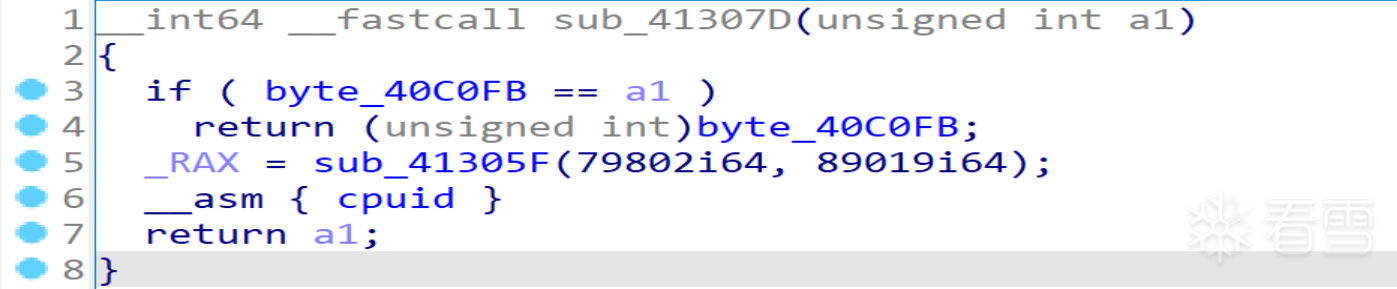
类似地,可以发现sub_413162(重命名为return_num1)返回固定值1,sub_4131D6(重命名为return_arg2)返回第二个参数的值,我们可以继续编写idc脚本,把对这3个函数的调用(call指令)换成对应的对rax/eax操作的指令,代码如下:
#include <idc.idc>

static main()
{
    auto seg, current_ea, mnemonic, op1, op2;

    // 遍历所有段
    for (seg = get_first_seg(); seg != BADADDR; seg = get_next_seg(seg))
    {
        auto seg_name = get_segm_name(seg);

        // 检查段名是否符合要求
        if (seg_name != ".text" && seg_name != "UPX0")
        {
            //Message("跳过段: %s (0x%X)\n", seg_name, seg);
            continue;
        }

        Message("正在处理段: %s (0x%X)\n", seg_name, seg);

        // 获取段的起始和结束地址
        auto start_ea = seg;
        auto end_ea = get_segm_end(seg);

        // 遍历段中的每一条指令
        current_ea = start_ea;
        while (current_ea < end_ea && current_ea != BADADDR)
        {
            // 获取指令的助记符和操作数
            mnemonic = print_insn_mnem(current_ea);
            op1 = print_operand(current_ea, 0);

            // 检查是否是目标指令
            if (mnemonic == "call")
            {
                if (op1 == "returnarg1")
                {
                    Message("Target Ins at: 0x%X (call returnarg1)\n", current_ea);

                    // 替换为 mov rax, rcx (3 字节)
                    patch_byte(current_ea, 0x48);       // REX.W 前缀
                    patch_byte(current_ea + 1, 0x89);   // mov 操作码
                    patch_byte(current_ea + 2, 0xC8);   // modrm: mov r/m64, r64 (rax = rcx)

                    // 填充 2 字节的 nop 指令
                    patch_byte(current_ea + 3, 0x90);   // nop
                    patch_byte(current_ea + 4, 0x90);   // nop

                    // 重新分析指令
                    create_insn(current_ea);
                }
                else if (op1 == "return_num1")
                {
                    Message("Target Ins at: 0x%X (call return_num1)\n", current_ea);

                    // 替换为 mov eax, 1 (5 字节)
                    patch_byte(current_ea, 0xB8);       // mov eax, imm32 的操作码
                    patch_dword(current_ea + 1, 1);     // imm32 = 1

                    // 重新分析指令
                    create_insn(current_ea);
                }
                else if (op1 == "return_arg2_except1695")
                {
                    Message("Target Ins at: 0x%X (call return_arg2_except1695)\n", current_ea);

                    // 替换为 mov rax, rdx (3 字节)
                    patch_byte(current_ea, 0x48);       // REX.W 前缀
                    patch_byte(current_ea + 1, 0x89);   // mov 操作码
                    patch_byte(current_ea + 2, 0xD0);   // modrm: mov r/m64, r64 (rax = rdx)

                    // 填充 2 字节的 nop 指令
                    patch_byte(current_ea + 3, 0x90);   // nop
                    patch_byte(current_ea + 4, 0x90);   // nop

                    // 重新分析指令
                    create_insn(current_ea);
                }
            }

            // 移动到下一条指令(避免死循环)
            auto next_ea = next_head(current_ea, end_ea);
            if (next_ea == BADADDR || next_ea <= current_ea)
                break;

            current_ea = next_ea;
        }
    }

    Message("Finished.\n");
}执行后发现反编译生成的代码缩减了一大半,至此我们基本实现了语义解混淆,剩下的混淆内容可以在后续分析中去除:
三、 程序逻辑分析
1. 反调试分析
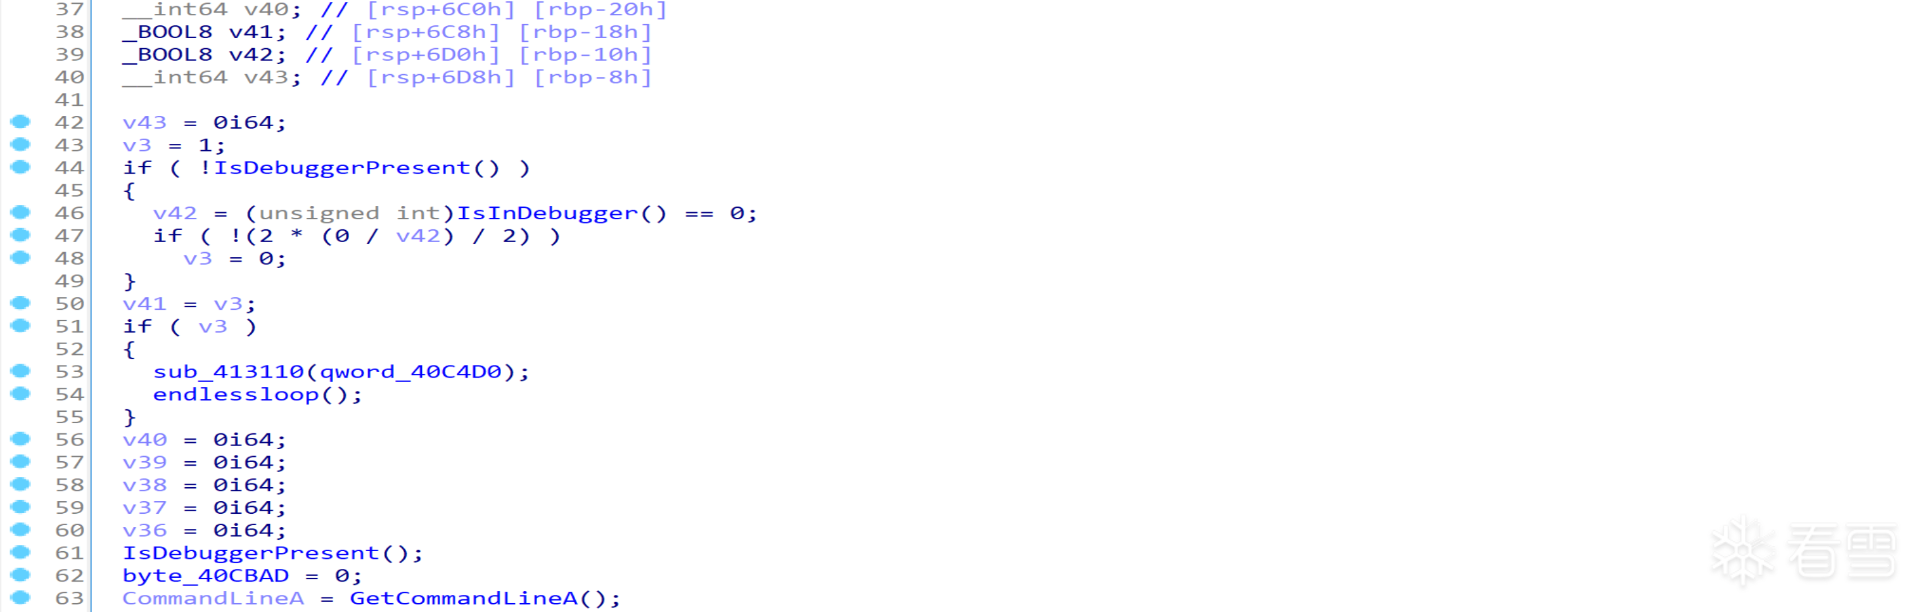
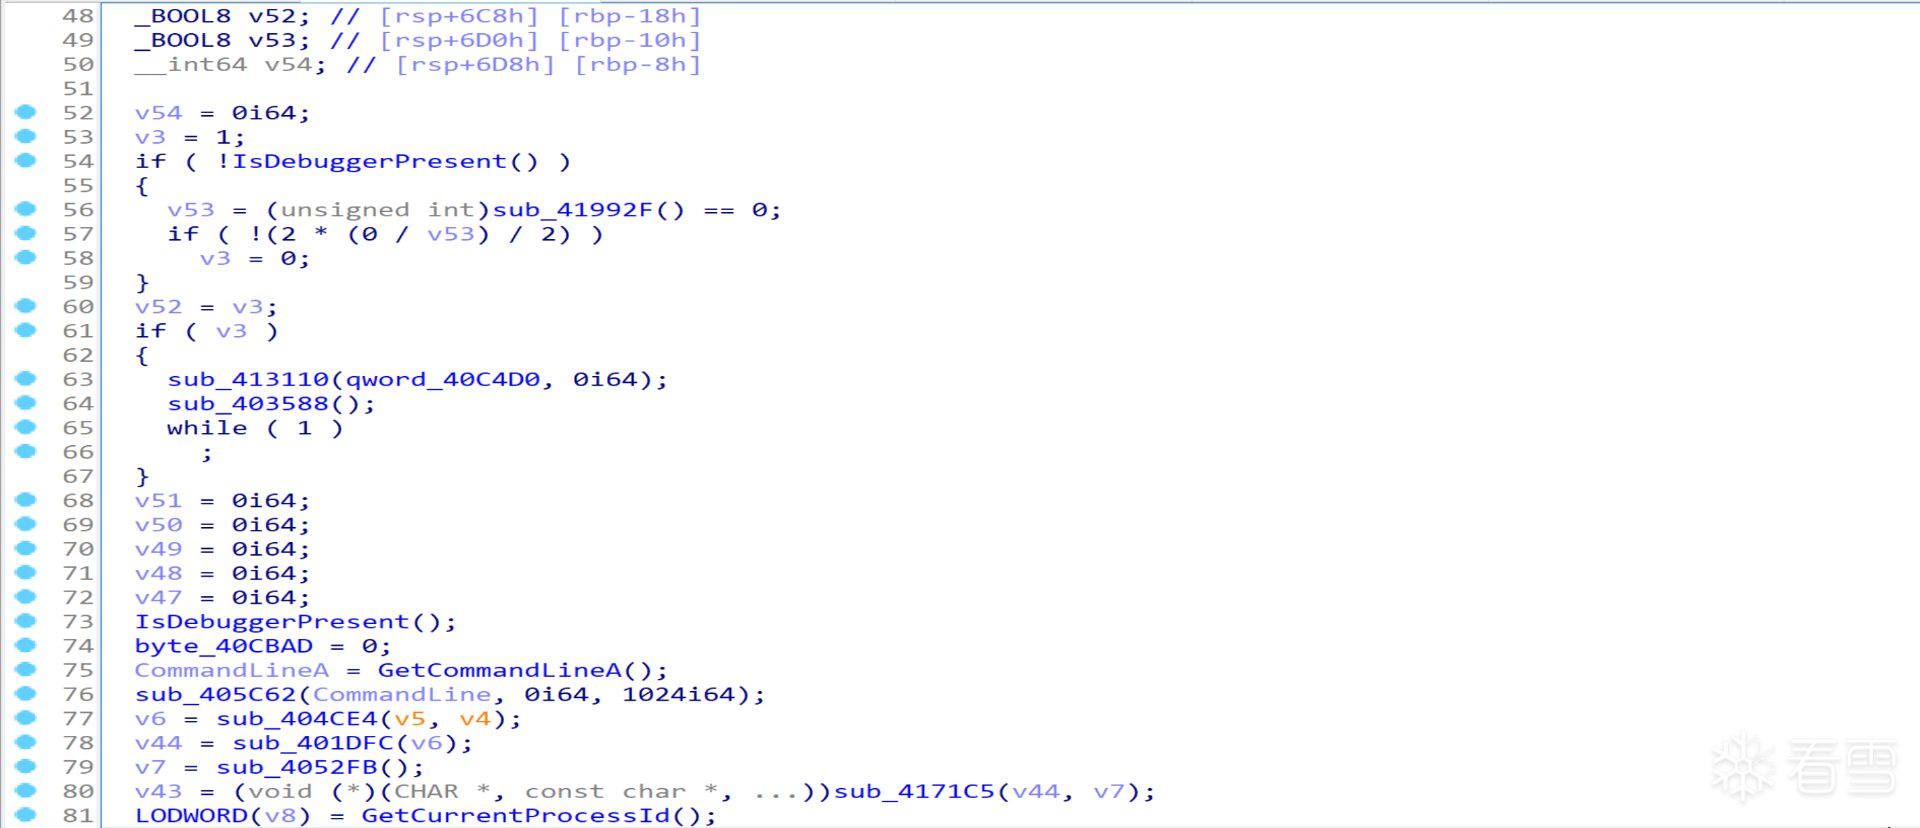
程序首先调用IsDebuggerPresent判断是否被调试,如果正在被调试则直接进入无限循环,这也符合之前笔者探究所得的情况。若未处于调试模式,则再调用sub_41992F(重命名为IsInDebugger)函数,判断其返回值是否为0,为0则会触发除以0异常而退出。
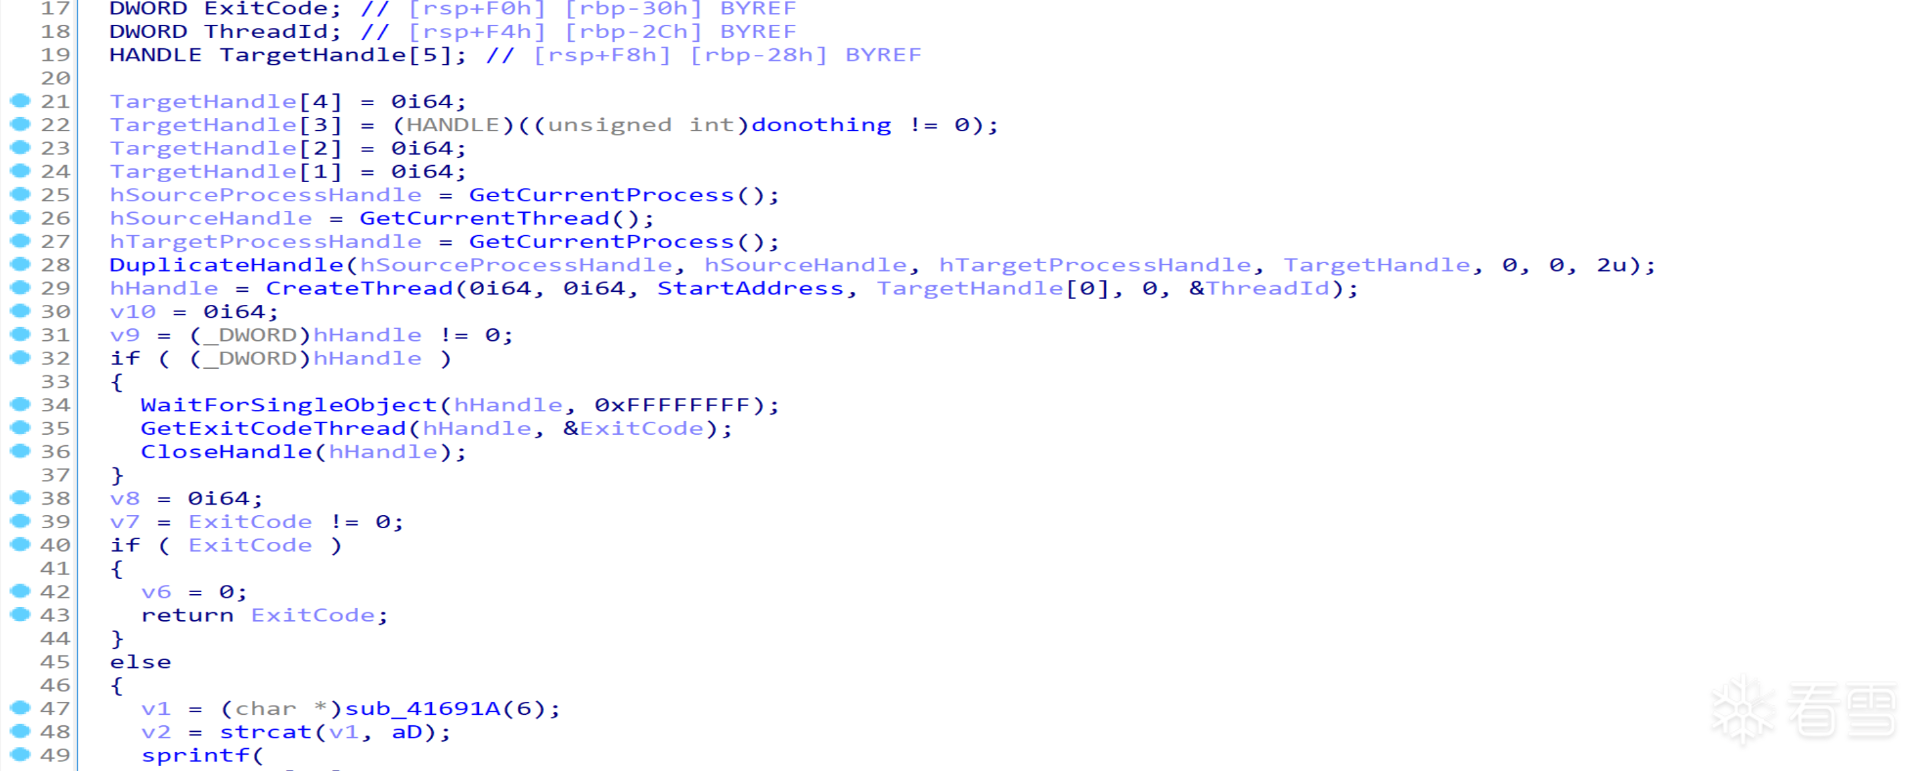
进入IsInDebugger函数,可以发现其首先创建了一个进程并获取其退出码,退出码不为0则直接返回退回码(非0值),表明未处于调试状态。
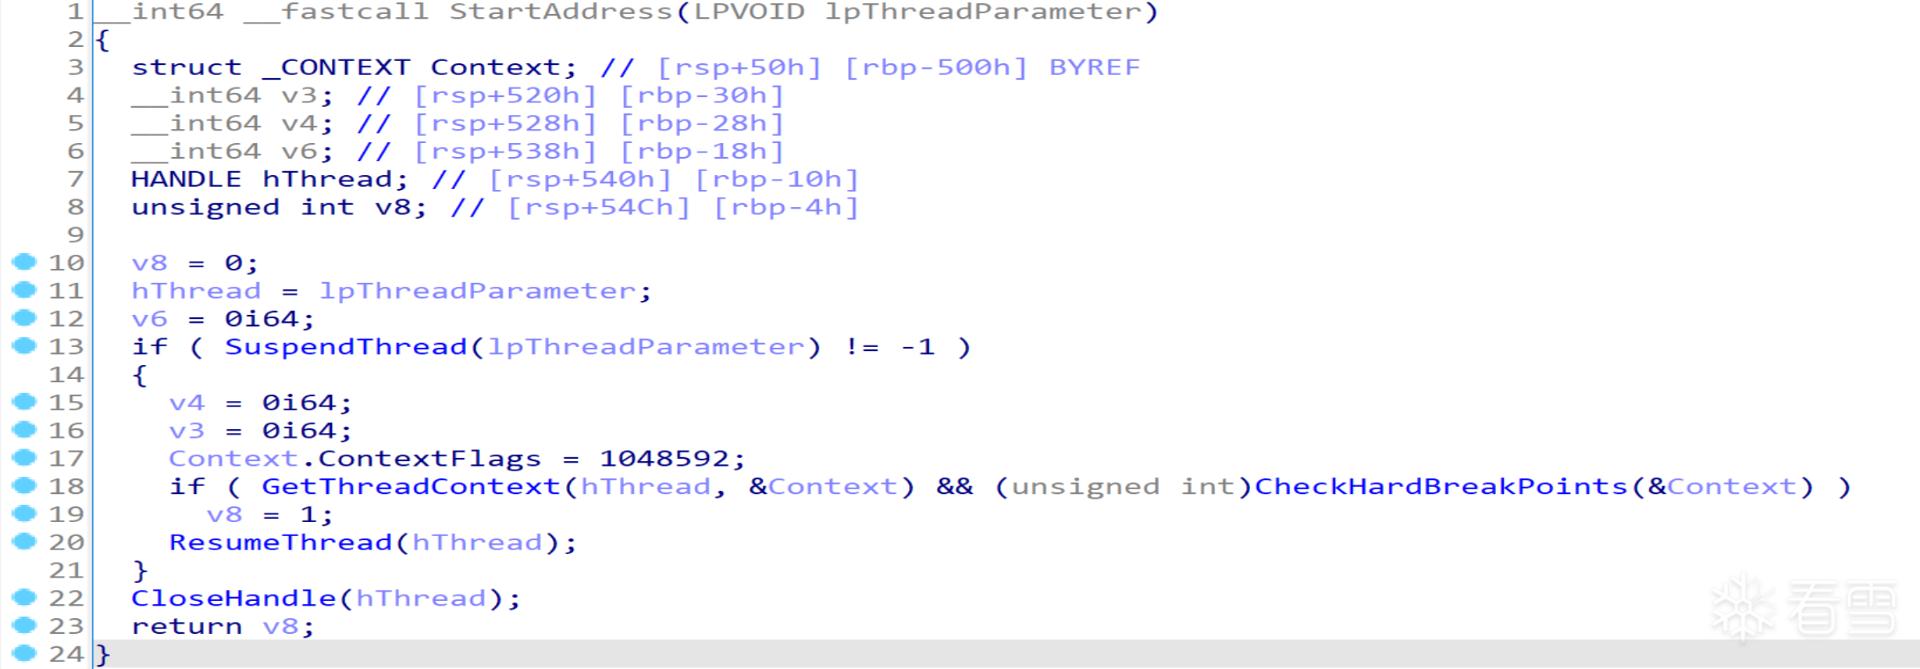
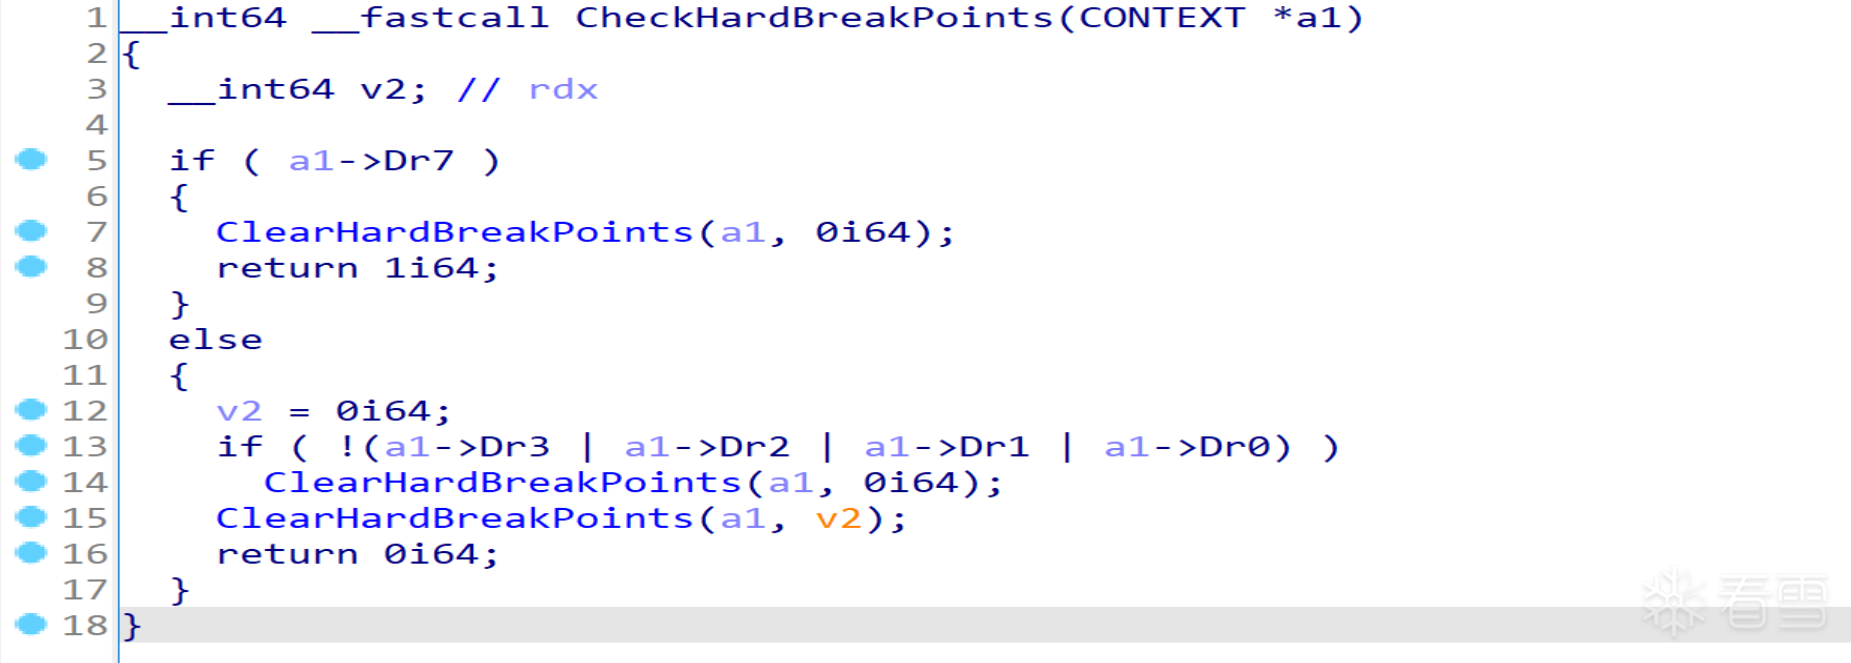
可以看到该线程通过判断Dr7寄存器是否被设置来判断是否设置了硬件断点,不论判断结果如何,都会清空所有硬件断点。
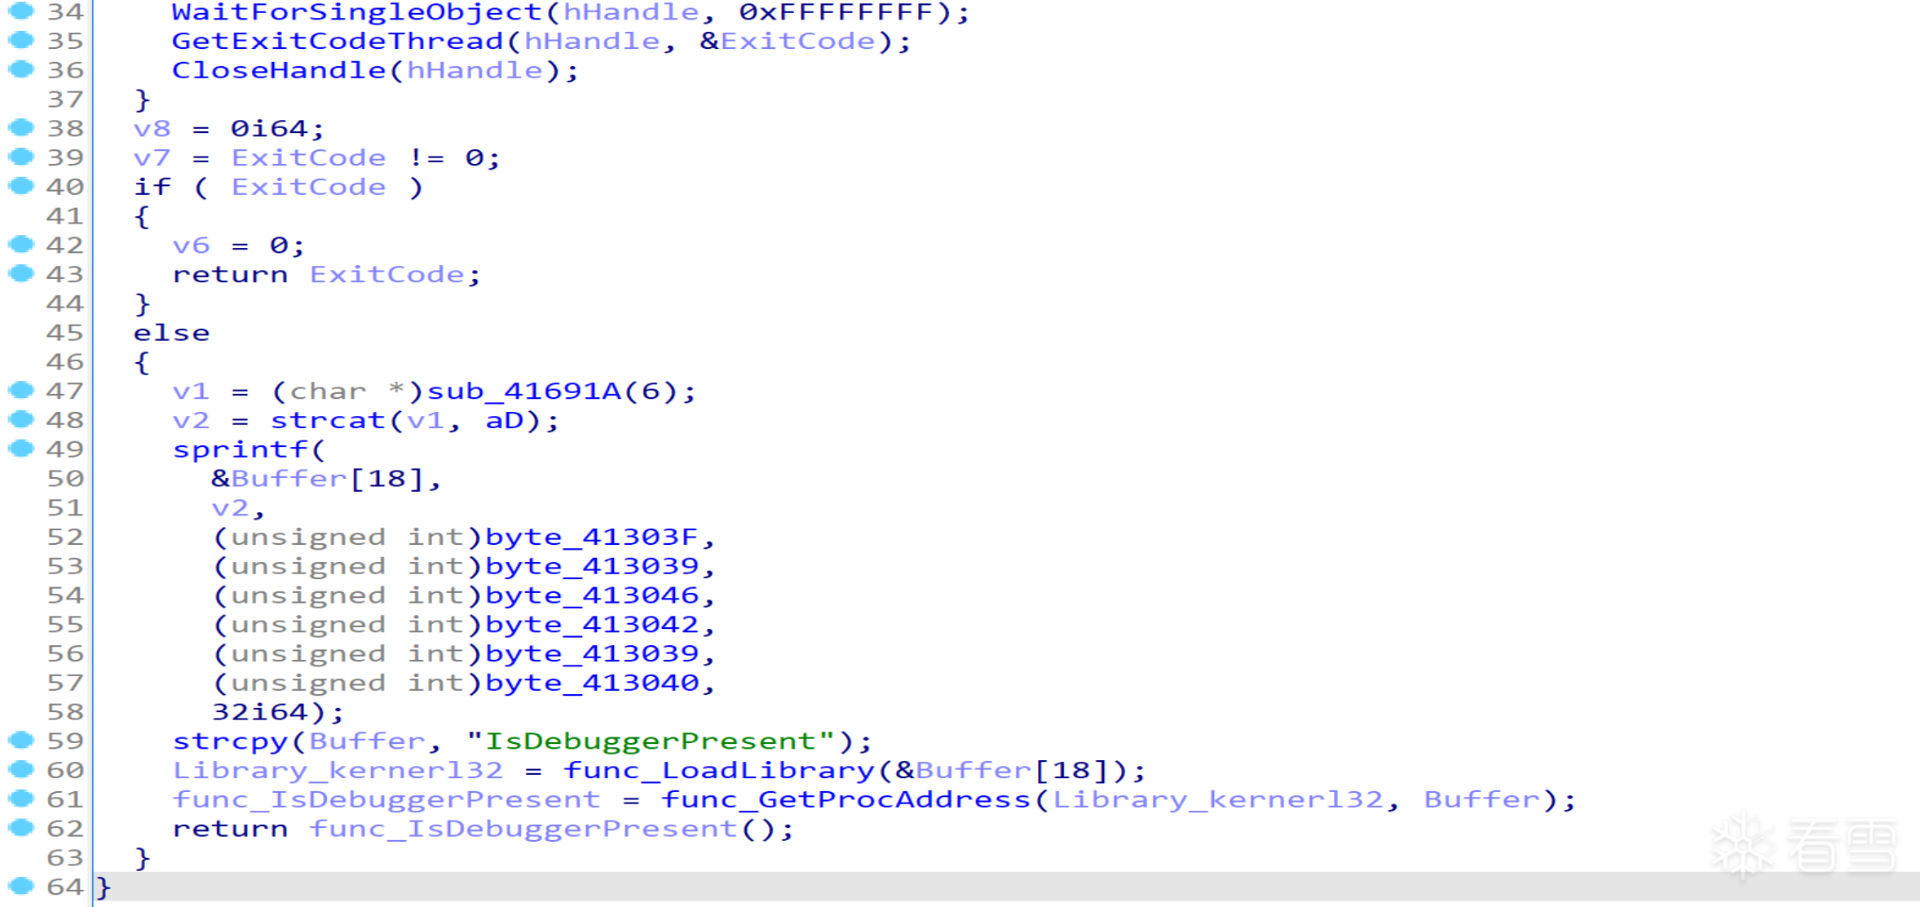
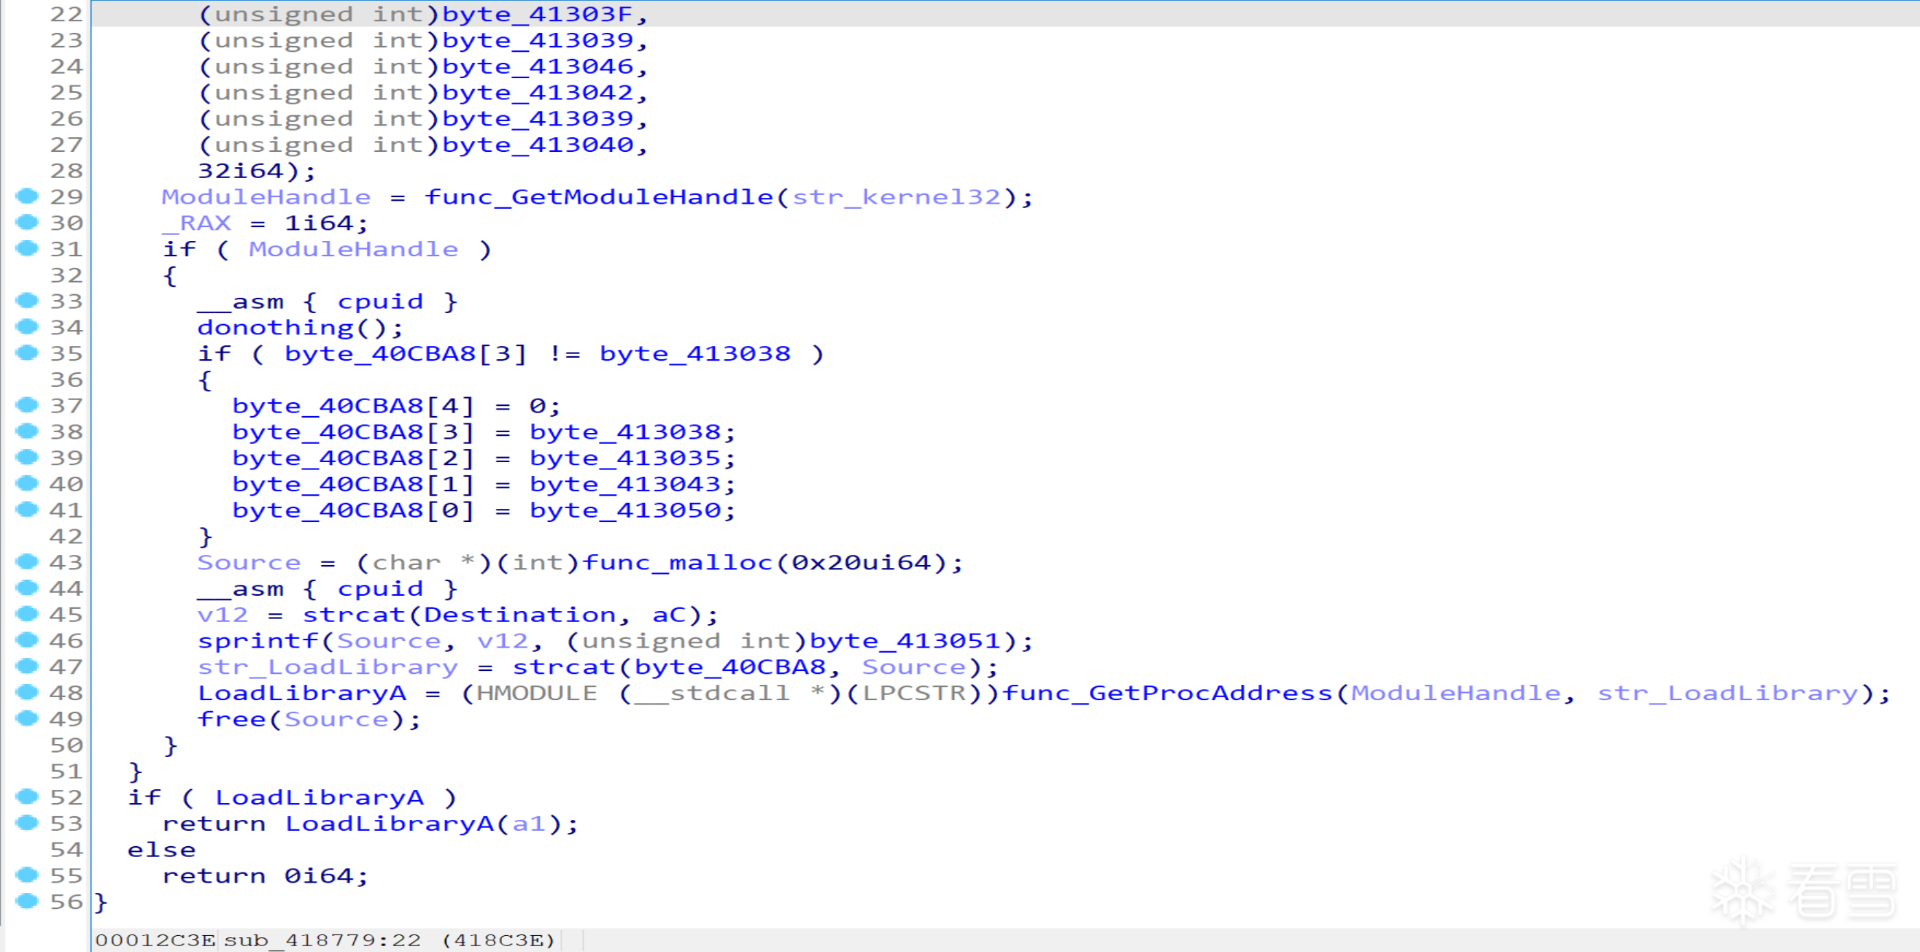
最后再次通过间接调用IsDebuggerPresent判断调试状态并返回,这里的func_前缀开头的函数(func_LoadLibrary、func_GetModuleHandle、func_GetProcAddress),其内部都跳转了很多次才到达有意义的部分(例如func_LoadLibrary:sub401DFC->sub_401ACD->...->sub_418779),这也算是一种语义混淆。
2. 核心逻辑
(1) 命令行参数类型
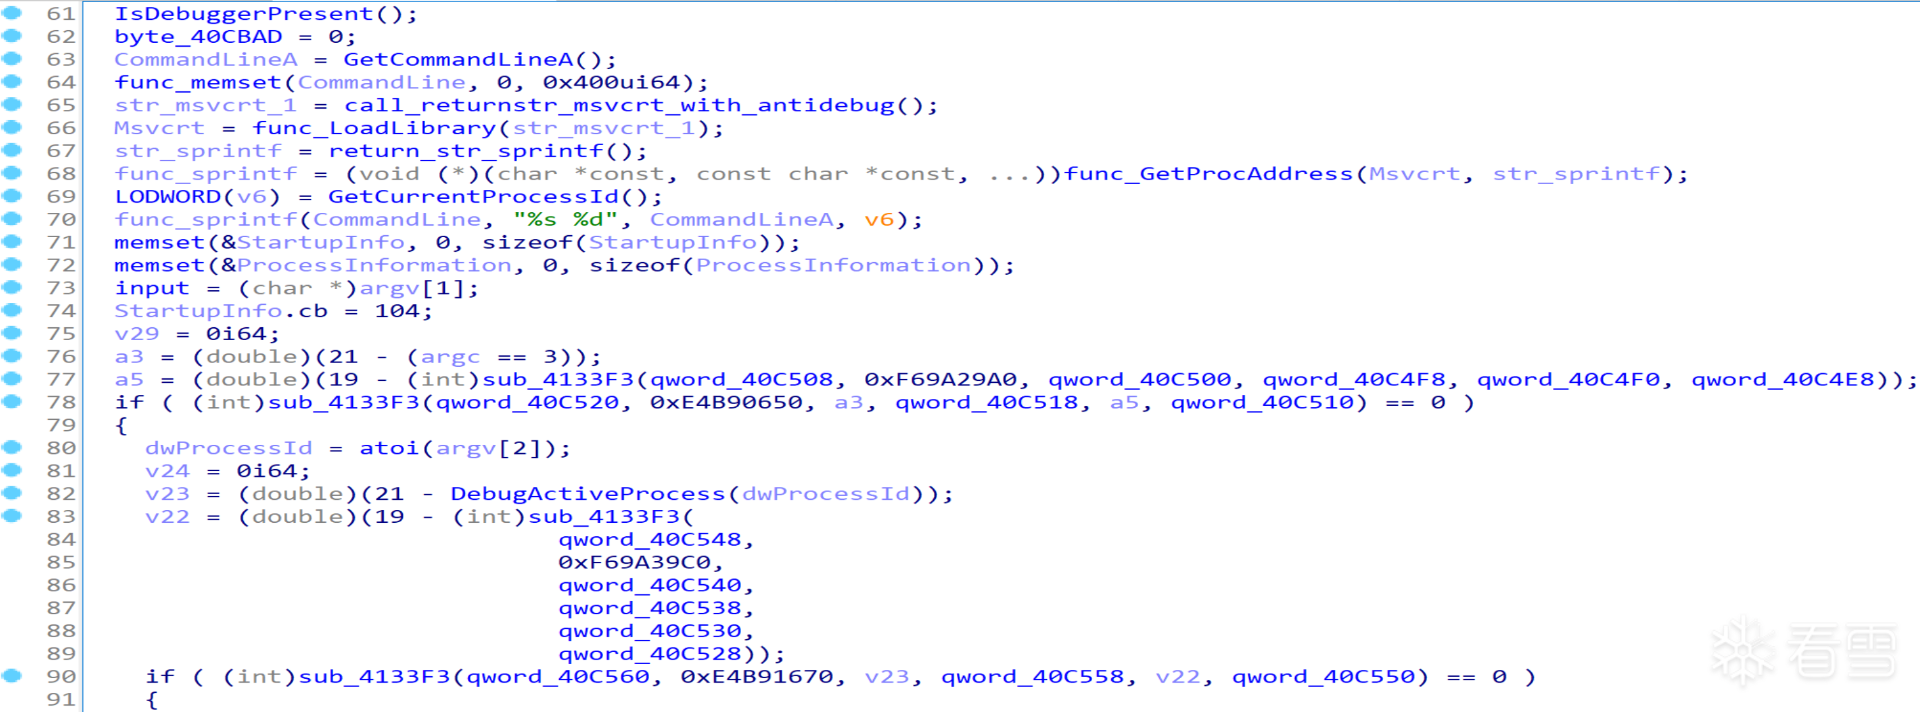
分析main函数后半部分,容易看出a3只会在argc为3和不为3的时候取值20和21,a5是一个定值,经过sub_4133F3函数计算后返回值决定了能否进入sub_40885A(重命名为VerifyInput)判断输入是否正确。
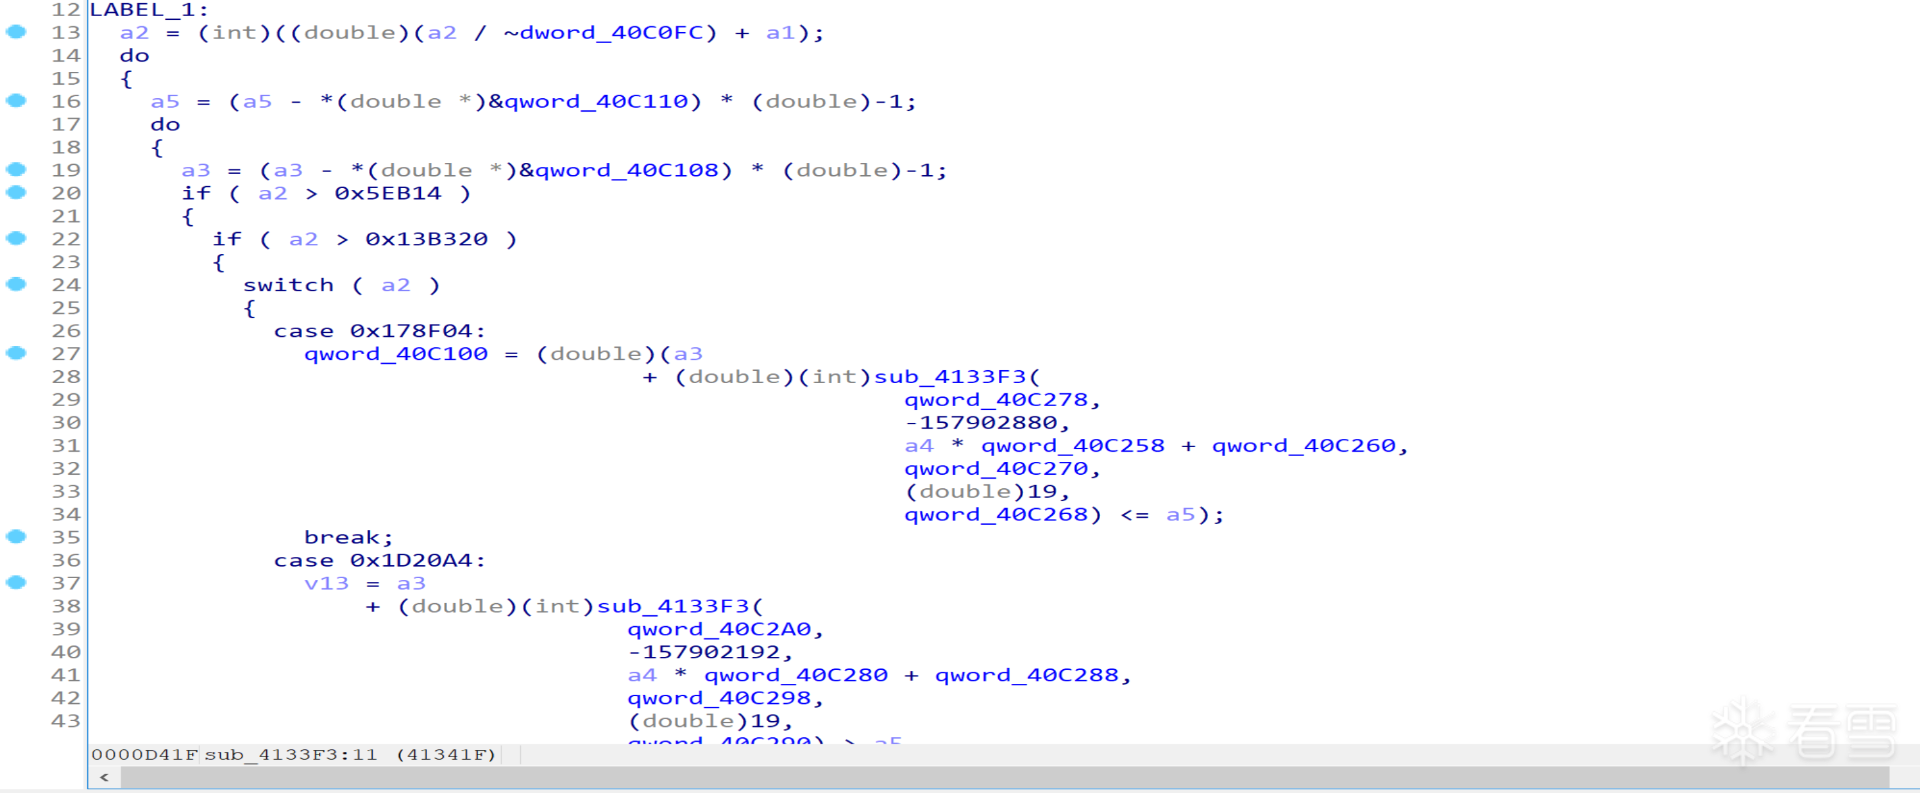
显然sub_4133F3函数的伪代码表明其是一个类似虚拟机的函数,该函数的第1个参数和第2个参数经过运算后得到opcode,再执行对应操作,静态分析比较困难。这里笔者直接绕过反调试使用动态分析,调试发现argc为3时能够进入main函数80行,即我们需要输入3个参数。
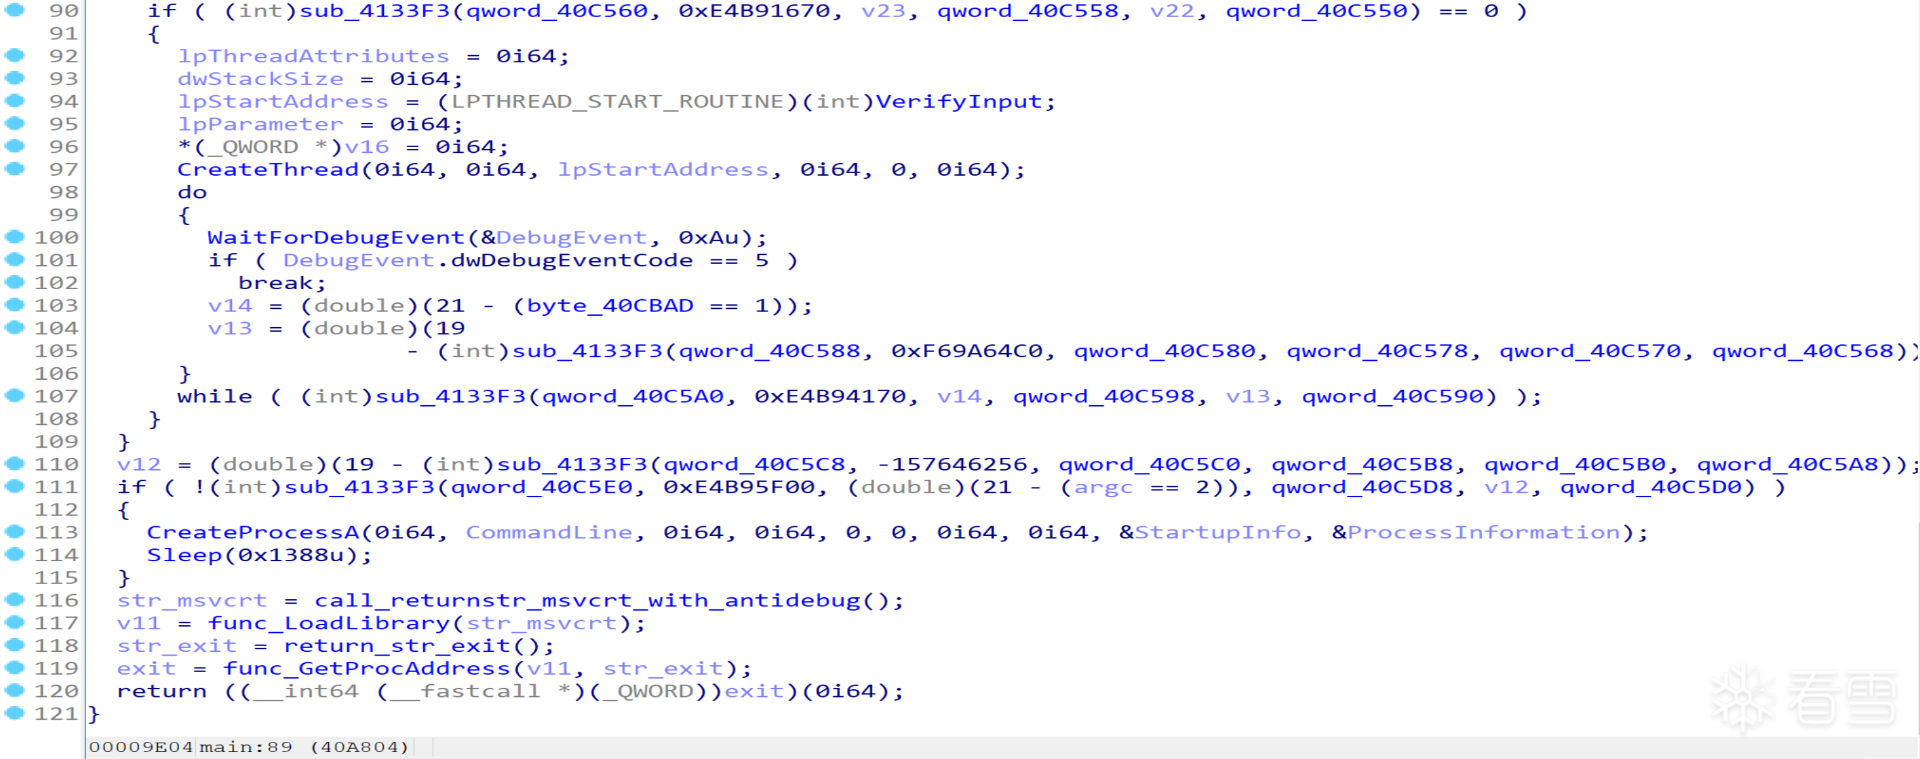
对第90行的条件分支也可以使用相同的方法,可发现当DebugActiveProcess返回非0值时能进入main函数第92行,这表明我们的第3个命令行参数需要输入一个正在运行的进程的PID。
(2) 命令行参数内容
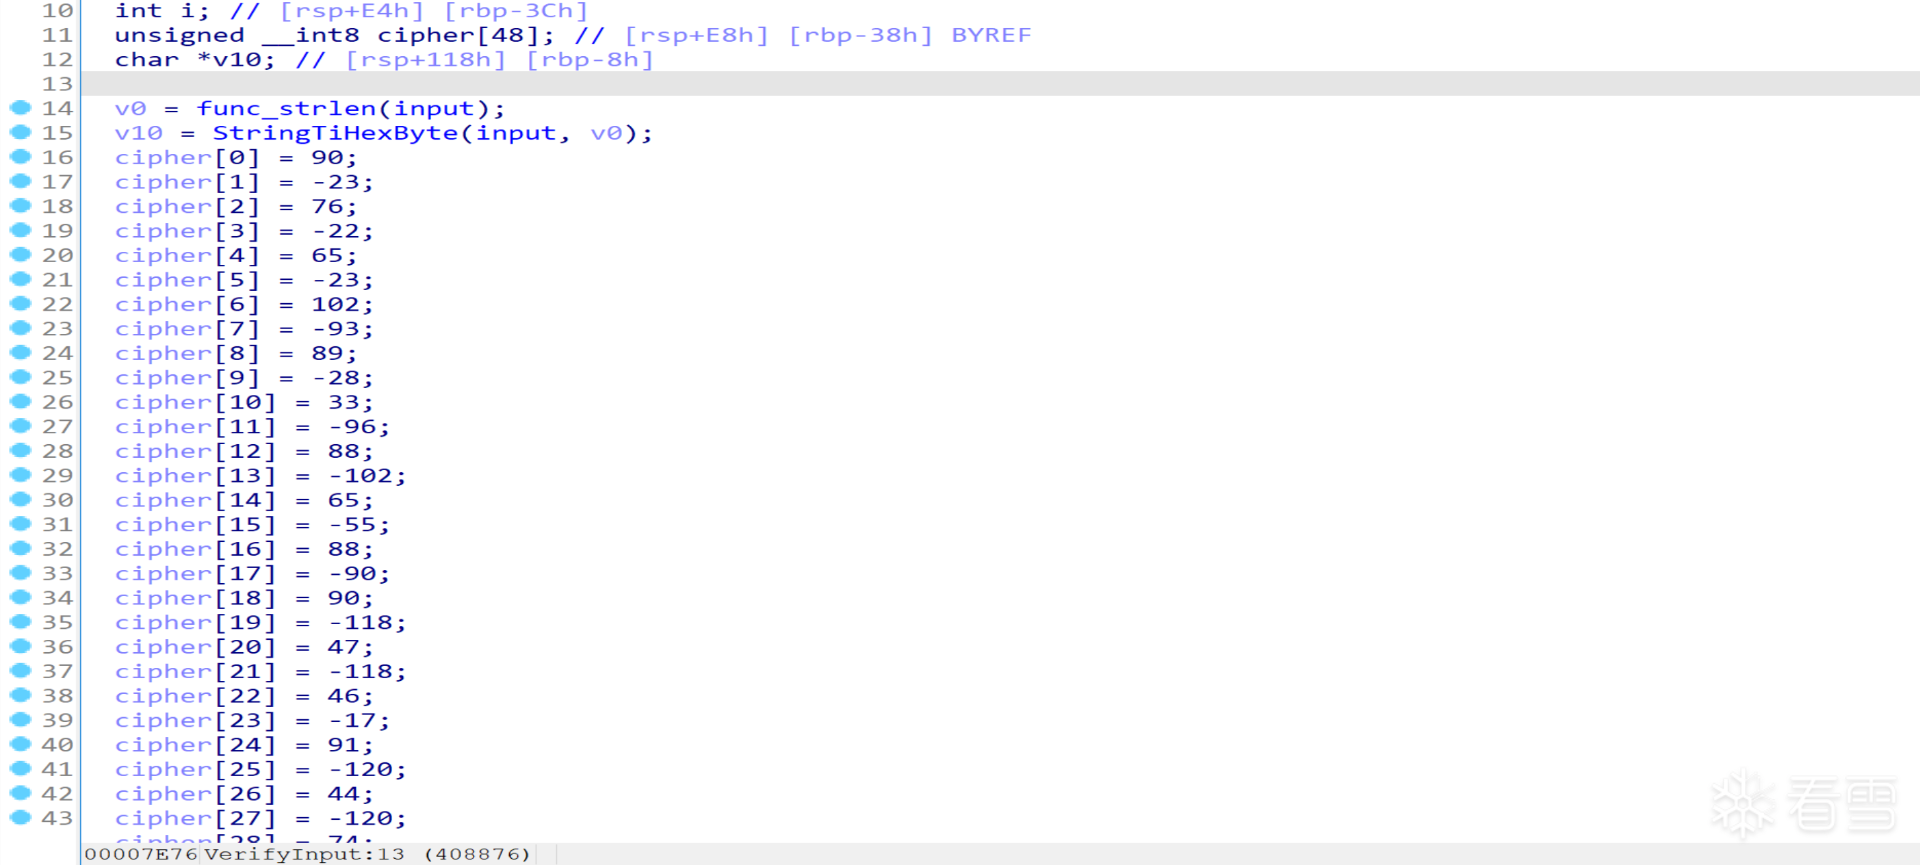
最后来看VerifyInput函数,动态调试可知v0为命令行第2个参数的长度,v10将该字符串参数转为字节数组,例如"12BC"转为{0x12,0xBC}。(注意:只能将字符串的大写字母进行转换,小写字母无法转换)
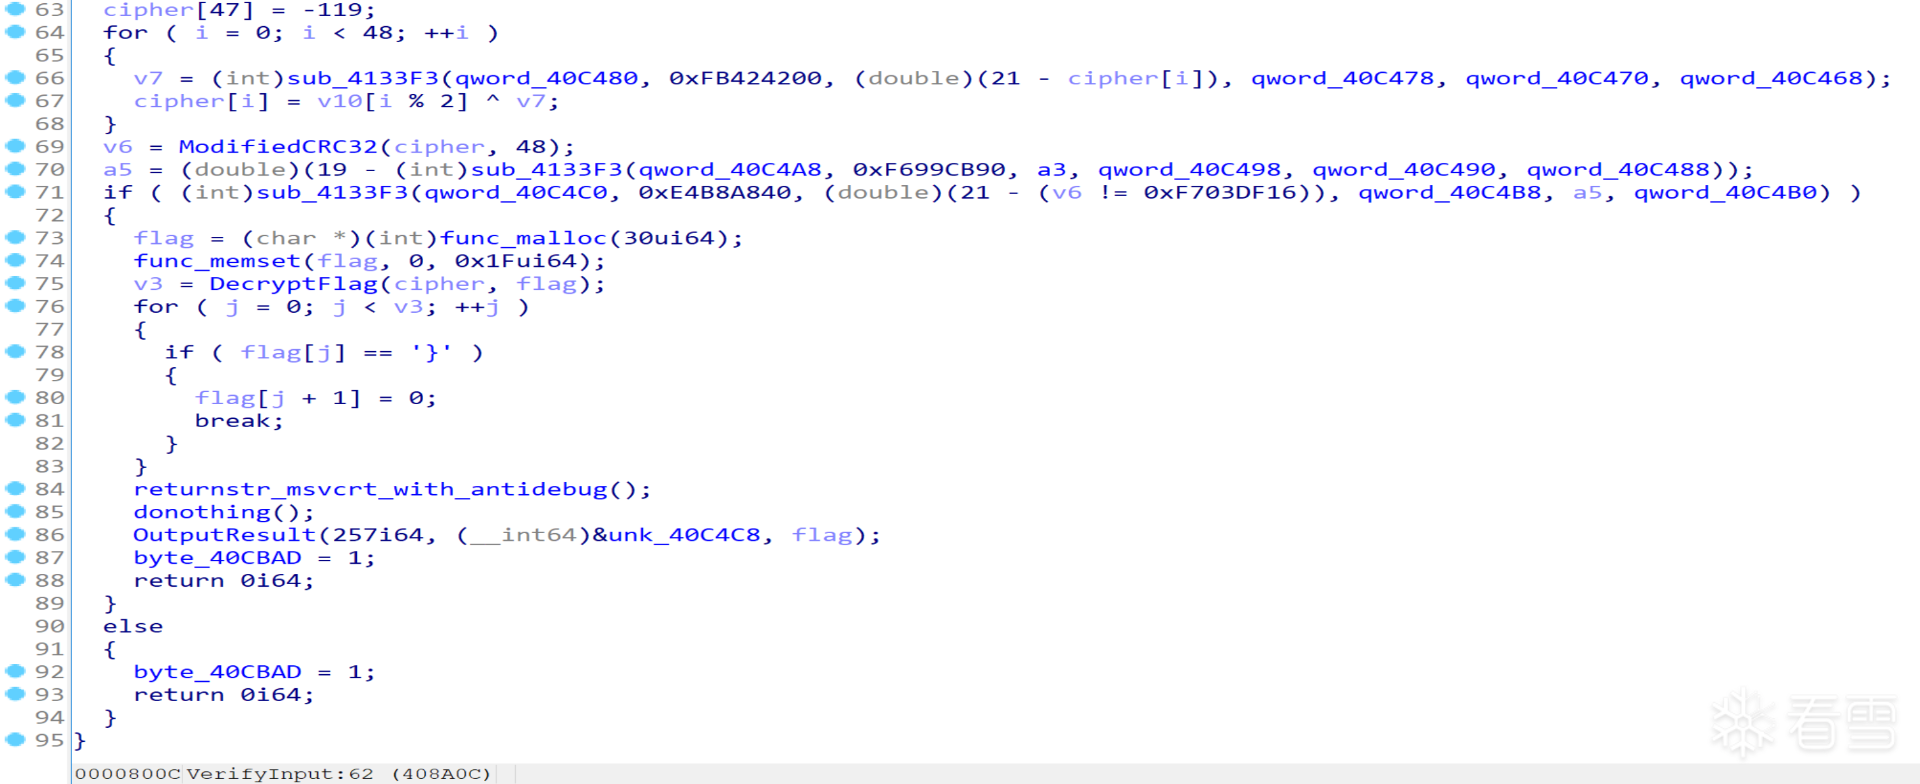
可以发现,由于cipher数组初始化为定值,故65-68行的循环中,每次v7的值也为定值,再依次与我们输入的前两个字节异或,最后所得的cipher数组通过sub_407E53(重命名为ModifiedCRC32)计算Hash值,若该值为0xF703DF16则第71行条件分支为真,程序对cipher数组解密并输出flag。因此我们只需动调得到48个v7的值,再根据ModifiedCRC32的算法爆破2字节即可得到输入的第二个参数。代码如下:
unsigned int hash(unsigned char* data, unsigned int len)
{
	unsigned int res = -1;
	for (int i = 0; i < len; ++i)
	{
		res ^= data[i];
		for (int j = 0; j < 8; ++j)
		{
			if (res & 1)
				res = (res >> 1) ^ 0xEDB88320;
			else
				res >>= 1;
		}
	}
	return ~res;
}

int main()
{
	for (int a = 0; a < 0xff; ++a)
	{
		for (int b = 0; b < 0xff; ++b)
		{
			unsigned char data[48];
			for (int i = 0; i < 48; ++i)
			{
				data[i] = (i % 2) ? (b ^ num[i]) : (a ^ num[i]);
			}
			if (hash(data, 48) == 0xF703DF16)
			{
				printf("%x %x\n", a, b);
				goto success;
			}
		}
	}

success:
	return 10086;
}
最终程序输出为79 bc,这表明我们的命令行第二个参数内容为"79BC"即可。
四、 输出结果
结合上述分析,我们得到了获取flag的步骤:
打开一个新进程(例如notepad.exe),获取其PID。
运行原始的re.exe,参数为79BC PID。

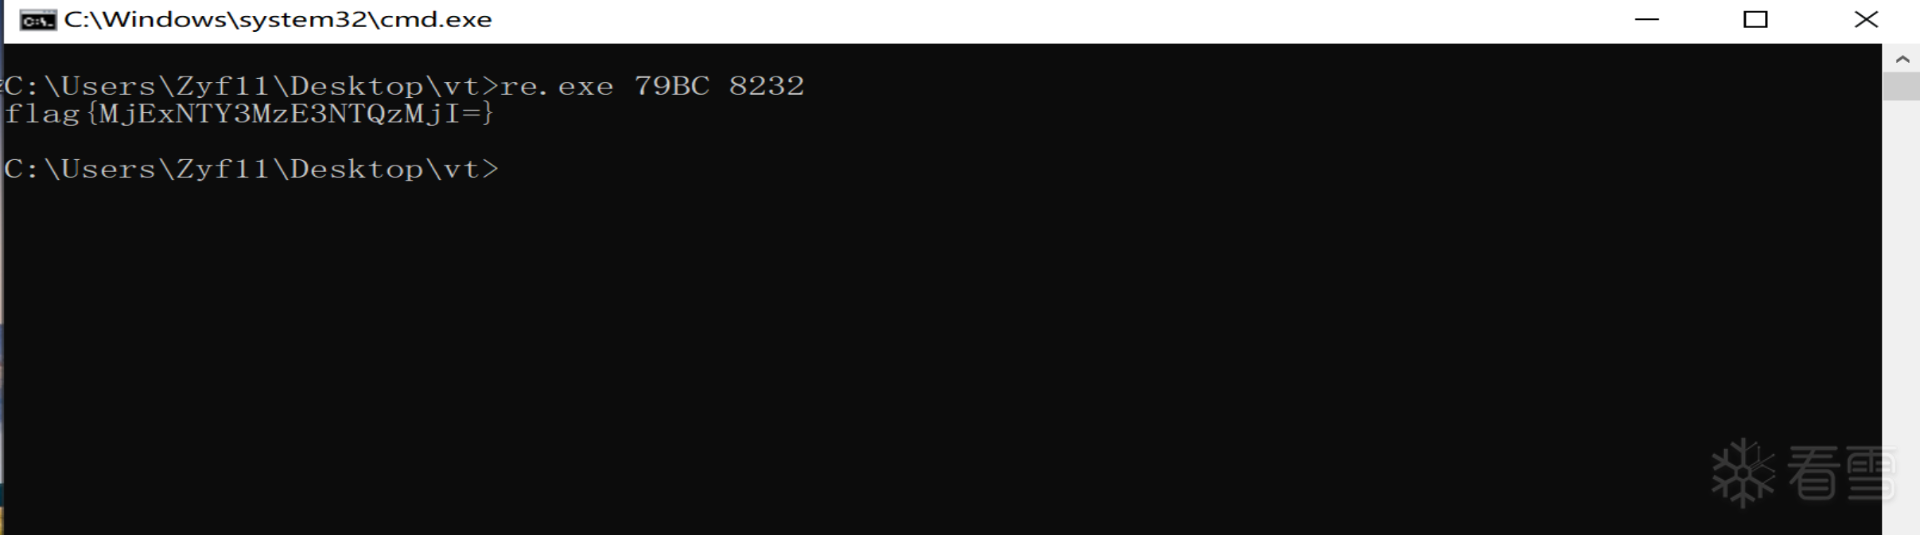
运行后得到结果flag{MjExNTY3MzE3NTQzMjI=}。
五、 总结
行文至此,笔者不禁再次感叹这道题目的精妙之处——它在多个层面上都运用了巧妙的混淆技术:从表面上看,题目伪装成被虚拟机大量保护的程序,与解题者展开心理博弈;在内部实现上,则采用了大量花指令进行语法混淆,并通过引入常量运算和函数运算得到固定结果、增加永真永假分支、函数多次跳转、包装系统API等手段进行语义混淆。此外,题目还运用了自创的虚拟化技术对关键运算函数进行混淆,并针对硬件断点实施了反调试措施。在逻辑分析层面,选手需要绕过反调试机制获取异或数组、运用爆破思想,并输入一个进程PID作为条件。总体而言,这道题目在设计和实现上都堪称优秀。
然而,笔者也认为这道题目也存在一定的不足之处,即它更适合出现在时间更为充裕的竞赛中。在初赛阶段,其性价比相对较低,可能无法充分发挥其应有的挑战性和价值。
更多【CTF对抗-攻城攻心的混淆大师——深入解析第十八届CISCN x 第二届长城杯初赛Reverse赛题vt】相关视频教程:www.yxfzedu.com
相关文章推荐
- 软件逆向- PE格式:新建节并插入代码 - Android安全CTF对抗IOS安全
- 加壳脱壳- UPX源码学习和简单修改 - Android安全CTF对抗IOS安全
- 二进制漏洞-win越界写漏洞分析 CVE-2020-1054 - Android安全CTF对抗IOS安全
- Pwn-2022长城杯决赛pwn - Android安全CTF对抗IOS安全
- 软件逆向-Wibu Codemeter 7.3学习笔记——Codemeter服务端 - Android安全CTF对抗IOS安全
- Pwn-沙箱逃逸之google ctf 2019 Monochromatic writeup - Android安全CTF对抗IOS安全
- 软件逆向-Wibu Codemeter 7.3学习笔记——AxProtector壳初探 - Android安全CTF对抗IOS安全
- 企业安全-学习Kubernetes笔记——暴露站点服务(Ingress) - Android安全CTF对抗IOS安全
- 企业安全-学习Kubernetes笔记——部署数据库站点(MySql) - Android安全CTF对抗IOS安全
- 企业安全-学习Kubernetes笔记——部署web站点环境(PHP+Nginx) - Android安全CTF对抗IOS安全
- 企业安全-学习Kubernetes笔记——安装NFS驱动 - Android安全CTF对抗IOS安全
- 企业安全-学习Kubernetes笔记——kubeadm安装Kubernetes - Android安全CTF对抗IOS安全
- 软件逆向-wibu软授权(四) - Android安全CTF对抗IOS安全
- 软件逆向-使用IDAPython开发复制RVA的插件 - Android安全CTF对抗IOS安全
- 2-wibu软授权(三) - Android安全CTF对抗IOS安全
- 软件逆向-wibu软授权(二) - Android安全CTF对抗IOS安全
- 软件逆向-wibu软授权(一) - Android安全CTF对抗IOS安全
- 软件逆向- PE格式:分析IatHook并实现 - Android安全CTF对抗IOS安全
- Android安全-安卓API自动化安全扫描 - Android安全CTF对抗IOS安全
- 二进制漏洞- Chrome v8 Issue 1307610漏洞及其利用分析 - Android安全CTF对抗IOS安全
2):严禁色情、血腥、暴力
3):严禁发布任何形式的广告贴
4):严禁发表关于中国的政治类话题
5):严格遵守中国互联网法律法规
6):有侵权,疑问可发邮件至service@yxfzedu.com