objective-c-使用 PyOpenGL 进行 2D 图形渲染总结
推荐 原创一、说明
OpenGL是一个广泛使用的开放式跨平台实时 3D 图形库,开发于二十多年前。它提供了一个低级API,允许开发人员以统一的方式访问图形硬件。在开发需要硬件加速且需要在不同平台上运行的复杂 2D 或 3D 应用程序时,它是首选平台。它可以在多种语言中使用,包括 C/C++、C#、Java、Objective-C(用于 iPhone 和 iPad 游戏)、Python 等。在本文中,我将展示如何将 OpenGL 与 Python 一起使用(感谢PyOpenGL 库)来高效渲染 2D 图形。
二、安装简介
需要带有 Numpy、 PyOpenGL和 PyQt4库的 Python。在 Windows 上,可以在此网页上找到二进制安装程序 。
此外,还需要系统显卡的最新驱动程序,以便可以使用最新的OpenGL实现。特别是,我们将利用 顶点缓冲对象 (VBO),从 OpenGL 版本 1.5(2003 年出现)开始,这些对象在核心实现中可用。在此日期之后发货的显卡应具有支持 VBO 的驱动程序。但是,系统上安装的驱动程序可能不支持最新版本的 OpenGL。
例如,在 Windows 上,我对 2009 年显卡的默认驱动程序存在一些问题:OpenGL 1.1 是唯一受支持的版本。 原因是当构造函数驱动程序未找到或不可用时,Windows(从 Vista 开始)可以使用一种基于 Windows 显示驱动程序模型 (WDDM)的通用驱动程序。现在,WDDM 驱动程序倾向于使用 DirectX(微软自己的图形库,与 OpenGL 并行)而不是 OpenGL,因此这些驱动程序仅支持非常旧的 OpenGL 版本。为了使事情正常进行,需要找到构造函数驱动程序并强制安装它们。可能会有点痛。
简而言之,如果在运行下面的脚本时出现提及 OpenGL 和缓冲区对象的错误消息,请确保显卡驱动程序正确。OpenGL Extensions Viewer是检查显卡 OpenGL 功能的一个非常有用的工具 。它适用于 Windows、Linux 和 iOS。
三、QGL控件
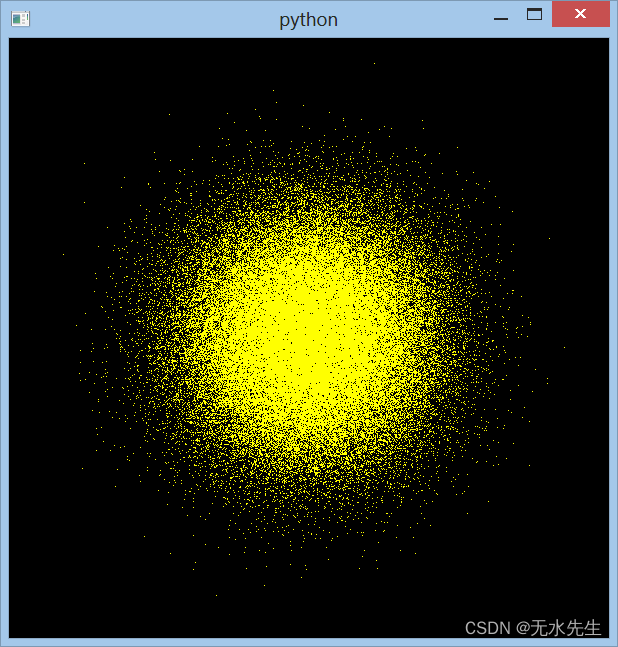
我们将定义一个 Qt 小部件,在窗口中的随机位置显示点。该小部件将派生自 QGLWidgetQt 小部件,它提供对 OpenGL API 进行渲染的访问。派生类中至少需要重写三个方法:initializeGL()、updateGL()和resizeGL(w, h)。
initializeGL():在这里调用 OpenGL 初始化命令。它也是创建顶点缓冲区对象并用一些数据填充它们的地方。
paintGL():在此处调用 OpenGL 渲染命令。每当需要重绘窗口时就会调用它。
resizeGL(w, h):在这里进行与相机和视口相关的调用。每当小部件的大小发生更改时都会调用它(新的小部件大小作为参数传递给此方法)。
顶点缓冲区对象
渲染数据最有效的方法是尽量减少从系统内存到 GPU 内存的数据传输,并尽量减少对 OpenGL 渲染命令的调用次数。执行此操作的一种便捷方法是使用 顶点缓冲区对象。它们允许在 GPU 上分配内存,在 GPU 上加载一次数据(如果数据发生变化则加载多次),并高效地渲染它,因为数据在连续调用之间保留在 GPU 上 paintGL()。PyOpenGL 集成了一个模块来轻松创建和使用 VBO:
import OpenGL.arrays.vbo as glvbo
# in initializeGL:
# create a VBO, data is a Nx2 Numpy array
self.vbo = glvbo.VBO(self.data)

# in paintGL:
# bind a VBO, i.e. tell OpenGL we're going to use it for subsequent
# rendering commands
self.vbo.bind()
四、使用 VBO 绘画
OpenGL 可以渲染点、线和凸多边形等图元。 glEnableClientState 和 glVertexPointer 函数配置 VBO 进行渲染,glDrawArrays 函数从存储在 GPU 内存中的缓冲区中绘制图元。可以与 VBO 一起使用的其他绘图命令包括 glMultiDrawArrays,用于从单个 VBO 绘制多个独立图元(与使用多个 VBO 相比,效率更高,但灵活性较差)。索引绘图也是可能的,并允许以任意顺序使用顶点,并在渲染期间多次重用顶点。相关函数是glDrawElements和glMultiDrawElements。
颜色可以在调用渲染命令之前使用函数 glColor 指定,也可以通过为颜色创建一个特殊的 VBO(包含每个点的颜色)来指定。相关函数是glColorPointer和glEnableClientState(GL_COLOR_ARRAY)。一种变体是将颜色与顶点打包在一起,即在单个 VBO 中每个点有 5 个数字(x、y 坐标和 R、V、B 颜色分量)。请参阅此处的一些详细信息。
注意:显然,在OpenGL中,使用单精度浮点数比使用双精度浮点数更好。显卡可能确实不支持后一种格式。我在这篇文章的早期版本中使用了双精度,在特定情况下我遇到了一些令人讨厌的内存访问冲突崩溃。当我换成花车时它们就消失了。如果这对任何人有帮助…、
# in paintGL:
# set the color yellow
gl.glColor(1,1,0)
# enable the VBO
gl.glEnableClientState(gl.GL_VERTEX_ARRAY)
# tell OpenGL that each vertex is made of 2 single precision floating
# numbers (x and y coordinates).
gl.glVertexPointer(2, gl.GL_FLOAT, 0, self.vbo)
# draw all points from the VBO
gl.glDrawArrays(gl.GL_POINTS, 0, len(self.data))
五、设置 2D 渲染的正交投影
该resizeGL方法设置用于 光栅化的几何投影。由于我们在本文中只对 2D 渲染感兴趣,因此我们 在该 函数中使用正交投影glOrtho。该 glViewport 函数允许指定用于后续渲染命令的屏幕部分。这里我们只是告诉 OpenGL 在整个窗口内进行绘制。
# paint within the whole window
gl.glViewport(0, 0, self.width, self.height)
# set orthographic projection (2D only)
gl.glMatrixMode(gl.GL_PROJECTION)
gl.glLoadIdentity()
# the window corner OpenGL coordinates are (-+1, -+1)
gl.glOrtho(-1, 1, 1, -1, -1, 1)
六、设置 PyQt 小部件
这里我们使用 PyQt 作为 GUI 窗口系统。为了在屏幕上显示一个窗口并使用我们的 OpenGL 小部件,我们首先需要定义一个 Qt 主窗口,将 OpenGL 小部件放入其中,最后创建一个 Qt 应用程序来托管主窗口。
# paint within the whole window
gl.glViewport(0, 0, self.width, self.height)
# set orthographic projection (2D only)
gl.glMatrixMode(gl.GL_PROJECTION)
gl.glLoadIdentity()
# the window corner OpenGL coordinates are (-+1, -+1)
gl.glOrtho(-1, 1, 1, -1, -1, 1)
定义一个 Qt 窗口,其中包含 OpenGL 小部件
# define a Qt window with an OpenGL widget inside it
class TestWindow(QtGui.QMainWindow):
    def __init__(self):
        super(TestWindow, self).__init__()
        # initialize the GL widget
        self.widget = GLPlotWidget()
        # [...] (set data for the OpenGL widget)
        # put the window at the screen position (100, 100)
        self.setGeometry(100, 100, self.widget.width, self.widget.height)
        self.setCentralWidget(self.widget)
        self.show()

# create the Qt App and window
app = QtGui.QApplication(sys.argv)
window = TestWindow()
window.show()
app.exec_()
七、完整剧本
这是完整的脚本。
# PyQt4 imports
from PyQt4 import QtGui, QtCore, QtOpenGL
from PyQt4.QtOpenGL import QGLWidget
# PyOpenGL imports
import OpenGL.GL as gl
import OpenGL.arrays.vbo as glvbo

class GLPlotWidget(QGLWidget):
    # default window size
    width, height = 600, 600

    def set_data(self, data):
        """Load 2D data as a Nx2 Numpy array.
        """
        self.data = data
        self.count = data.shape[0]

    def initializeGL(self):
        """Initialize OpenGL, VBOs, upload data on the GPU, etc.
        """
        # background color
        gl.glClearColor(0,0,0,0)
        # create a Vertex Buffer Object with the specified data
        self.vbo = glvbo.VBO(self.data)

    def paintGL(self):
        """Paint the scene.
        """
        # clear the buffer
        gl.glClear(gl.GL_COLOR_BUFFER_BIT)
        # set yellow color for subsequent drawing rendering calls
        gl.glColor(1,1,0)
        # bind the VBO
        self.vbo.bind()
        # tell OpenGL that the VBO contains an array of vertices
        gl.glEnableClientState(gl.GL_VERTEX_ARRAY)
        # these vertices contain 2 single precision coordinates
        gl.glVertexPointer(2, gl.GL_FLOAT, 0, self.vbo)
        # draw "count" points from the VBO
        gl.glDrawArrays(gl.GL_POINTS, 0, self.count)

    def resizeGL(self, width, height):
        """Called upon window resizing: reinitialize the viewport.
        """
        # update the window size
        self.width, self.height = width, height
        # paint within the whole window
        gl.glViewport(0, 0, width, height)
        # set orthographic projection (2D only)
        gl.glMatrixMode(gl.GL_PROJECTION)
        gl.glLoadIdentity()
        # the window corner OpenGL coordinates are (-+1, -+1)
        gl.glOrtho(-1, 1, 1, -1, -1, 1)

if __name__ == '__main__':
    # import numpy for generating random data points
    import sys
    import numpy as np
    import numpy.random as rdn

    # define a Qt window with an OpenGL widget inside it
    class TestWindow(QtGui.QMainWindow):
        def __init__(self):
            super(TestWindow, self).__init__()
            # generate random data points
            self.data = np.array(.2*rdn.randn(100000,2),dtype=np.float32)
            # initialize the GL widget
            self.widget = GLPlotWidget()
            self.widget.set_data(self.data)
            # put the window at the screen position (100, 100)
            self.setGeometry(100, 100, self.widget.width, self.widget.height)
            self.setCentralWidget(self.widget)
            self.show()

    # create the Qt App and window
    app = QtGui.QApplication(sys.argv)
    window = TestWindow()
    window.show()
    app.exec_()

更多【objective-c-使用 PyOpenGL 进行 2D 图形渲染总结】相关视频教程:www.yxfzedu.com
相关文章推荐
- 编程技术-K8S集群调度 - 其他
- 编程技术-POWER APPS:必填项功能 - 其他
- 编程技术-浅析移动端车牌识别技术的工作原理及其过程 - 其他
- 编程技术-证明串口是好的 - 其他
- 编程技术-C++学习第三十七天----第十章--对象和类 - 其他
- 算法-Python输出三角形面积和周长 - 其他
- 算法-C语言 每日一题 牛客网 11.12 Day16 - 其他
- 编程技术-新型的铁塔基站“能源管家” - 其他
- 深度学习-卷积输入输出计算 - 其他
- 编程技术-VsCode 安装 GitHub Copilot插件 (最新) - 其他
- 编程技术-Mysql数据库 15.SQL语言 索引 - 其他
- 编程技术-【赠书第4期】机器学习与人工智能实战:基于业务场景的工程应用 - 其他
- java-数据结构线性表——栈 - 其他
- objective-c-iOS OpenGL ES3.0入门实践 - 其他
- 编程技术-FreeRTOS知识梳理 - 其他
- 计算机视觉-【OpenCV实现图像:用OpenCV图像处理技巧之巧用直方图】 - 其他
- objective-c-axios请求的问题 - 其他
- 编程技术-c++四种类型转换 - 其他
- 编程技术-基于RK3568的跑步机方案 - 其他
- 网络-超级干货:光纤知识总结最全的文章 - 其他
2):严禁色情、血腥、暴力
3):严禁发布任何形式的广告贴
4):严禁发表关于中国的政治类话题
5):严格遵守中国互联网法律法规
6):有侵权,疑问可发邮件至service@yxfzedu.com
- 编程技术-电脑出现“此驱动器存在问题请立即扫描”该怎么办?
- metersphere-社区分享|杭银消费金融基于MeterSphere开展接口自动化测试
- uni-app-【uniapp】签名组件,兼容vue2vue3
- 编程技术-【自然语言处理】基于python的问答系统实现
- 编程技术-Bean作用域
- lua-Unreal UnLua + Lua Protobuf
- python-【Python自学笔记】Flask调教方法Internel Server Error
- oracle-node插件MongoDB(二)——MongoDB的基本命令
- 智能手机-手机怎么打包?三个方法随心选!
- 智能手机-香港金融科技周VERTU CSO Sophie谈Web3.0的下一个风口 手机虚拟货币移动支付
