编程技术-开源一个自己写的简易的windows内核hook框架
推荐 原创- 项目地址为 ,欢迎大家来star。 以下为项目的readme。
KernelHook
- 这是一个用来在windows内核使用的inlinehook框架。本框架代码还在开发中,并不太完善,请谨慎使用。
使用方法
- 将
zydis.hzydis.casmcode.hasmcode.chook.hhook.c包含到你的项目中,然后在需要使用到本框架的地方#include "hook.h"即可使用本框架。
大致hook流程

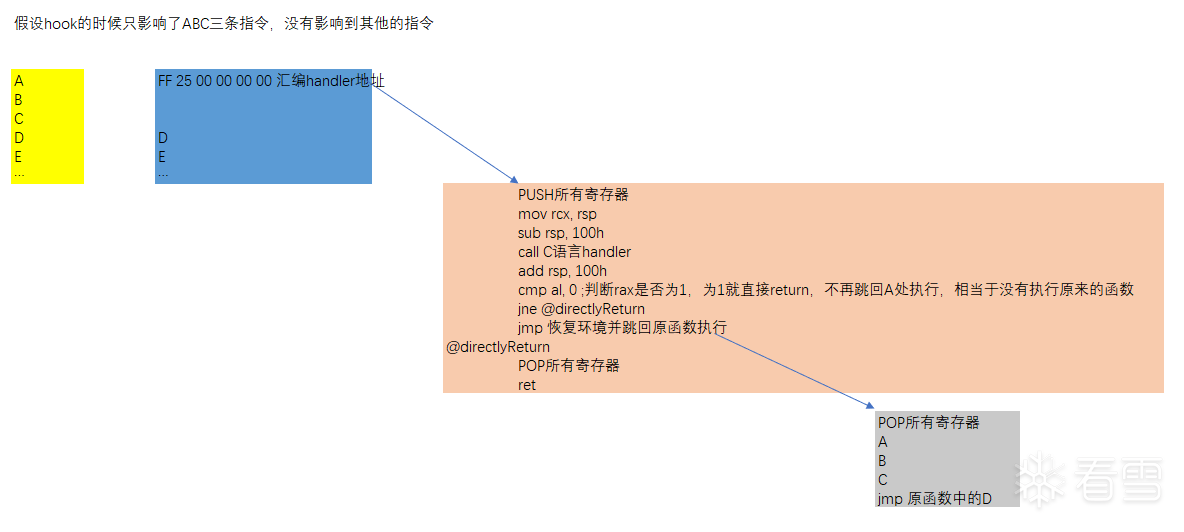
如图,假设未被hook的代码如黄色图块显示。代码顺序为ABCDE,假设ABC三条指令加起来长度大于14字节,可以放下
ff 25 00 00 00 00 00 00 00 00 00 00 00 00这个跳转。本框架会自动识别这三条代码的长度,然后将其替换为一个ff25jmp。其跳到自己申请的一块空间。跳转完成之后首先进行环境的保存,将所有寄存器保存到栈中。然后call一个C语言写的callback函数。可以在这个函数中进行相应的操作。如果这个函数的返回值是FALSE,则跳转回原函数处进行执行。如果为TRUE,则直接return,不再执行原函数。如果需要执行原函数,则重新POP所有之前保存的寄存器,然后执行A B C三条语句,最后通过一个ff25jmp跳到原函数中的下一行处执行(在此示例中是D处)。
set_fast_prehandler使用
- 在对某些调用非常频繁的函数(如pagefault处理函数)进行hook时,如果使用上面的流程可能会导致非常卡。因为上面的流程在每次调用中都需要PUSH和POP所有的寄存器,并跳转到C语言编写的函数处进行是否处理的判断。因此,本框架提供了设置快速判断的功能。需要自行编写汇编代码进行判断。用法如下
|
1
2
3
4
5
6
7
8
9
10
11
12
|
UCHAR buf[]
=
{
0x48
,
0x83
,
0xF9
,
0x01
,
/
/
00007FF806EA094F
| |
cmp
rcx,
1
|
0x74
,
0x0E
,
/
/
00007FF806EA0953
| | je ntdll.
7FF806EA0963
|
0xFF
,
0x25
,
0x00
,
0x00
,
0x00
,
0x00
,
/
/
00007FF806EA0955
| | jmp qword ptr ds : [
7FF806EA095B
] |
0x00
,
0x00
,
/
/
00007FF806EA095B
| | add byte ptr ds : [rax] ,al |
0x00
,
0x00
,
/
/
00007FF806EA095D
| | add byte ptr ds : [rax] ,al |
0x00
,
0x00
,
/
/
00007FF806EA095F
| | add byte ptr ds : [rax] ,al |
0x00
,
0x00
,
/
/
00007FF806EA0961
| | add byte ptr ds : [rax] ,al |
0x90
,
/
/
00007FF806EA0963
| | nop
};
set_fast_prehandler(number, buf, sizeof buf,
12
);
|
第一个参数是需要设置fast_prehandler的hook的编号。第二个参数是自行编写的prehandler的buffer地址,第三个参数是buffer的大小,第四个参数是buffer中 ff25 jmp的地址的偏移。自行编写的代码的格式如下
|
1
2
3
4
5
6
7
8
9
10
|
/
/
prehandler格式类似如下
/
/
cmp
XXX
/
/
jnz 重新运行原来的code,运行原始逻辑,然后跳回到原来位置 ; 对一些参数进行判断
/
/
jmp [eip] ; 一个ff25 jmp,offset填
0
/
/
00
00
/
/
00
00
/
/
00
00
/
/
00
00
/
/
@重新运行原来的code,运行原始逻辑,然后跳回到原来位置
/
/
; 这后面的原始逻辑由后面的代码自动填入,不用手动写。
|
如果前面cmp判断不需要处理,那么就跳到 @重新运行原来的code,运行原始逻辑,然后跳回到原来位置 。否则通过 ff25 jmp重新跳到原来的hook函数的地址,重新执行原来的hook_handler。
对使用了相对地址的汇编代码的处理方法
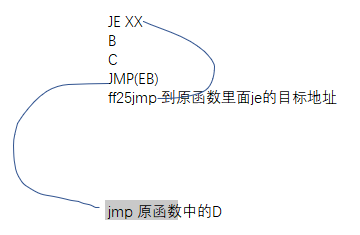
7X XX && E1 xx && E2 xx && E3 xx && EB xx一字节短跳

思路如下。将这个短跳的跳转地址改为
jmp 到原函数里面的jx目标地址代码的地址。最后在执行完A B C之后通过一个EB短跳跳到原来的JMP D处。
0F 8X XX XX XX XX四字节相对跳转
- 思路同上。
实例代码
- handler函数的形式如下
|
1
|
BOOLEAN NtOpenProcess_callback(PGuestContext pcontext)
|
其中返回值为FALSE表示执行完本函数后继续执行原来的函数。如果为true则不再执行原始的函数,直接返回。 pcontext 是一个指向之前保存的寄存器的指针。其结构如下
|
1
2
3
4
5
6
7
8
9
10
11
12
13
14
15
16
17
18
19
20
|
typedef struct _GuestContext
{
ULONG64 mRflags;
ULONG64 mRax;
ULONG64 mRcx;
ULONG64 mRdx;
ULONG64 mRbx;
ULONG64 mRsp;
ULONG64 mRbp;
ULONG64 mRsi;
ULONG64 mRdi;
ULONG64 mR8;
ULONG64 mR9;
ULONG64 mR10;
ULONG64 mR11;
ULONG64 mR12;
ULONG64 mR13;
ULONG64 mR14;
ULONG64 mR15;
}GuestContext,
*
PGuestContext;
|
在handler函数中可以通过读取这些寄存器来获取调用的信息,也可以通过修改这些寄存器达到修改调用方调用原函数时的调用参数的目的。
- 对于
NtOpenProcess进行hook的示例代码如下
|
1
2
3
4
5
6
7
8
9
10
11
12
13
14
15
16
17
18
19
20
21
22
23
24
25
26
27
28
29
30
31
32
33
34
35
36
37
|
#include<ntifs.h>
#include <ntddk.h>
#include <ntstrsafe.h>
#include "hook.h"
ULONG64 num
=
0
;
VOID DRIVERUNLOAD(_In_ struct _DRIVER_OBJECT
*
DriverObject)
{
KdPrintEx((
77
,
0
,
"unload\r\n"
));
reset_hook(num);
}
BOOLEAN NtOpenProcess_callback(PGuestContext pcontext)
{
KdPrintEx((
77
,
0
,
"参数为 %llx %llx %llx %llx\r\n"
, pcontext
-
>mRcx, pcontext
-
>mRdx, pcontext
-
>mR8, pcontext
-
>mR9));
return
FALSE;
/
/
RETURN FALSE表示执行完本函数后继续执行原始的ntopenprocess函数。如果
return
true则不再执行原始的openprocess函数,直接返回。
}
VOID hook_NtOpenProcess()
{
UNICODE_STRING unName
=
{
0
};
RtlInitUnicodeString(&unName, L
"NtOpenProcess"
);
PUCHAR funcAddr
=
MmGetSystemRoutineAddress(&unName);
hook_by_addr(funcAddr, NtOpenProcess_callback, &num);
}
NTSTATUS DriverEntry(PDRIVER_OBJECT pDriver, PUNICODE_STRING pReg)
{
KdPrintEx((
77
,
0
,
"entry\r\n"
));
hook_NtOpenProcess();
pDriver
-
>DriverUnload
=
DRIVERUNLOAD;
return
STATUS_SUCCESS;
}
|
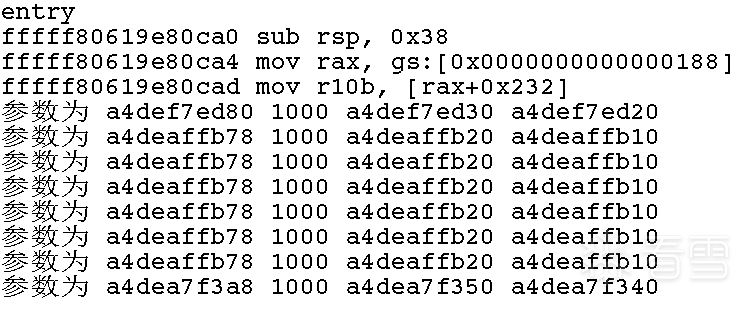
运行结果如下

设置fast_prehandler的代码如下
|
1
2
3
4
5
6
7
8
9
10
11
12
13
14
15
16
17
18
19
20
21
22
|
VOID hook_NtOpenProcess()
{
UNICODE_STRING unName
=
{
0
};
RtlInitUnicodeString(&unName, L
"NtOpenProcess"
);
PUCHAR funcAddr
=
MmGetSystemRoutineAddress(&unName);
hook_by_addr(funcAddr, NtOpenProcess_callback, &num);
UCHAR buf[]
=
{
/
/
0x48
,
0x81
,
0xFA
,
0x00
,
0x10
,
0x00
,
0x00
,
0x48
,
0x83
,
0xF9
,
0x01
,
/
/
00007FF806EA094F
| |
cmp
rcx,
1
|
0x75
,
0x0E
,
/
/
00007FF806EA0953
| | jne ntdll.
7FF806EA0963
|
0xFF
,
0x25
,
0x00
,
0x00
,
0x00
,
0x00
,
/
/
00007FF806EA0955
| | jmp qword ptr ds : [
7FF806EA095B
] |
0x00
,
0x00
,
/
/
00007FF806EA095B
| | add byte ptr ds : [rax] ,al |
0x00
,
0x00
,
/
/
00007FF806EA095D
| | add byte ptr ds : [rax] ,al |
0x00
,
0x00
,
/
/
00007FF806EA095F
| | add byte ptr ds : [rax] ,al |
0x00
,
0x00
,
/
/
00007FF806EA0961
| | add byte ptr ds : [rax] ,al |
0x90
,
/
/
00007FF806EA0963
| | nop
};
/
/
DbgBreakPoint();
set_fast_prehandler(num, buf, sizeof buf,
12
);
}
|
运行结果如下

这里在fast_prehandler中判断了 rcx 是否等于1,如果不等于1就直接走原流程,因此没有打印出任何信息。我们把他改为 cmp rdx, 0x1000 再试一下
|
1
2
3
4
5
6
7
8
9
10
11
|
UCHAR buf[]
=
{
0x48
,
0x81
,
0xFA
,
0x00
,
0x10
,
0x00
,
0x00
,
/
/
cmp
rdx,
0x1000
/
/
0x48
,
0x83
,
0xF9
,
0x01
,
/
/
00007FF806EA094F
| |
cmp
rcx,
1
|
0x75
,
0x0E
,
/
/
00007FF806EA0953
| | jne ntdll.
7FF806EA0963
|
0xFF
,
0x25
,
0x00
,
0x00
,
0x00
,
0x00
,
/
/
00007FF806EA0955
| | jmp qword ptr ds : [
7FF806EA095B
] |
0x00
,
0x00
,
/
/
00007FF806EA095B
| | add byte ptr ds : [rax] ,al |
0x00
,
0x00
,
/
/
00007FF806EA095D
| | add byte ptr ds : [rax] ,al |
0x00
,
0x00
,
/
/
00007FF806EA095F
| | add byte ptr ds : [rax] ,al |
0x00
,
0x00
,
/
/
00007FF806EA0961
| | add byte ptr ds : [rax] ,al |
0x90
,
/
/
00007FF806EA0963
| | nop
};
|
可以看到只有 rdx 为1000的时候才会进入到C语言编写的handler中。否则快速跳回到原流程中执行。

TODO
- 本框架还在开发中,还有很多不完善的地方。由于汇编代码中有很多使用相对地址的跳转指令,如果在别的地方运行势必会导致出错。需要对这些指令逐个进行相应的处理。
- [x] 处理硬编码为
7X XX 或 E1 xx 或 E2 xx 或 E3 xx 或 EB xx的一字节相对短跳 - [x] 处理硬编码为
0f 8x xx xx xx xx的四字节相对跳转 - [x] 处理编码为
e8(e9) xx xx xx xx的相对跳转指令 - [ ] 处理其他使用了相对寻址的指令,如
test,lea,mov等。 - [ ] 使用SEH对函数大小进行判断,如果函数没有足够的空间,则返回失败
- [ ] 如果函数已经被挂钩,要进行判断,防止运行了无法运行的代码导致抛出UD
- [ ] 想办法对XMM寄存器也进行相应的保存。
- [x] 保存环境的时候shellcode忘记加pushfq了,要加上。
- [ ] 有可能出现别的地方跳到被hook的地方的情况(无能为力了这个)
依赖
- 本项目使用了
https://github.com/oblique/insn_len和https://github.com/zyantific/zydis两个项目作为依赖。
如何贡献
- 非常欢迎你的加入! 或者提交一个 Pull Request。
更多【开源一个自己写的简易的windows内核hook框架】相关视频教程:www.yxfzedu.com
相关文章推荐
- Pwn-沙箱逃逸之google ctf 2019 Monochromatic writeup - Android安全CTF对抗IOS安全
- 软件逆向-Wibu Codemeter 7.3学习笔记——AxProtector壳初探 - Android安全CTF对抗IOS安全
- 企业安全-学习Kubernetes笔记——暴露站点服务(Ingress) - Android安全CTF对抗IOS安全
- 企业安全-学习Kubernetes笔记——部署数据库站点(MySql) - Android安全CTF对抗IOS安全
- 企业安全-学习Kubernetes笔记——部署web站点环境(PHP+Nginx) - Android安全CTF对抗IOS安全
- 企业安全-学习Kubernetes笔记——安装NFS驱动 - Android安全CTF对抗IOS安全
- 企业安全-学习Kubernetes笔记——kubeadm安装Kubernetes - Android安全CTF对抗IOS安全
- 软件逆向-wibu软授权(四) - Android安全CTF对抗IOS安全
- 软件逆向-使用IDAPython开发复制RVA的插件 - Android安全CTF对抗IOS安全
- 2-wibu软授权(三) - Android安全CTF对抗IOS安全
- 软件逆向-wibu软授权(二) - Android安全CTF对抗IOS安全
- 软件逆向-wibu软授权(一) - Android安全CTF对抗IOS安全
- 软件逆向- PE格式:分析IatHook并实现 - Android安全CTF对抗IOS安全
- Android安全-安卓API自动化安全扫描 - Android安全CTF对抗IOS安全
- 二进制漏洞- Chrome v8 Issue 1307610漏洞及其利用分析 - Android安全CTF对抗IOS安全
- iOS安全-IOS 脱壳入坑经验分享 - Android安全CTF对抗IOS安全
- 二进制漏洞-Windows UAF 漏洞分析CVE-2014-4113 - Android安全CTF对抗IOS安全
- CTF对抗-lua 逆向学习 & RCTF picstore 还原代码块 - Android安全CTF对抗IOS安全
- Android安全-如何修改unity HybridCLR 热更dll - Android安全CTF对抗IOS安全
- 软件逆向-浅谈编译器对代码的优化 - Android安全CTF对抗IOS安全
2):严禁色情、血腥、暴力
3):严禁发布任何形式的广告贴
4):严禁发表关于中国的政治类话题
5):严格遵守中国互联网法律法规
6):有侵权,疑问可发邮件至service@yxfzedu.com