软件逆向-x64dbg插件编写基础
推荐 原创x64dbg 手册:https://help.x64dbg.com/en/latest/developers/index.html
1. x64dbg扩展功能的三种方式
x64dbg扩展功能的方式有三种:
- 写脚本(python或者idc)
- 脚本DLL,就是编写一个DLL导出 AsyncStart() or Start(),然后通过命令scriptdll/dllscript来加载DLL执行代码
- 编写插件
在x64dbg的文档中并没有说明 "插件" 到底是一个什么东西,只是说插件的后缀名叫dp32或者dp64,通过观察其他的插件发现其实就是DLL,只不过是导出了一些指定函数的DLL
本文的目的就是说明编写x64dbg插件的步骤,然后编写一个简单的x64dbg插件
2. 环境配置
本机环境:win11 21h2、vs2022、x64dbg(snapshot_2023-01-25_11-53)
2.1 x64的SDK
要给x64dbg编写插件肯定需要x64dbg提供的sdk包,sdk包就在x64dbg的根目录之下的pluginsdk文件夹中:
|
1
2
3
4
5
6
7
8
9
|
├───pluginsdk
│ ├───dbghelp
│ ├───DeviceNameResolver
│ ├───jansson
│ ├───lz4
│ ├───TitanEngine
│ └───XEDParse
└───release
├───...
|
在pluginsdk中有x64dbg自己提供的头文件和lib文件,以及它使用的其他第三方库的头文件和lib文件,比如XEDParse、TitanEngine等
2.2 配置vs工程
先创建一个VS的DLL工程,这一步不必多说
将整个pluginsdk文件夹拷贝到工程目录之下,虽然多了很多东西,但是比少拷贝了文件去找要好
然后配置头文件目录和lib文件的目录以及引入lib文件:
- 在工程属性->vc++目录->外部包含目录加入pluginsdk路径
- 在工程属性->vc++目录->库目录加入pluginsdk路径
- 在工程属性->链接器->输入->附加依赖项中添加 x32bridge.lib和x32dbg.lib,这也是pluginsdk下唯二的两个lib
3. 基本导出函数
3.1 pluginit
函数声明:
|
1
|
extern
"C"
__declspec(dllexport)
bool
pluginit(PLUG_INITSTRUCT
*
initStruct);
|
pluginit函数是x64dbg插件必须导出的一个函数
在整个函数中,要做的事件就是填充参数initStruct:
|
1
2
3
4
5
6
7
|
struct PLUG_INITSTRUCT
{
[IN]
int
pluginHandle;
/
/
插件的句柄
[OUT]
int
sdkVersion;
/
/
填 PLUG_SDKVERSION 即可
[OUT]
int
pluginVersion;
/
/
填插件的版本
[OUT] char pluginName[
256
];
/
/
填插件指针
};
|
所以在pluginit中要做的事情就是填写插件的基本信息:
|
1
2
3
4
5
6
7
8
9
10
11
12
13
14
15
16
17
18
19
20
|
/
/
必需的,插件初始化函数
extern
"C"
__declspec(dllexport)
bool
pluginit(PLUG_INITSTRUCT
*
initStruct)
{
_plugin_logprintf(
"[%s] pluginit\r\n"
, TAG);
/
/
打印日志
memcpy_s(
initStruct
-
>pluginName,
sizeof(initStruct
-
>pluginName),
TAG,
strlen(TAG));
initStruct
-
>sdkVersion
=
PLUG_SDKVERSION;
initStruct
-
>pluginVersion
=
1
;
if
(!InitPlugin())
/
/
做一些初始化动作
{
_plugin_logprintf(
"[%s] pluginit Failed\r\n"
, TAG);
/
/
打印日志
return
false;
}
return
true;
}
|
3.2 plugstop和plugsetup
这两个导出函数不是必须的,但是可以在里面做一些事情:
- plugstop:插件被移除的时候被调用,可以用来清除注册的回调和命令,清理资源
- plugsetup:当插件初始化成功的时候调用,可以在这里添加菜单、做其他的界面相关的事情
本例在plugsetup中添加了两个子菜单,代码如下:
|
1
2
3
4
5
6
7
8
9
10
11
12
13
14
15
16
17
|
/
/
非必需,插件被移除时调用
extern
"C"
__declspec(dllexport)
bool
plugstop()
{
_plugin_logprintf(
"[%s] plugstop\r\n"
, TAG);
return
true;
}
/
/
非必需,启动插件时调用
/
/
在这里执行UI操作,比如增加菜单
extern
"C"
__declspec(dllexport) void plugsetup(PLUG_SETUPSTRUCT
*
setupStruct)
{
_plugin_logprintf(
"[%s] plugsetup\r\n"
, TAG);
/
/
添加子菜单
_plugin_menuaddentry(setupStruct
-
>hMenu,
0
,
"enable UEH"
);
_plugin_menuaddentry(setupStruct
-
>hMenu,
1
,
"disable UEH"
);
}
|
4. 事件回调函数
当我们添加了插件的子菜单之后,要如何响应菜单的点击呢?
导出以CB开头的函数就可以去接收到对应的事件,比如
|
1
2
3
4
5
|
extern
"C"
__declspec(dllexport) void CBINITDEBUG(CBTYPE cbType, PLUG_CB_INITDEBUG
*
info);
/
/
初始化调试
extern
"C"
__declspec(dllexport) void CBSTOPDEBUG(CBTYPE cbType, PLUG_CB_STOPDEBUG
*
info);
/
/
停止调试
extern
"C"
__declspec(dllexport) void CBEXCEPTION(CBTYPE cbType, PLUG_CB_EXCEPTION
*
info);
/
/
异常
extern
"C"
__declspec(dllexport) void CBDEBUGEVENT(CBTYPE cbType, PLUG_CB_DEBUGEVENT
*
info);
/
/
调试事件
extern
"C"
__declspec(dllexport) void CBMENUENTRY(CBTYPE cbType, PLUG_CB_MENUENTRY
*
info);
/
/
点击子菜单
|
参数中所用到的结构体可以在这里找到:https://help.x64dbg.com/en/latest/developers/plugins/Callbacks/index.html,只要是满足CB*的导出函数,且属于这里面的类型https://help.x64dbg.com/en/latest/developers/plugins/API/registercallback.html,应该都可以注册成功,注意函数名中不要有下划线
本例中,我们只需要简单的响应一下子菜单的点击:
|
1
2
3
4
5
6
7
8
9
10
11
12
13
14
15
16
17
18
|
/
/
菜单响应回调
extern
"C"
__declspec(dllexport) void CBMENUENTRY(
CBTYPE bType,
PLUG_CB_MENUENTRY
*
pEntry
)
{
switch (pEntry
-
>hEntry)
{
case
0
:
/
/
注册时填的菜单
ID
EnableUeh();
break
;
case
1
:
DisableUeh();
break
;
default:
break
;
}
}
|
5. 库函数
在插件中,我们可以调用Dbg开头的函数来辅助功能,函数列表:https://help.x64dbg.com/en/latest/developers/functions/debug/index.html
比如读写被调试进程可以使用
|
1
2
3
4
5
6
7
8
9
10
11
|
bool
DbgMemRead(
duint va,
void
*
dest,
duint size
);
bool
DbgMemWrite(
duint va,
void
*
dest,
duint size
);
|
其他功能就暂时还没探索,本例中用这两个就够啦
6. 对UnhandledExceptionFilter打补丁
本例中的插件需要实现对UnhandledExceptionFilter打补丁的功能,实现调试器可以调试UEH回调
6.1 为什么要打补丁
下面是小弟的通过测试的一点浅薄理解,没有跟踪系统的代码,如有不对的地方还请大佬们指出
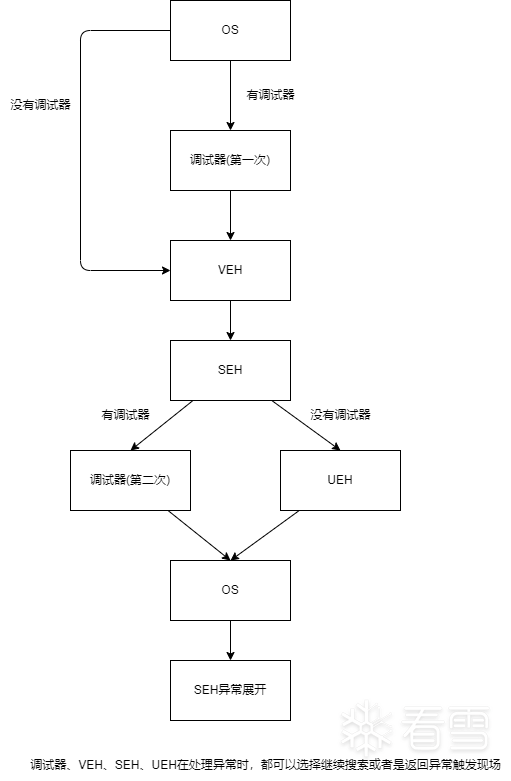
应用层派发异常的流程大致如下:

根据上面的流程图,在异常从SEH中出来的时候,根据是否有调试器,要么派发给调试器,要么派发给UEH回调,二选一,所以在调试的过程中不会之下UEH回调的代码
为了能在调试器中调试UEH回调,我们需要改变一下系统异常分发的流程,使其走到另一个分支去
这个分支出现在kernelbase/kernel32!UnhandledExceptionFilter 中,所以需要对其打补丁
6.2 实现功能
剩下的步骤就很简单了,首先在插件初始化时,判断系统版本,获取UnhandledExceptionFilter 的地址,通过特征码找到需要打补丁的地址
|
1
2
3
4
5
6
7
8
9
10
11
12
13
14
15
16
17
18
19
20
21
22
23
24
25
26
27
28
29
30
31
32
33
34
35
36
37
38
39
40
41
42
43
44
45
46
47
|
bool
InitPlugin()
{
/
/
获取版本号
DWORD dwBuildVer
=
GetVerSion();
PUCHAR pFuncBegin
=
(PUCHAR)GetProcAddress(
GetModuleHandleA(
"kernelbase"
),
"UnhandledExceptionFilter"
);
if
(pFuncBegin
=
=
NULL)
{
pFuncBegin
=
(PUCHAR)GetProcAddress(
GetModuleHandleA(
"kernel32"
),
"UnhandledExceptionFilter"
);
if
(pFuncBegin
=
=
NULL)
{
_plugin_logprintf(
"[%s] Get kernelbase!UnhandledExceptionFilter Addr Failed\r\n"
, TAG);
bIsEnabledUeh
=
false;
return
false;
}
}
/
/
获取特征码
if
(dwBuildVer >
=
22000
)
{
/
/
win11
g_pUehSig
=
UehSigWin11;
_plugin_logprintf(
"[%s] OS Build Number: %d\r\n"
, TAG, dwBuildVer);
}
else
if
(dwBuildVer
=
=
7600
|| dwBuildVer
=
=
7601
)
{
/
/
win7
g_pUehSig
=
UehSigWin7;
_plugin_logprintf(
"[%s] OS Build Number: %d\r\n"
, TAG, dwBuildVer);
}
g_pUehPatchPoint
=
FindSignatureCode(pFuncBegin,
0x100
, g_pUehSig);
if
(g_pUehPatchPoint
=
=
NULL)
{
_plugin_logprintf(
"[%s] Signatrue Not Found!\r\n"
, TAG);
bIsEnabledUeh
=
false;
return
false;
}
return
true;
}
|
然后响应菜单事件,当点击EnableUeh时,打补丁,点击DisableUeh时,恢复补丁
|
1
2
3
4
5
6
7
8
9
10
11
12
13
14
15
16
17
18
19
20
21
22
23
24
25
26
27
28
29
30
31
32
33
34
|
void EnableUeh()
{
/
/
保存原来的数据
DbgMemRead((duint)g_pUehPatchPoint, UehPatchRawData, strlen((const char
*
)g_pUehSig)
/
2
);
/
/
打补丁
if
(DbgMemWrite((duint)g_pUehPatchPoint, UehPathCode, sizeof(UehPathCode)))
{
_plugin_logprintf(
"[%s] Enable UEH Success!\r\n"
, TAG);
bIsEnabledUeh
=
true;
}
else
{
_plugin_logprintf(
"[%s] Enable UEH Failed!\r\n"
, TAG);
bIsEnabledUeh
=
false;
}
}
void DisableUeh()
{
if
(bIsEnabledUeh
=
=
true)
{
/
/
Patch
if
(DbgMemWrite((duint)g_pUehPatchPoint, UehPatchRawData, strlen((const char
*
)g_pUehSig)
/
2
))
{
_plugin_logprintf(
"[%s] Enable UEH Success!\r\n"
, TAG);
bIsEnabledUeh
=
false;
}
else
{
_plugin_logprintf(
"[%s] Enable UEH Failed!\r\n"
, TAG);
}
}
}
|
一个简单的插件框架就这样完成了
更多【x64dbg插件编写基础】相关视频教程:www.yxfzedu.com
相关文章推荐
- c++-C++特殊类与单例模式 - 其他
- 编辑器-vscode git提交 - 其他
- 前端-WebGL的技术难点分析 - 其他
- c++-【c++之设计模式】组合使用:抽象工厂模式与单例模式 - 其他
- python-【JavaSE】基础笔记 - 类和对象(下) - 其他
- github-Redis主从复制基础概念 - 其他
- 运维-【iOS免越狱】利用IOS自动化WebDriverAgent实现自动直播间自动输入 - 其他
- 前端-AJAX-解决回调函数地狱问题 - 其他
- html5-HTML5的语义元素 - 其他
- html5-1.2 HTML5 - 其他
- hive-项目实战:抽取中央控制器 DispatcherServlet - 其他
- kafka-Kafka(消息队列)--简介 - 其他
- github-github 上传代码报错 fatal: Authentication failed for ‘xxxxxx‘ - 其他
- matlab-【MATLAB源码-第69期】基于matlab的LDPC码,turbo码,卷积码误码率对比,码率均为1/3,BPSK调制。 - 其他
- 爬虫-Python 爬虫基础 - 其他
- ui-Qt6,使用 UI 界面完成命令执行自动化的设计 - 其他
- 物联网-基于STM32的设计智慧超市管理系统(带收银系统+物联网环境监测) - 其他
- python-【Python基础】 Python设计模式之单例模式介绍 - 其他
- 物联网-物联网对接协议 - 其他
- 安全-远程运维用什么软件?可以保障更安全? - 其他
2):严禁色情、血腥、暴力
3):严禁发布任何形式的广告贴
4):严禁发表关于中国的政治类话题
5):严格遵守中国互联网法律法规
6):有侵权,疑问可发邮件至service@yxfzedu.com
- selenium-为什么UI自动化难做?—— 关于Selenium UI自动化的思考
- matlab-【matlab】KMeans KMeans++实现手写数字聚类
- jvm-JVM-虚拟机的故障处理与调优案例分析
- 编程技术-安卓调用手机邮箱应用发送邮件
- 编程技术-C语言仅凭自学能到什么高度?
- 编程技术-春秋云境靶场CVE-2022-32991漏洞复现(sql手工注入)
- 编程技术-java 将tomcat的jks证书转换成pfx证书
- 编程技术-任意注册漏洞
- 安全-赛宁网安入选国家工业信息安全漏洞库(CICSVD)2023年度技术组成员单
- jvm-深入理解JVM虚拟机第二十四篇:详解JVM当中的动态链接和常量池的作用