二进制漏洞-针对 Exif 手写一个模糊测试器
推荐 原创【二进制漏洞-针对 Exif 手写一个模糊测试器】此文章归类为:二进制漏洞。
针对 Exif 手写一个模糊测试器
这其实我去年跟着视频做的一个学习笔记,今天刷看雪时看到篇文章才知道,这是来自NYU Fuzzing Talk。
我觉得是一个挺不错的fuzz入门教程。
基础知识
虽然模糊测试经常发送随机或半随机数据,但完全随机的输入大多数情况下会被应用程序很早的阶段就判断为无效输入。通过对文件格式有深入的理解,我们可以确保至少部分输入是有效的,或接近有效,从而深入地测试程序的后续处理流程。
很多文件格式,例如PDF、PNG、ELF等,都有所谓的“magic值”或魔数这是文件开头的特定字节序列,用于标识文件的格式。没有正确的 magic 值程序可能会立即拒绝文件,不进一步处理。了解这些 magic 值对于构建有效的模糊输入是关键。
这就是为什么我们需要官方文档的原因
jpg 格式


我们 fuzz 的时候需要先改好头和尾,不然可能程序都不执行
第一步 读取原始种子
读取原始种子用于变异,然后将原始种子和变异种子拿给程序解析,去看有没有crash
这是原图
简易fuzz-读取框架
fuzz 当中首先需要读取种子内容,然后让目标程序去运行解析。首先我们需要有一个读取框架用于将目标文档用作于我们的有效输入样本。
1 2 3 4 5 6 7 8 9 10 11 12 13 14 15 16 17 18 19 20 | import sys# read bytes from our valid JPEG and return them in a mutable bytearray def get_bytes(filename): f = open(filename, "rb").read() return bytearray(f)if len(sys.argv) < 2: print("Usage: JPEGfuzz.py <valid_jpg>")else: filename = sys.argv[1] data = get_bytes(filename) counter = 0 for x in data: if counter < 10: print(x) counter += 1 |

第二步 样本变异
模糊测试当中一个关键的步骤是进行样本的变异。样本变异简而言之,就是对已知的输入样本(例如一个文件或数据包)进行修改,产生新的、可能触发程序异常的输入。这是模糊测试的核心,因为它的目的就是尝试各种不同的输入,查找程序的潜在问题。
翻转
变异策略也有很多:翻转,插入,删除等
以翻转为例,我们可以选择随机翻转
1 2 3 4 5 6 7 | 2550xFF11111111随机翻转110111110xDF233 |
1 2 3 4 5 6 7 8 9 10 11 12 13 14 15 16 17 18 19 20 21 22 23 24 25 26 27 28 29 30 31 32 33 34 35 36 37 38 39 40 41 42 43 44 45 46 47 48 49 50 51 52 53 54 55 56 57 58 59 60 61 62 63 64 65 66 67 68 69 70 71 72 73 | import sysimport random# read bytes from our valid JPEG and return them in a mutable bytearray def get_bytes(filename): f = open(filename, "rb").read() return bytearray(f)def bit_flip(data): num_of_flips = int((len(data) - 4) * 0.01) indexes = range(4, (len(data) - 4)) chosen_indexes = [] # iterate selecting indexes until we've hit our num_of_flips number counter = 0 while counter < num_of_flips: chosen_indexes.append(random.choice(indexes)) counter += 1 for x in chosen_indexes: current = data[x] current = (bin(current).replace("0b","")) current = "0" * (8 - len(current)) + current indexes = range(0,8) picked_index = random.choice(indexes) new_number = [] # our new_number list now has all the digits, example: ['1', '0', '1', '0', '1', '0', '1', '0'] for i in current: new_number.append(i) # if the number at our randomly selected index is a 1, make it a 0, and vice versa if new_number[picked_index] == "1": new_number[picked_index] = "0" else: new_number[picked_index] = "1" # create our new binary string of our bit-flipped number current = '' for i in new_number: current += i # convert that string to an integer current = int(current,2) # change the number in our byte array to our new number we just constructed data[x] = current return data# create new jpg with mutated datadef create_new(data): f = open("mutated.jpg", "wb+") f.write(data) f.close()if len(sys.argv) < 2: print("Usage: JPEGfuzz.py <valid_jpg>")else: filename = sys.argv[1] data = get_bytes(filename) mutated_data = bit_flip(data) create_new(mutated_data) |
然后我们对之前那个jpg进行变异得到一个新的图片,这就是我们变异样本

然后我们可以对比变异前后两张图片在二进制上的差别
magic nums
magic num 就是指有些数字是特殊的,我们可以选择直接插入magic num 来更有效的进行变异
1 2 3 4 5 6 7 8 9 10 | 0xFF0x7F0x000xFFFF0x00000xFFFFFFFF0x000000000x80000000 <-- minimum 32-bit int0x40000000 <-- just half of that amountOx7FFFFFFF <-- max 32-bit int |
一些文件格式标志等
- JPEG 文件: 开头的字节为 FF D8
- GIF 文件: 开头的字节为 47 49 46 38
- ELF可执行文件:开头的字节为 7F 45 4C 46
我们这里有一个对magic num 的初步选择
- 1字节修改
如果选择的魔数是(1,255),则 data 在选定的索引位置的值被设置为255
如果是(1,127),则设置为127
如果是(1,0),则设置为0 - 2字节修改
如果选择的魔数是 (2,255),则 data 在选定的索引位置及其后的位置的值被设置为255
如果是(2,0),则这两个位置都被设置为0 - 4字节修改:
(4,255)修改 data 在选定索引位置及其后的三个位置的值为255。
(4,0) 设置这四个位置的值为0
(4,128) 设置第一个位置为128,其余为0
(4,64) 设置第一个位置为64,其余为0
(4,127) 设置第一个位置为127,其余为255
1 2 3 4 5 6 7 8 9 10 11 12 13 14 15 16 17 18 19 20 21 22 23 24 25 26 27 28 29 30 31 32 33 34 35 36 37 38 39 40 41 42 43 44 45 46 47 48 49 50 51 52 53 54 55 56 57 58 59 60 61 62 63 64 65 66 67 68 69 70 71 72 73 74 75 76 77 78 79 80 81 82 83 84 85 86 87 88 89 90 91 92 93 94 95 96 97 98 99 100 101 102 103 104 105 106 107 108 109 110 111 112 113 114 115 116 117 118 119 120 121 122 123 124 125 126 127 128 129 130 131 132 133 134 135 136 137 138 | import sysimport random# read bytes from our valid JPEG and return them in a mutable bytearray def get_bytes(filename): f = open(filename, "rb").read() return bytearray(f)def bit_flip(data): num_of_flips = int((len(data) - 4) * 0.01) indexes = range(4, (len(data) - 4)) chosen_indexes = [] # iterate selecting indexes until we've hit our num_of_flips number counter = 0 while counter < num_of_flips: chosen_indexes.append(random.choice(indexes)) counter += 1 for x in chosen_indexes: current = data[x] current = (bin(current).replace("0b","")) current = "0" * (8 - len(current)) + current indexes = range(0,8) picked_index = random.choice(indexes) new_number = [] # our new_number list now has all the digits, example: ['1', '0', '1', '0', '1', '0', '1', '0'] for i in current: new_number.append(i) # if the number at our randomly selected index is a 1, make it a 0, and vice versa if new_number[picked_index] == "1": new_number[picked_index] = "0" else: new_number[picked_index] = "1" # create our new binary string of our bit-flipped number current = '' for i in new_number: current += i # convert that string to an integer current = int(current,2) # change the number in our byte array to our new number we just constructed data[x] = current return datadef magic(data): magic_vals = [ (1, 255), (1, 255), (1, 127), (1, 0), (2, 255), (2, 0), (4, 255), (4, 0), (4, 128), (4, 64), (4, 127) ] picked_magic = random.choice(magic_vals) length = len(data) - 8 index = range(0, length) picked_index = random.choice(index) # here we are hardcoding all the byte overwrites for all of the tuples that begin (1, ) if picked_magic[0] == 1: if picked_magic[1] == 255: # 0xFF data[picked_index] = 255 elif picked_magic[1] == 127: # 0x7F data[picked_index] = 127 elif picked_magic[1] == 0: # 0x00 data[picked_index] = 0 # here we are hardcoding all the byte overwrites for all of the tuples that begin (2, ) elif picked_magic[0] == 2: if picked_magic[1] == 255: # 0xFFFF data[picked_index] = 255 data[picked_index + 1] = 255 elif picked_magic[1] == 0: # 0x0000 data[picked_index] = 0 data[picked_index + 1] = 0 # here we are hardcoding all of the byte overwrites for all of the tuples that being (4, ) elif picked_magic[0] == 4: if picked_magic[1] == 255: # 0xFFFFFFFF data[picked_index] = 255 data[picked_index + 1] = 255 data[picked_index + 2] = 255 data[picked_index + 3] = 255 elif picked_magic[1] == 0: # 0x00000000 data[picked_index] = 0 data[picked_index + 1] = 0 data[picked_index + 2] = 0 data[picked_index + 3] = 0 elif picked_magic[1] == 128: # 0x80000000 data[picked_index] = 128 data[picked_index + 1] = 0 data[picked_index + 2] = 0 data[picked_index + 3] = 0 elif picked_magic[1] == 64: # 0x40000000 data[picked_index] = 64 data[picked_index + 1] = 0 data[picked_index + 2] = 0 data[picked_index + 3] = 0 elif picked_magic[1] == 127: # 0x7FFFFFFF data[picked_index] = 127 data[picked_index + 1] = 255 data[picked_index + 2] = 255 data[picked_index + 3] = 255 return data# create new jpg with mutated datadef create_new(data): f = open("mutated.jpg", "wb+") f.write(data) f.close()if len(sys.argv) < 2: print("Usage: JPEGfuzz.py <valid_jpg>")else: filename = sys.argv[1] data = get_bytes(filename) #mutated_data = bit_flip(data) mutated_data = magic(data) create_new(mutated_data) |
再来看看这个变异的效果
再看看二进制数据上的差别

我们可以看到数据在二进制格式上的变化比之前大得多 ,毕竟之前只有单 bit 翻转
第三步 选择目标
其实正常来说,这应该是第一步
虽然收集和生成初始输入样本是必要的,但进行输入变异只是模糊测试的热身工作。真正的目的是对这些变异后的输入进行深入的测试,看看它们是否可以触发目标程序中的漏洞或错误。每当我们找到一个通过某种输入触发的问题时,我们就有了进一步了解目标程序的机会,也可能发现了一个潜在的安全风险
流程
- 使用我们的函数之一改变数据
- 用变异的数据创建新图片
- 将突变的图片提供给我们的二进制文件进行解析
- 捕获并记录导致程序出现”Segmentation faults”的图片
我们选择的目标的是 Exif
Exif,全称"Exchangeable image file format”,是一种图像文件格式标准。它用于保存照片的元数据,如拍摄日期、相机型号、曝光时间、GPS位置等。
我们这里选择这个 Exif 项目
简单测试器功能:这个项目的程序就是对图片进行解析
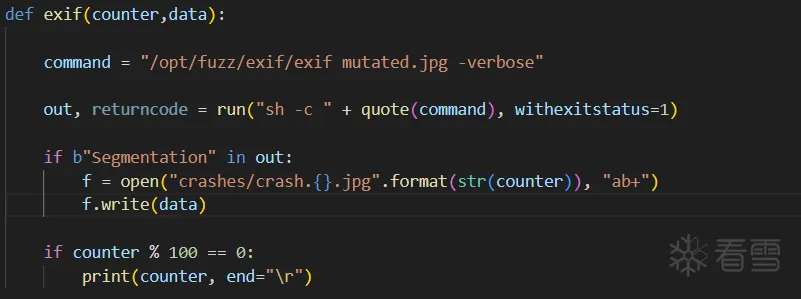
有了目标二进制程序我们希望进一步深入自动化测试:
- 向二进制文件提供变异数据
- 由于“段错误”消息不是由二进制文件直接输出的,而是由命令行 shell 响应 SIGSEGV 信号输出的。所以需要使用 Python 的 pexpect 模块的 run() 方法和 pipes 模块的 quote() 方法来监视这一消息。
- 添加新功能:当监测到“段错误”时,将变异数据保存为JPEG图像
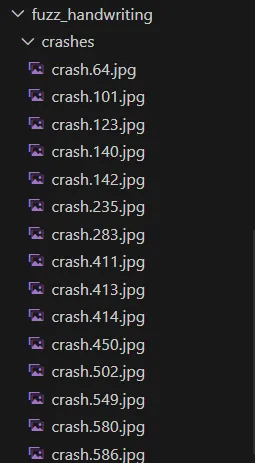
- 在“crashes”文件夹中保存导致二进制文件崩溃的JPEG,格式为crash.<模糊测试迭代次数>.jpg。
- 持续在终端中打印,每100次模糊测试迭代更新一次输出
这一步其实实现起来的代码比较简单
1 2 3 4 5 6 7 8 9 10 11 12 13 14 15 16 17 18 19 20 21 22 23 24 25 26 27 28 29 30 31 32 33 34 35 36 37 38 39 40 41 42 43 44 45 46 47 48 49 50 51 52 53 54 55 56 57 58 59 60 61 62 63 64 65 66 67 68 69 70 71 72 73 74 75 76 77 78 79 80 81 82 83 84 85 86 87 88 89 90 91 92 93 94 95 96 97 98 99 100 101 102 103 104 105 106 107 108 109 110 111 112 113 114 115 116 117 118 119 120 121 122 123 124 125 126 127 128 129 130 131 132 133 134 135 136 137 138 139 140 141 142 143 144 145 146 147 148 149 150 151 152 153 154 155 156 157 158 159 160 161 162 163 | import sysimport randomfrom pexpect import runfrom pipes import quote# read bytes from our valid JPEG and return them in a mutable bytearray def get_bytes(filename): f = open(filename, "rb").read() return bytearray(f)def bit_flip(data): num_of_flips = int((len(data) - 4) * 0.01) indexes = range(4, (len(data) - 4)) chosen_indexes = [] # iterate selecting indexes until we've hit our num_of_flips number counter = 0 while counter < num_of_flips: chosen_indexes.append(random.choice(indexes)) counter += 1 for x in chosen_indexes: current = data[x] current = (bin(current).replace("0b","")) current = "0" * (8 - len(current)) + current indexes = range(0,8) picked_index = random.choice(indexes) new_number = [] # our new_number list now has all the digits, example: ['1', '0', '1', '0', '1', '0', '1', '0'] for i in current: new_number.append(i) # if the number at our randomly selected index is a 1, make it a 0, and vice versa if new_number[picked_index] == "1": new_number[picked_index] = "0" else: new_number[picked_index] = "1" # create our new binary string of our bit-flipped number current = '' for i in new_number: current += i # convert that string to an integer current = int(current,2) # change the number in our byte array to our new number we just constructed data[x] = current return datadef magic(data): magic_vals = [ (1, 255), (1, 255), (1, 127), (1, 0), (2, 255), (2, 0), (4, 255), (4, 0), (4, 128), (4, 64), (4, 127) ] picked_magic = random.choice(magic_vals) length = len(data) - 8 index = range(0, length) picked_index = random.choice(index) # here we are hardcoding all the byte overwrites for all of the tuples that begin (1, ) if picked_magic[0] == 1: if picked_magic[1] == 255: # 0xFF data[picked_index] = 255 elif picked_magic[1] == 127: # 0x7F data[picked_index] = 127 elif picked_magic[1] == 0: # 0x00 data[picked_index] = 0 # here we are hardcoding all the byte overwrites for all of the tuples that begin (2, ) elif picked_magic[0] == 2: if picked_magic[1] == 255: # 0xFFFF data[picked_index] = 255 data[picked_index + 1] = 255 elif picked_magic[1] == 0: # 0x0000 data[picked_index] = 0 data[picked_index + 1] = 0 # here we are hardcoding all of the byte overwrites for all of the tuples that being (4, ) elif picked_magic[0] == 4: if picked_magic[1] == 255: # 0xFFFFFFFF data[picked_index] = 255 data[picked_index + 1] = 255 data[picked_index + 2] = 255 data[picked_index + 3] = 255 elif picked_magic[1] == 0: # 0x00000000 data[picked_index] = 0 data[picked_index + 1] = 0 data[picked_index + 2] = 0 data[picked_index + 3] = 0 elif picked_magic[1] == 128: # 0x80000000 data[picked_index] = 128 data[picked_index + 1] = 0 data[picked_index + 2] = 0 data[picked_index + 3] = 0 elif picked_magic[1] == 64: # 0x40000000 data[picked_index] = 64 data[picked_index + 1] = 0 data[picked_index + 2] = 0 data[picked_index + 3] = 0 elif picked_magic[1] == 127: # 0x7FFFFFFF data[picked_index] = 127 data[picked_index + 1] = 255 data[picked_index + 2] = 255 data[picked_index + 3] = 255 return data# create new jpg with mutated datadef create_new(data): f = open("mutated.jpg", "wb+") f.write(data) f.close()def exif(counter,data): command = "/home/arahat0/fuzz_learn/fuzz_handwriting/exif/exif mutated.jpg -verbose" out, returncode = run("sh -c " + quote(command), withexitstatus=1) if b"Segmentation" in out: f = open("crashes/crash.{}.jpg".format(str(counter)), "ab+") f.write(data) if counter % 100 == 0: print(counter, end="\r")if len(sys.argv) < 2: print("Usage: JPEGfuzz.py <valid_jpg>")else: filename = sys.argv[1] counter = 0 while counter < 1000: data = get_bytes(filename) functions = [0, 1] picked_function = random.choice(functions) if picked_function == 0: mutated = magic(data) create_new(mutated) exif(counter,mutated) else: mutated = bit_flip(data) create_new(mutated) exif(counter,mutated) counter += 1 |
1 | python3 04-exif-test.py /home/arahat0/fuzz_learn/fuzz_handwriting/exif-samples/jpg/Canon_40D.jpg |
在此之后我们还可以利用正则亲自尝试这些文件是否真的可以对 exif 造成 crash
1 | for i in /home/arahat0/fuzz_learn/fuzz_handwriting/fuzz_handwriting/crashes/*.jpg; do /home/arahat0/fuzz_learn/fuzz_handwriting/exif/exif "$i" -verbose > /dev/null 2>&1; done |

第四步 测试验证
有了这些可以让exif产生crash的样本后,我们就需要定位追踪到具体是那部分产生的crash,这时我们就可以 AddressSanitizer 工具
AddressSanitizer 工作原理
- 内存布局:ASan通过修改程序的内存布局,为每块分配的内存增加“红色区域或“毒药区域”。当程序访问这些区域时,ASan会立即报告错误。
- 影子内存:ASan使用一个称为“影子内存”的结构来追踪每个内存字节的状态这样它可以知道哪些内是有效的,哪些已经被释放,哪些是缓冲区外的
检测的错误类型
- 堆缓冲区溢出和堆栈缓冲区溢出:当程序写入超出分配的内存范围时
- 使用后释放:当程序释放了内存后继续访问它
- 双重释放:释放同一块内存两次。
- 使用前初始化:访问未初始化的内存
- .....
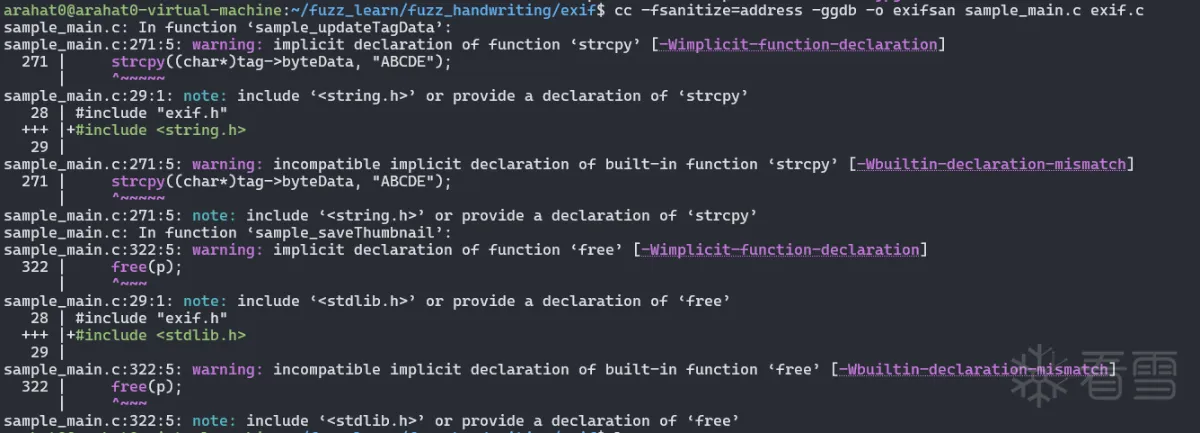
同时我们需要在编译时也采取些措施
1 | cc -fsanitize=address -ggdb -o exifsan sample_main.c exif.c |
- -fsanitize=address:这是一个编译器标志,它启用了地址无害化(AddressSanitizer)。AddressSanitizer是一个快速的内存错误检测器,可以检测出一些常见的内存错误,如堆栈缓冲区溢出、使用后释放的内存访问等。
- -ggdb:这个编译器标志为生成的目标代码添加了更丰富的调试信息,使得使用GDB(GNU调试器)进行调试时能获得更详细的信息。
我们此时用新编译出来的 exifsan 去执行我们有效变异的 jpg就可以看到触发报错的位置

最后我们就可以定位到出问题的那个文件或者gdb调试core看看是到底是出了什么问题
参考
https://www.youtube.com/watch?v=SngK4W4tVc0
更多【二进制漏洞-针对 Exif 手写一个模糊测试器】相关视频教程:www.yxfzedu.com
相关文章推荐
- CE图标工具 - 游戏逆向软件逆向Windows内核驱动出租
- 驱动出租及驱动定制价格 - 游戏逆向软件逆向Windows内核驱动出租
- Android安全-Lsposed 技术原理探讨 && 基本安装使用 - 游戏基址二进制漏洞 密码应用智能设备
- 软件逆向-WinCHM 再探索! - 游戏基址二进制漏洞 密码应用智能设备
- 软件逆向-DTrace 研究 - 游戏基址二进制漏洞 密码应用智能设备
- 软件逆向-常见语言基础逆向方法合集 - 游戏基址二进制漏洞 密码应用智能设备
- 软件逆向-分享个东西,cheat engine的变速精灵(speedhack)模块调用方法. - 游戏基址二进制漏洞 密码应用智能设备
- 软件逆向-SoftAny WinCHM 5.496 注册码笔记 by ZeNiX - 游戏基址二进制漏洞 密码应用智能设备
- CTF对抗-crackme001 Acid burn - 游戏基址二进制漏洞 密码应用智能设备
- Android安全-定制bcc/ebpf在android平台上实现基于dwarf的用户态栈回溯 - 游戏基址二进制漏洞 密码应用智能设备
- CTF对抗-Java安全小白的入门心得 - 初见RMI协议 - 游戏基址二进制漏洞 密码应用智能设备
- 编程技术-这个崩溃有点意思,你中过招吗 - 游戏基址二进制漏洞 密码应用智能设备
- 软件逆向-PE头解析-字段说明 - 游戏基址二进制漏洞 密码应用智能设备
- 软件逆向-PE加载过程 FileBuffer-ImageBuffer - 游戏基址二进制漏洞 密码应用智能设备
- 加壳脱壳-进程 Dump & PE unpacking & IAT 修复 - Windows 篇 - 游戏基址二进制漏洞 密码应用智能设备
- CTF对抗-第五空间 crackme深度分析 - 游戏基址二进制漏洞 密码应用智能设备
- Pwn-DAS9月月赛PWN题出题心路 - 游戏基址二进制漏洞 密码应用智能设备
- CTF对抗-CSAW-CTF-Web部分题目 - 游戏基址二进制漏洞 密码应用智能设备
- CTF对抗-2022MT-CTF Re - 游戏基址二进制漏洞 密码应用智能设备
- 编程技术-逆向IoRegisterPlugPlayNotification获取即插即用回调地址,配图加注释超级详细 - 游戏基址二进制漏洞 密码应用智能设备
2):严禁色情、血腥、暴力
3):严禁发布任何形式的广告贴
4):严禁发表关于中国的政治类话题
5):严格遵守中国互联网法律法规
6):有侵权,疑问可发邮件至service@yxfzedu.com
- 编程技术-自然语言处理实战项目21-两段文本的查重功能,返回最相似的文本字符串,可应用于文本查重与论文查重
- 编程技术-基于教与学算法优化概率神经网络PNN的分类预测 - 附代码
- 运维-linux生产者消费者模型
- 编程技术-微服务概览
- 算法-基于python+TensorFlow+Django卷积网络算法+深度学习模型+蔬菜识别系统
- 计算机外设-【PyQt】(自制类)处理鼠标点击逻辑
- css-Module build failed (from ./node_modules/postcss-loader/src/index.js):
- java-【TiDB】TiDB CLuster部署
- tidb-KCC@广州与 TiDB 社区联手—广州开源盛宴
- pdf-耗时3年写了一本数据结构与算法pdf!开源了